REMOVAL
Removal / installation · Vehicles built from Nov 2005
| 1. DISCONNECT CABLE FROM NEGATIVE BATTERY TERMINAL |

- CAUTION:
- Wait at least 90 seconds after disconnecting the cable from the negative (-) battery terminal to prevent airbag and seat belt pretensioner activation.
| 2. REMOVE BACK DOOR CENTER GARNISH (for Back Door Attached Type) |
Using a screwdriver, detach the 4 claws and 4 clips and remove the garnish.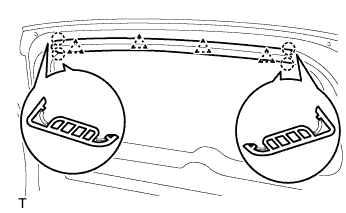

- HINT:
- Tape the screwdriver tip before use.
| 3. REMOVE BACK DOOR SIDE GARNISH LH (for Back Door Attached Type) |
Using a screwdriver, detach the 2 claws and 2 clips and remove the garnish.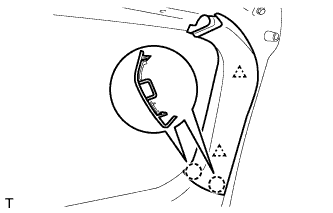
| 4. REMOVE BACK DOOR SIDE GARNISH RH (for Back Door Attached Type) |
- HINT:
- Use the same procedures described for the LH side.
| 5. REMOVE BACK DOOR TRIM BOARD (for Back Door Attached Type) |
Using a screwdriver, detach the 13 clips and remove the trim board.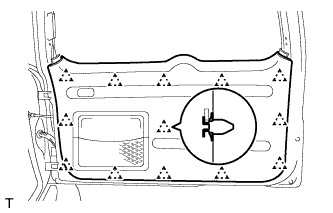
- HINT:
- Tape the screwdriver tip before use.
- If the screwdriver cannot reach the clips, pull on the lower trim to remove it.
- Tape the screwdriver tip before use.
Remove the 5 screws and the back door trim pocket.
| 6. REMOVE BACK DOOR OUT SIDE GARNISH (w/o Tire Carrier) |
Remove the 3 nuts 6 clips.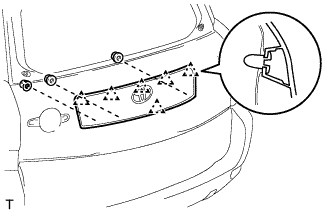
Disconnect the connector and remove the back door outside garnish.
Remove the 2 license plate lights (Click here).
| 7. REMOVE BACK DOOR LOWER OUT SIDE GARNISH SUB-ASSEMBLY (w/ Tire Carrier) |
Remove 15 clips and detach the claws.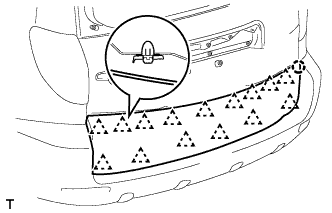
Remove the back door outside garnish.
| 8. REMOVE REAR BUMPER COVER (for Bumper Attached Type) |
Remove the 9 screws and 7 clips.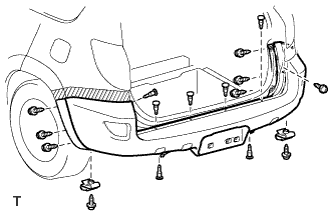
w/ Rear Quarter Panel Mudguard:
Remove the rear quarter panel mudguard.
Put protective tape under the quarter panel.
Detach the 12 claws and remove the bumper cover.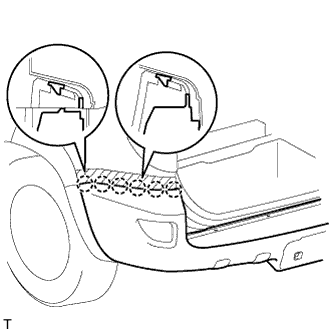
w/ Fog Light:
Disconnect the 2 fog light connectors.
w/ License Light:
Disconnect the license plate light connector.
Remove the 2 license plate lights (Click here).
| 9. REMOVE LICENSE PLATE LIGHT ASSEMBLY |
Disconnect the connector.
Using a screwdriver, remove the light as shown in the illustration.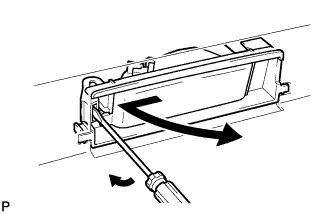
| 10. REMOVE LICENSE PLATE LIGHT ASSEMBLY (w/o Tire Carrier) |
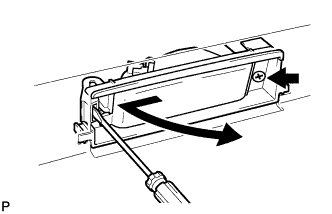 |
Disconnect the connector.
Remove the screw.
Using a screwdriver, remove the light as shown in the illustration.