P0340 Camshaft Position Sensor "A" Circuit (Bank 1 or Single Sensor)
Diagnostic trouble codes · Vehicles built Nov 2005 – Dec 2006
Versions by build date: Nov 2005 – Dec 2006 Jan 2007 – Jul 2007 from Aug 2007
DESCRIPTION
The Camshaft Position (CMP) sensor consists of a magnet and an iron core which is wrapped with copper wire, and is installed onto the cylinder head. When the camshaft rotates, each of 3 teeth on the camshaft passes through the CMP sensor. This activates the internal magnet in the sensor, generating a voltage in the copper wire. The camshaft rotation is synchronized with the crankshaft rotation. When the crankshaft turns twice, the voltage is generated 3 times in the CMP sensor. The generated voltage in the sensor acts as a signal, allowing the ECM to locate the camshaft position. This signal is then used to control ignition timing, fuel injection timing, and the VVT system.| DTC No. |
DTC Detection Condition |
Trouble Area |
| P0340 |
Case 1
|
|
- HINT:
- DTC P0340 indicates a malfunction relating to the CMP sensor (+) circuit (the wire harness between the ECM and CMP sensor, and the CMP sensor itself).
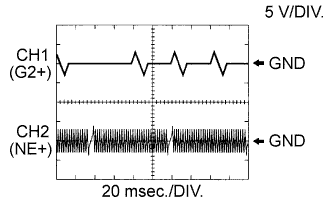

- HINT:
- The correct waveform is as shown in the illustration.
- G2+ stands for the CMP sensor signal, and NE+ stands for the Crankshaft Position (CKP) sensor signal.
- Grounding failure of the shielded wire may cause noise in waveforms.
- The correct waveform is as shown in the illustration.
Item
Content
Terminals
CH1: G2+ - G2-
CH2: NE+ - NE-
Equipment Settings
5 V/DIV.
20 ms./DIV.
Conditions
Cranking or idling
WIRING DIAGRAM
Refer to DTC P0335 (Click here).INSPECTION PROCEDURE
- HINT:
- Read freeze frame data using the intelligent tester. Freeze frame data records the engine condition when malfunctions are detected. When troubleshooting, freeze frame data can help determine if the vehicle was moving or stationary, if the engine was warmed up or not, if the air-fuel ratio was lean or rich, and other data from the time the malfunction occurred.
| 1. INSPECT CAMSHAFT POSITION SENSOR (RESISTANCE) |

Disconnect the B6 Camshaft Position (CMP) sensor connector.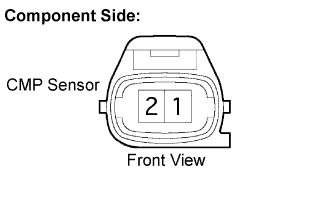
Measure the resistance between terminals 1 and 2.
- Standard resistance:
Tester Connection
Condition
Specified Condition
1 - 2
Cold
1,630 to 2,740 Ω
1 - 2
Hot
2,065 to 3,225 Ω
- HINT:
- Terms cold and hot refer to the temperature of the sensor. Cold means approximately -10 to 50°C (14 to 122°F). Hot means approximately 50 to 100°C (122 to 212°F).
Reconnect the CMP sensor connector.
|
|
||||

| OK | |
 |
| 2. CHECK HARNESS AND CONNECTOR (CAMSHAFT POSITION SENSOR - ECM) |
Disconnect the B6 CMP sensor connector.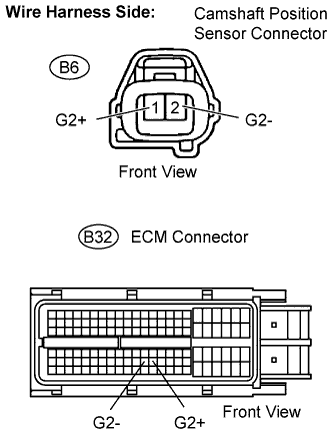
Disconnect the B32 ECM connector.
Measure the resistance.
- Standard resistance (Check for open):
Tester Connection
Specified Condition
G2+ (B6-1) - G2+ (B32-99)
Below 1 Ω
G2- (B6-2) - G2- (B32-98)
- Standard resistance (Check for short):
Tester Connection
Specified Condition
G2+ (B6-1) or G2+ (B32-99) - Body ground
10 kΩor higher
G2- (B6-2) or G2- (B32-98) - Body ground
Reconnect the ECM connector.
Reconnect the CMP sensor connector.
|
|
||||
| OK | |
|
| 3. CHECK SENSOR INSTALLATION (CAMSHAFT POSITION SENSOR) |
Check the CMP sensor installation.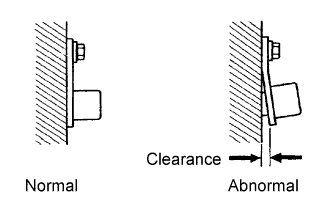
- OK:
- Sensor is installed correctly.
|
|
||||
| OK | |
|
| 4. CHECK VALVE TIMING |
Remove the cylinder head cover.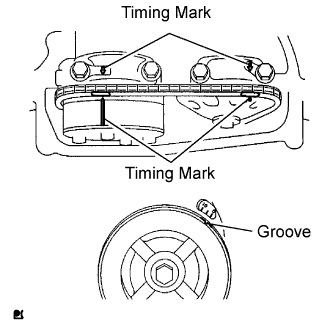
Turn the crankshaft pulley, and align its groove with the timing mark "0" on the timing chain cover.
Check that the timing marks on the camshaft timing sprocket and camshaft timing gear are facing upward as shown in the illustration.
- If not, turn the crankshaft 1 revolution (360°), then align the marks as above.
- OK:
- Timing marks on camshaft timing gears are aligned as shown in the illustration.
- If not, turn the crankshaft 1 revolution (360°), then align the marks as above.
Reinstall the cylinder head cover.
|
|
||||
| OK | |
|
| 5. CHECK CAMSHAFT |
Check the teeth of the camshaft.
- OK:
- Camshaft teeth do not have any cracks or deformation.
|
|
||||
| OK | |
|
| 6. REPLACE CAMSHAFT POSITION SENSOR |
| NEXT | |
|
| 7. CHECK AND REPLACE WHETHER DTC OUTPUT RECURS |
Connect the intelligent tester to the DLC3.
Turn the ignition switch on (IG) and turn the tester ON.
Clear DTCs (Click here).
Start the engine.
Select the following menu items: Powertrain / Engine and ECT / DTC.
Read DTCs.
- Result:
Display (DTC Output)
Proceed to
No output
A
P0340
B
- HINT:
- If the engine does not start, replace the ECM.
|
|
||||
| A | ||
 |
||
| ||