2005-2008 RAV4 · Service Manual BODY

REMOVAL

Removal / installation · Vehicles built from Jan 2007

Versions by build date: Nov 2005 – Dec 2006 from Jan 2007


1. DISCONNECT CABLE FROM NEGATIVE BATTERY TERMINAL

CAUTION:
Wait at least 90 seconds after disconnecting the cable from the negative (-) battery terminal to prevent airbag and seat belt pretensioner activation.


2. REMOVE FRONT DOOR OPENING TRIM LH
  1. Partially remove the front door opening trim weatherstrip LH so that the front pillar garnish LH can be removed (Click here).


3. REMOVE FRONT DOOR OPENING TRIM RH

HINT:
Use the same procedures described for the LH side.


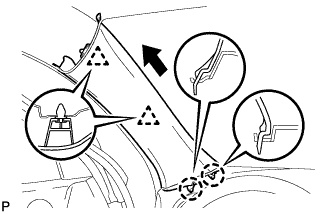
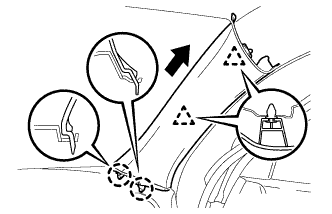
4. REMOVE FRONT PILLAR GARNISH LH

  1. B129698
    w/o Curtain Shield Airbag:

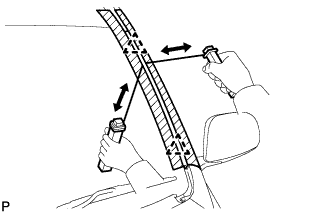
    1. Using a clip remover, detach the 2 clips.

    2. Pull the garnish in the direction indicated by the arrow in the illustration to detach the 2 claws. Then remove the garnish.

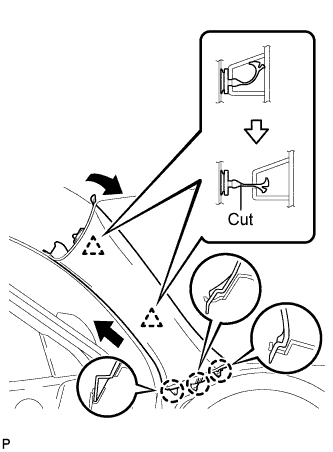
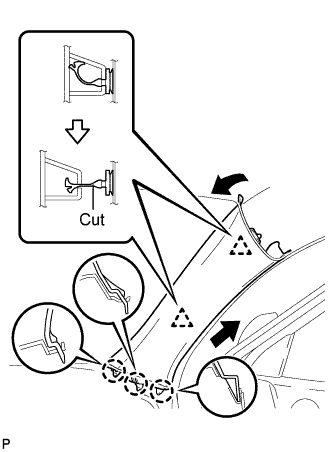
  1. B203236E01
    w/ Curtain Shield Airbag:

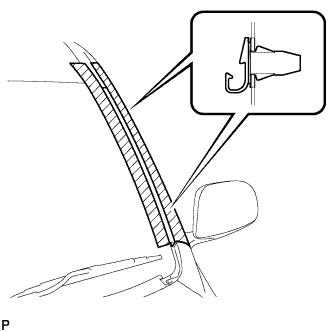
    1. Detach the 2 clips.

    2. Cut off the 2 clips.

    3. Detach the 3 claws and remove the garnish.

    4. Remove the 2 clips from the vehicle body.

      NOTICE:
      As the clips are cut, be sure to install new clips when installing the garnish.

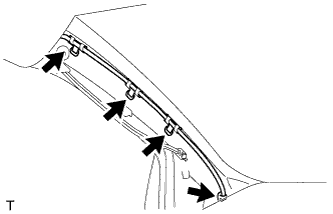
  1. B114316
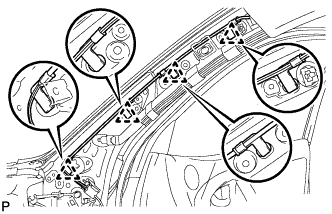
    Using a clip remover, remove the 4 wiring harness clamps.

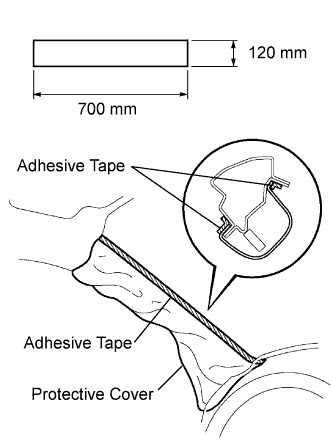
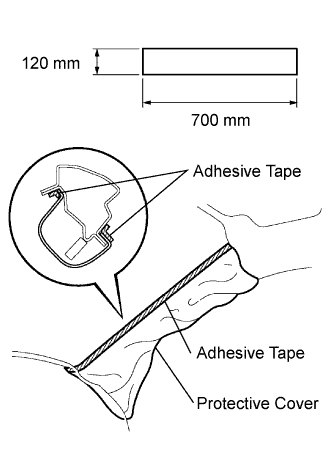
  1. B065292E06
    w/ Curtain Shield Airbag:

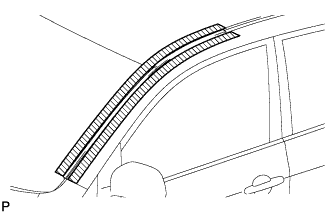
    1. Thoroughly cover the airbag with cloth or nylon of 700 mm (27.56 in.) x 120 mm (4.72 in.) and fix the ends of the cover with adhesive tape, as shown in the illustration.

      NOTICE:
      Cover the curtain shield airbag with a protective cover as soon as the front pillar garnish is removed.


5. REMOVE FRONT PILLAR GARNISH RH

  1. B131251
    w/o Curtain Shield Airbag:

    1. Using a clip remover, detach the 2 clips.

    2. Pull the garnish in the direction indicated by the arrow in the illustration to detach the 2 claws. Then remove the garnish.

  1. B203237E01
    w/ Curtain Shield Airbag:

    1. Detach the 2 clips.

    2. Cut off the 2 clips.

    3. Detach the 3 claws and remove the garnish.

    4. Remove the 2 clips from the vehicle body.

      NOTICE:
      As the clips are cut, be sure to install new clips when installing the garnish.

  1. B135443
    Using a clip remover, remove the 4 antenna cord clamps.

  1. B131254E01
    w/ Curtain Shield Airbag:

    1. Thoroughly cover the airbag with cloth or nylon of 700 mm (27.56 in.) x 120 mm (4.72 in.) and fix the ends of the cover with adhesive tape, as shown in the illustration.

      NOTICE:
      Cover the curtain shield airbag with a protective cover as soon as the front pillar garnish is removed.


6. REMOVE INNER REAR VIEW MIRROR ASSEMBLY (w/o EC Mirror)

B101366E04
  1. Pinch the cover and detach the 2 claws. Then remove the cover.

  1. B101367
    Push the lever, and then slide and remove the inner rear view mirror.


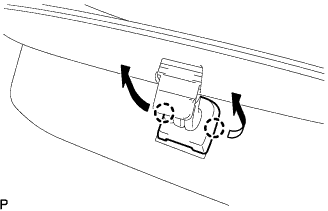
7. REMOVE INNER REAR VIEW MIRROR ASSEMBLY (w/ EC Mirror)

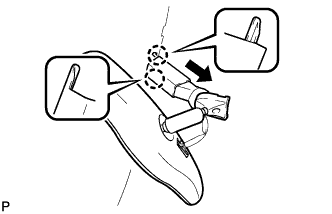
B133633
  1. Detach the 2 claws and remove the inner rear view mirror stay holder cover as shown in the illustration.

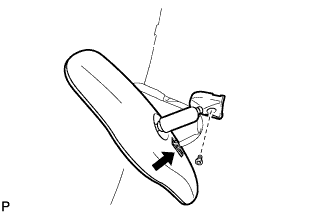
  1. B133634
    Disconnect the connector.

  1. Using a T20 "TORX" socket wrench, remove the screw and inner rear view mirror.


8. REMOVE RAIN SENSOR (w/ Rain Sensor)

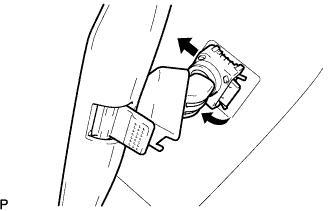
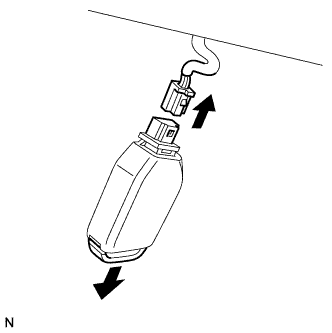
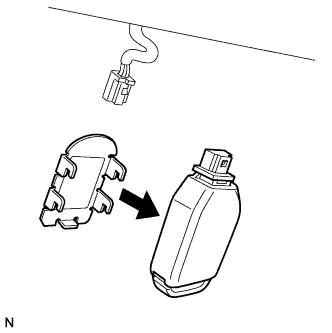
B131521
  1. Pull out the top of the cover, and remove the cover from the sensor body.

  1. B131522
    Disconnect the wire connector.

  1. Release the stopper

  1. B131523
    Pull out the sensor body.


9. REMOVE ROOM LIGHT ASSEMBLY

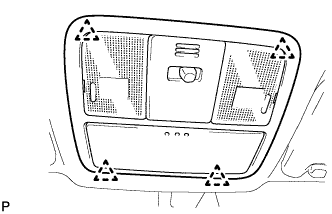
B131951
  1. Detach the 4 clips and remove the map light.

  1. Disconnect the light connector.


10. REMOVE ASSIST GRIP COVER

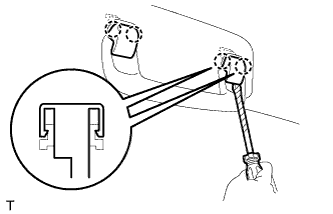
  1. B131002
    Using a screwdriver, detach the 4 claws and remove the 2 assist grip covers.

    HINT:
    Tape the screwdriver tip before use.


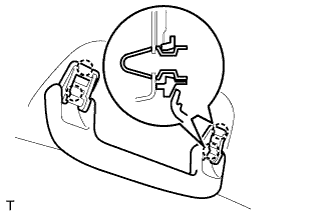
11. REMOVE ASSIST GRIP SUB-ASSEMBLY FRONT

  1. B131003
    Detach the 4 claws and remove the assist grip.


12. REMOVE VISOR ASSEMBLY LH

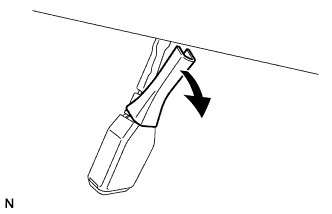
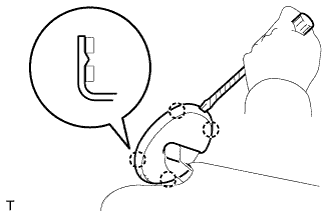
  1. B131005
    Using a screwdriver, detach the 4 claws and remove the visor bracket cover.

    HINT:
    Tape the screwdriver tip before use.

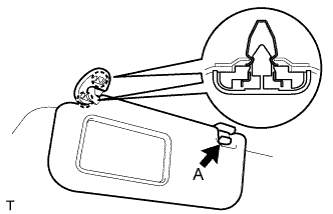
  1. B131006E01
    Remove portion A from the visor holder.

  1. Detach the 2 claws and remove the visor.


13. REMOVE VISOR ASSEMBLY RH

HINT:
Use the same procedures described for the LH side.


14. REMOVE VISOR HOLDER LH

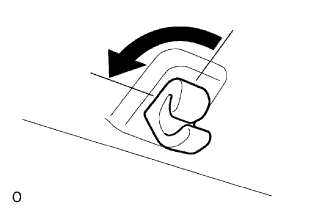
  1. B050596E06
    Remove the visor holder by turning it counterclockwise.


15. REMOVE ROOF HEADLINING ASSEMBLY (for Short Body)

HINT:
It is not necessary to completely remove the roof headlining. Slightly lower the front section of the roof headlining.

  1. Partially remove the roof headlining (Click here).


16. REMOVE ROOF HEADLINING ASSEMBLY (for Long Body)

HINT:
It is not necessary to completely remove the roof headlining. Slightly lower the front section of the roof headlining.

  1. Partially remove the roof headlining (Click here).


17. REMOVE FRONT WIPER ARM HEAD CAP
  1. Remove the 2 caps.


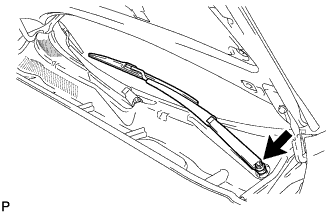
18. REMOVE FRONT WIPER ARM AND BLADE ASSEMBLY LH

B131452
  1. Remove the nut and arm and blade.


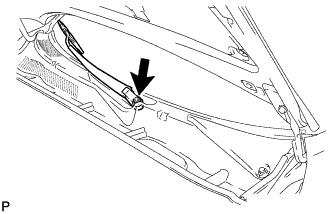
19. REMOVE FRONT WIPER ARM AND BLADE ASSEMBLY RH

B131474
  1. Remove the nut and arm and blade.


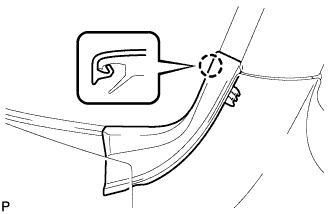
20. REMOVE FRONT FENDER TO COWL SIDE SEAL LH

E125248E01
  1. Detach the claw and remove the front fender to cowl side seal.


21. REMOVE FRONT FENDER TO COWL SIDE SEAL RH

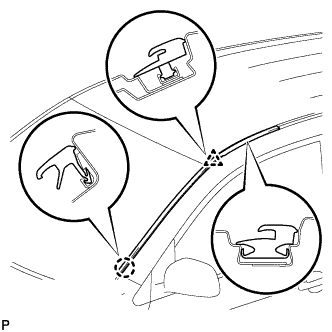
22. REMOVE NO. 2 WINDSHIELD MOULDING OUTSIDE LH

B134606
  1. Remove the moulding with the clip and claw.


23. REMOVE NO. 2 WINDSHIELD MOULDING OUTSIDE RH
  1. Remove the moulding with the clip and claw.


24. REMOVE NO. 2 WINDSHIELD OUTSIDE MOULDING FASTENER LH

B133259
  1. Apply protective tape to the outer surface of the vehicle body to prevent scratches.
    Using a heat light, heat the moulding to 40 to 60°C (104 to 140°F).

    NOTICE:
    Do not heat the moulding excessively.

  1. Tie both piano wire ends to wooden blocks or similar objects.

  1. B134607
    Cut the adhesive tape by pulling the piano wire as shown in the illustration.

  1. B134608
    Remove the 2 clips and moulding fastener.


25. REMOVE NO. 1 WINDSHIELD OUTSIDE MOULDING FASTENER

HINT:
Use the same procedures described for the LH side.


26. REMOVE COWL TOP VENTILATOR LOUVER

B131453
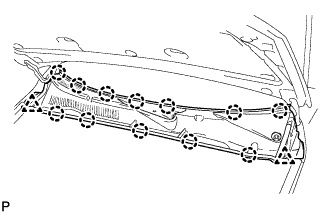
  1. Remove the 2 clips.

  1. Detach the 12 claws and remove the louver.


27. REMOVE FRONT WINDOW MOULDING INNER CENTER

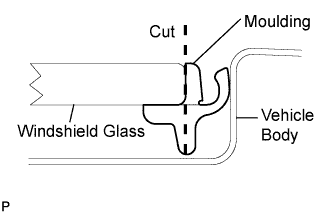
B129388E01
  1. Using a knife, cut off the moulding as shown in the illustration.

    NOTICE:
    Be careful not to damage the vehicle body.

  1. Remove the remaining moulding.

    HINT:
    Make a partial cut in the moulding. Then pull and remove it by hand.


28. REMOVE WINDSHIELD GLASS

B084567E04
  1. w/ Windshield Deicer:
    Remove the clip and disconnect the connector.

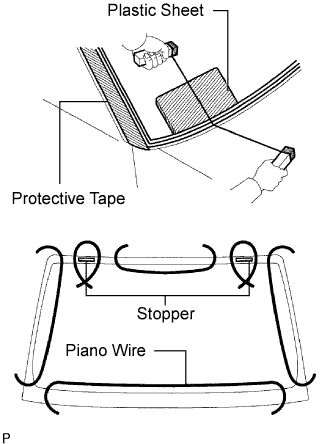
  1. Apply protective tape to the outer surface of the vehicle body to prevent scratches.

  1. From the interior, insert a piano wire between the vehicle body and glass as shown in the illustration.

  1. Tie objects that can serve as handles (for example, wooden blocks) to both wire ends.

    NOTICE:
    1. When separating the glass from the vehicle, be careful not to damage the vehicle's paint or interior/exterior ornaments.
    2. To prevent the instrument panel from being scratched when removing the glass, place a plastic sheet between the piano wire and instrument panel.

  1. B106095E03
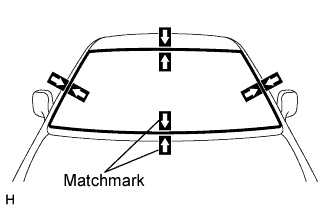
    Place matchmarks over the glass and vehicle body on the locations indicated in the illustration.

    HINT:
    Matchmarks do not need to be placed if not reusing the glass.

  1. Cut through the adhesive by pulling the piano wire around the glass.

    NOTICE:
    Leave as much adhesive on the vehicle body as possible when cutting through the adhesive.

  1. Disengage the stoppers.

  1. Using suction cups, remove the glass.


29. CLEAN WINDSHIELD GLASS

B106080
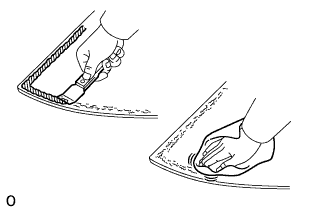
  1. Using a scraper, remove the damaged stoppers, dams and adhesive sticking to the glass.

  1. Clean the outer edges of the glass with white gasoline.

    NOTICE:
    Do not touch the glass surface after cleaning it.
    Even if using new glass, clean it with white gasoline.


30. CLEAN VEHICLE BODY

B106081E05
  1. Clean and shape the contact surface of the vehicle body.

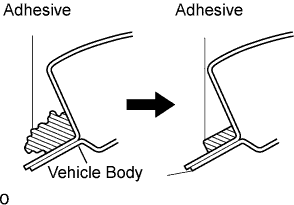
    1. On the contact surface of the vehicle body, use a knife to cut away excess adhesive as shown in the illustration.
      HINT:
      Leave as much adhesive on the vehicle body as possible.

      NOTICE:
      Be careful not to damage the vehicle body.

  1. Clean the contact surface of the vehicle body with cleaner.

    HINT:
    Even if all the adhesive has been removed, clean the vehicle body.

← REMOVAL (Nov 2005 – Dec 2006)INSTALLATION (Nov 2005 – Dec 2006) →