INSTALLATION
Removal / installation · Vehicles built from Jan 2007
Versions by build date: Nov 2005 – Dec 2006 from Jan 2007
| 1. INSTALL INJECTOR ASSEMBLY |

- NOTICE:
- Before installing the injector, check for carbon, foreign matter, etc. on the seal surfaces of the cylinder head and injector. If there is foreign matter, remove it before installing the injector.
Install 4 new nozzle seats to the cylinder head.
Install new O-rings to each injector.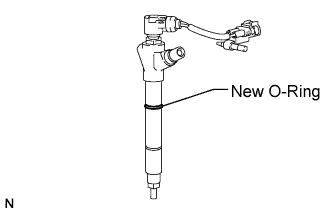

Apply a light coat of engine oil to the O-rings on each injector.
Install the 4 injectors to the cylinder head.
- NOTICE:
- Fit the injectors to the nozzle seats.
Temporarily install the 4 clamps to the cylinder head with the 4 bolts.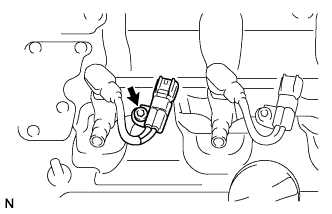
Using a hexagon socket wrench, tighten the 4 bolts.
- Torque:
- 9 N*m{ 92 kgf*cm , 80 in.*lbf }
Install the nozzle holder clamps and washers as shown in the illustration.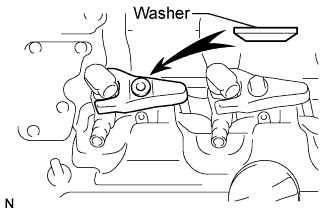
Temporarily install the nozzle holder clamp bolts.
- NOTICE:
- Pay attention to the mounting orientation (beveled edge) of the washer.
- When temporarily attaching the nozzle holder clamp and the nozzle holder clamp bolt, be careful not to position them at an angle.
- Pay attention to the mounting orientation (beveled edge) of the washer.
- HINT:
- Apply a light coat of engine oil on the threads of the nozzle holder clamp bolts.
Temporarily install the No. 1, No. 2, No. 3 and No. 4 injection pipe.
Temporarily install 4 new gaskets and the No. 1 leakage pipe with the 4 union bolts.
Tighten the 4 nozzle holder clamp bolts.
- Torque:
- 25 N*m{ 255 kgf*cm , 18 ft.*lbf }
| 2. INSTALL NO. 1 NOZZLE LEAKAGE PIPE ASSEMBLY |
Temporarily install a new gasket, fuel check valve and bolt.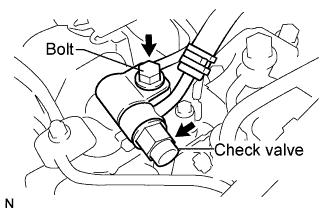
Tighten the 4 union bolts.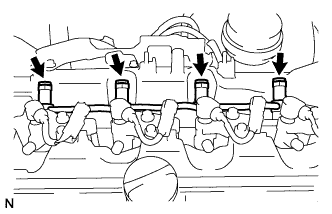
- Torque:
- 18 N*m{ 184 kgf*cm , 13 ft.*lbf }
Tighten the fuel check valve and bolt.
- Torque:
- 31.5 N*m{ 321 kgf*cm , 23 ft.*lbf } for fuel check valve
- 20.5 N*m{ 209 kgf*cm , 15 ft.*lbf } for bolt
| 3. INSTALL INJECTION PIPE SUB-ASSEMBLY |
- NOTICE:
- In a case where an injector is replaced, the injection pipes must also be replaced.
- In a case where an injector is replaced, the injection pipes must also be replaced.
Temporarily install the 4 injection pipes.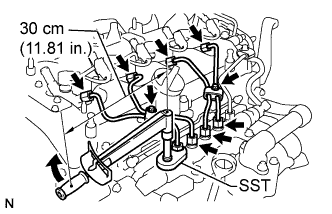
Using SST, tighten the 4 nuts at the common rail end of the injection pipes.
- SST
- 09023-38401
- Torque:
- 27 N*m{ 275 kgf*cm , 20 ft.*lbf }
- HINT:
- Use of the proper SST is required to ensure that the correct torque is applied to the injection pipe nut.
- Use a torque wrench with a fulcrum length of 30 cm (11.81 in.).
- Make sure that the pipe is not deformed or twisted during installation.
If the pipe is deformed or twisted, or if it cannot be installed properly, replace the pipe with a new pipe.
- Use of the proper SST is required to ensure that the correct torque is applied to the injection pipe nut.
Using SST, tighten the 4 nuts at the injector end of the injection pipes.
- SST
- 09023-38401
- Torque:
- 27 N*m{ 275 kgf*cm , 20 ft.*lbf }
- HINT:
- Use of the proper SST is required to ensure that the correct torque is applied to the injection pipe nut.
- Use a torque wrench with a fulcrum length of 30 cm (11.81 in.).
- Make sure that the pipe is not deformed or twisted during installation.
If the pipe is deformed or twisted, or if it cannot be installed properly, replace the pipe with a new pipe.
- Use of the proper SST is required to ensure that the correct torque is applied to the injection pipe nut.
| 4. CONNECT ENGINE WIRE |
Connect the engine wire to the engine cover bracket.
Connect the glow plug wire harness.
Install the 2 nuts.
Install the nut and grommet.
- Torque:
- 2.2 N*m{ 22 kgf*cm , 19 in.*lbf }
Connect the turbo pressure sensor connector.
Connect the discharge valve connector.
Connect the fuel pressure sensor connector.
| 5. BLEED AIR FROM FUEL SYSTEM |
Using the hand pump indicated by the arrows in the illustration, bleed the fuel system. Continue pumping until pumping becomes difficult.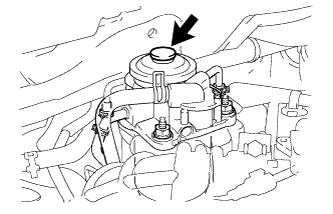
| 6. INSTALL NO. 1 ENGINE COVER |
Attach the 4 clips to install the engine cover.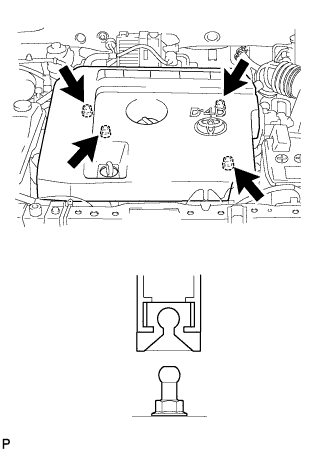
| 7. CONNECT CABLE TO NEGATIVE BATTERY TERMINAL |
| 8. PERFORM REGISTRATION OF INJECTOR COMPENSATION CODE |
- HINT:
- Each injector assembly has a characteristic fuel injecting behavior (Click here).
| 9. INSPECT FOR FUEL LEAK |
Perform the ACTIVE TEST.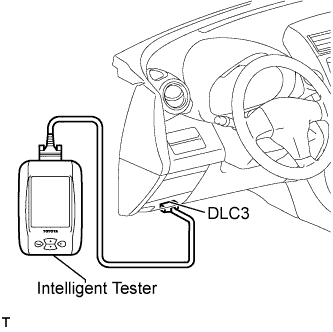
Connect the intelligent tester to the DLC3.
Turn the ignition switch on (IG).
Turn the intelligent tester ON.
Enter the following menus: Powertrain / Engine / Active Test.
Perform the Active Test.
Intelligent Tester Display
Test Details
Control Range
Diagnostic Notes
Test the Fuel Leak
Pressurizing common rail internal fuel pressure, and checking for fuel leaks
Stop/Start
- Fuel pressure inside common rail pressurized to specified value and engine speed increased to 2,000 rpm when Start is selected
- Above conditions to be maintained while test is Start
- Fuel pressure inside common rail pressurized to specified value and engine speed increased to 2,000 rpm when Start is selected