REASSEMBLY
Removal / installation · Vehicles built from Nov 2005
| 1. INSTALL NEEDLE ROLLER BEARING |

Coat the needle roller bearing with gear oil, and install it into the No. 2 output shaft.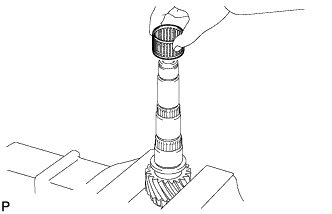

| 2. INSTALL REVERSE DRIVEN GEAR |
Coat the reverse driven gear with gear oil, and install it into the No. 2 output shaft.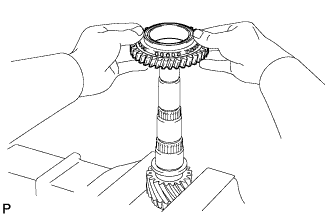
| 3. INSTALL NO. 4 TRANSMISSION CLUTCH HUB |
Install the key spring and 2 shifting keys to the clutch hub.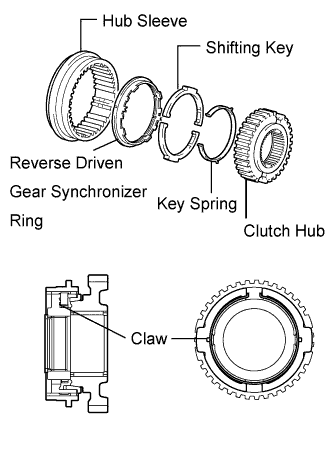
- HINT:
- Install the shifting key with the grooves on the clutch hub side.
- Install the key spring with the claw on the clutch hub side.
- Refer to the illustration when installing the key spring and shifting keys.
- Install the shifting key with the grooves on the clutch hub side.
Install the hub sleeve to the reverse driven gear as shown in the illustration.
Coat the No. 4 transmission clutch hub with gear oil, and install it into the No. 2 output shaft.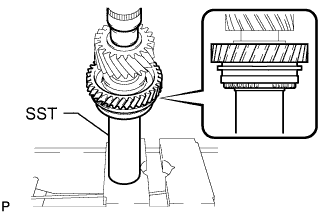
Using SST and a press, install the reverse gear and No. 4 transmission clutch hub into the No. 2 output shaft.
- SST
- 09308-14010
- NOTICE:
- After installation, make sure that the gear and synchronizer ring move smoothly.
- HINT:
- Make sure that the protruding part on the synchronizer ring is fitted into the groove of the clutch hub.
| 4. INSTALL SHAFT SNAP RING |
Using the table below, select a new snap ring that makes the thrust clearance of the No. 4 transmission clutch hub less than 0.1 mm (0.004 in.).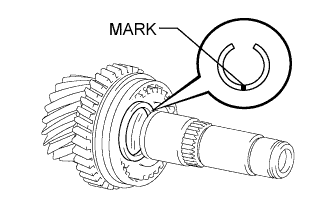
- Standard snap ring thickness:
Mark
Thickness
Mark
Thickness
A
2.25 to 2.30 mm (0.0886 to 0.0906 in.)
E
2.45 to 2.50 mm (0.0965 to 0.0984 in.)
B
2.30 to 2.35 mm (0.0906 to 0.0925 in.)
F
2.50 to 2.55 mm (0.0984 to 0.1004 in.)
C
2.35 to 2.40 mm (0.0925 to 0.0945 in.)
G
2.55 to 2.60 mm (0.1004 to 0.1024 in.)
D
2.40 to 2.45 mm (0.0945 to 0.0965 in.)
H
2.60 to 2.65 mm (0.1024 to 0.1043 in.)
Using a brass bar and hammer, tap the snap ring onto the No. 2 output shaft.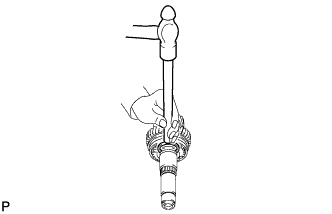
| 5. INSPECT REVERSE DRIVEN GEAR THRUST CLEARANCE |
Using a feeler gauge, measure the thrust clearance.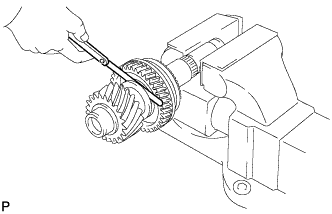
- Standard thrust clearance:
- 0.11 to 0.34 mm (0.0043 to 0.0134 in.)
- Maximum thrust clearance:
- 0.34 mm (0.0134 in.)
| 6. INSPECT REVERSE DRIVEN GEAR RADIAL CLEARANCE |
Using a dial indicator, measure the radial clearance.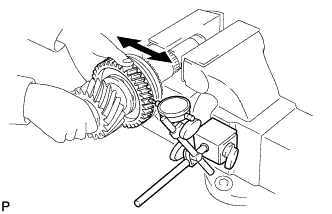
- Standard radial clearance:
- 0.015 to 0.068 mm (0.0006 to 0.0027 in.)
- Maximum radial clearance:
- 0.068 mm (0.0027 in.)
| 7. INSTALL 5TH DRIVEN GEAR |
Install the output shaft spacer into the No. 2 output shaft.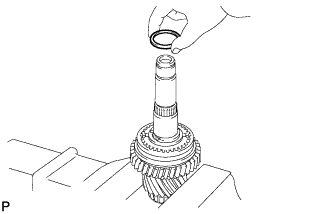
Coat the needle roller bearing with gear oil, and install it into the No. 2 output shaft.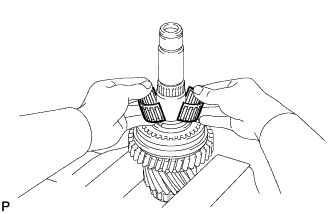
Install the output shaft spacer into the No. 2 output shaft.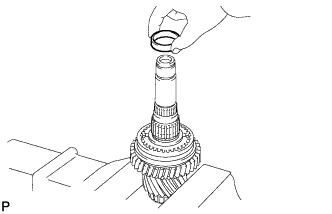
Coat the 5th driven gear with gear oil, and install it into the No. 2 output shaft.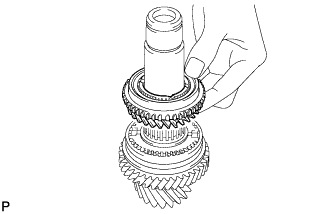
| 8. INSTALL NO. 3 TRANSMISSION CLUTCH HUB |
Apply gear oil to the sleeve and hub.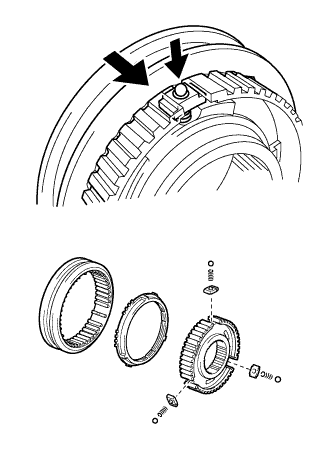
Install the clutch hub sleeve to the clutch hub.
Install the 3 shifting keys to the clutch hub.
Install the 3 shifting key springs to the clutch hub.
Place the balls in the holes of the shifting keys, and install the hub sleeve while pushing in the balls.
- NOTICE:
- Take care to prevent the balls from scattering.
Coat the 5th driven gear synchronizer ring set with gear oil, and install them to the 5th driven gear.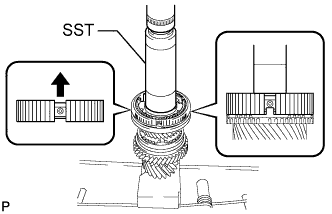
Using SST and a press, press in the No. 3 transmission clutch hub to the No. 2 output shaft.
- SST
- 09308-14010
- NOTICE:
- After installation, make sure that the gear and synchronizer ring move smoothly.
- HINT:
- Make sure that the protruding part on the synchronizer ring is fitted into the groove of the clutch hub.
| 9. INSTALL SHAFT SNAP RING |
Using the table below, select a new snap ring that makes the thrust clearance of the No. 3 transmission clutch hub less than 0.1 mm (0.004 in.).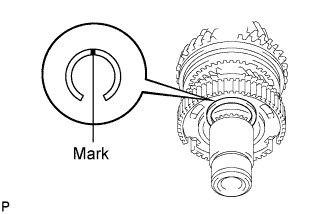
- Standard snap ring thickness:
Mark
Thickness
Mark
Thickness
1
2.25 to 2.30 mm (0.0886 to 0.0906 in.)
4
2.40 to 2.45 mm (0.0945 to 0.0965 in.)
2
2.30 to 2.35 mm (0.0906 to 0.0925 in.)
5
2.45 to 2.50 mm (0.0965 to 0.0984 in.)
3
2.35 to 2.40 mm (0.0925 to 0.0945 in.)
6
2.50 to 2.55 mm (0.0984 to 0.1004 in.)
Using a brass bar and hammer, tap the snap ring onto the No. 2 output shaft.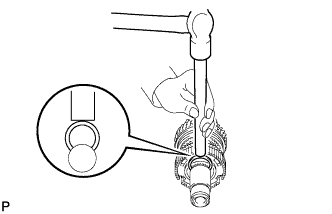
| 10. INSPECT 5TH DRIVEN GEAR THRUST CLEARANCE |
Using a feeler gauge, measure the thrust clearance.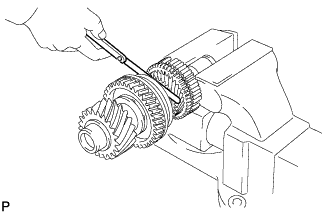
- Standard thrust clearance:
- 0.10 to 0.55 mm (0.0039 to 0.0217 in.)
- Maximum thrust clearance:
- 0.55 mm (0.0217 in.)
| 11. INSPECT 5TH DRIVEN GEAR RADIAL CLEARANCE |
Using a dial indicator, measure the radial clearance.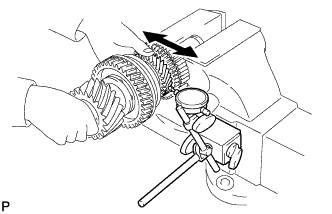
- Standard radial clearance:
- 0.015 to 0.066 mm (0.0006 to 0.0026 in.)
- Maximum radial clearance:
- 0.066 mm (0.0026 in.)
| 12. INSTALL 6TH DRIVEN GEAR |
Install the output shaft spacer into the No. 2 output shaft.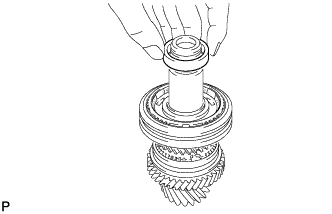
Coat the needle roller bearing with gear oil, and install it into the No. 2 output shaft.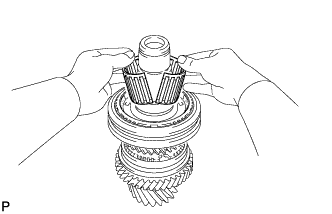
Coat the synchronizer ring with gear oil, and install it into the transmission clutch hub.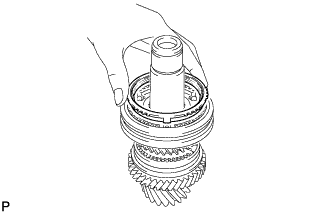
Coat the 6th driven gear with gear oil, and install it into the No. 2 output shaft.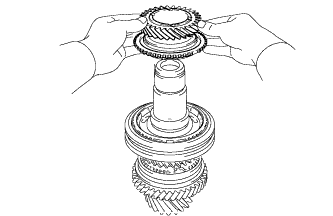
| 13. INSTALL NO. 2 OUTPUT SHAFT REAR BEARING |
Using SST and a press, press the No. 2 output shaft rear bearing into the No. 2 output shaft.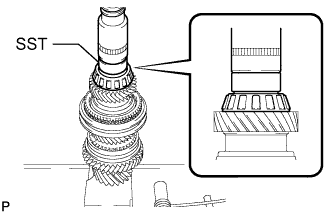
- SST
- 09710-04071
- NOTICE:
- After installation, make sure that the gear and synchronizer ring move smoothly.
| 14. INSTALL NO. 2 OUTPUT SHAFT BEARING SNAP RING |
Using the table below, select a new snap ring that makes the thrust clearance of the 6th gear less than 0.1 mm (0.004 in.).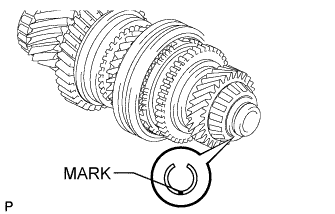
- Standard snap ring thickness:
Mark
Thickness
Mark
Thickness
B
1.85 to 1.90 mm (0.0728 to 0.0748 in.)
0
2.05 to 2.10 mm (0.0807 to 0.0827 in.)
C
1.90 to 1.95 mm (0.0748 to 0.0768 in.)
1
2.10 to 2.15 mm (0.0827 to 0.0846 in.)
D
1.95 to 2.00 mm (0.0768 to 0.0787 in.)
2
2.15 to 2.20 mm (0.0846 to 0.0866 in.)
E
2.00 to 2.05 mm (0.0787 to 0.0807 in.)
-
-
Using a snap ring expander, install the snap ring onto the No. 2 output shaft.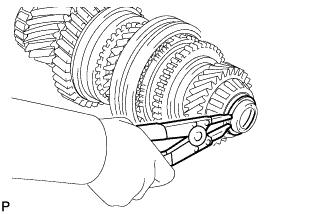
| 15. INSPECT 6TH DRIVEN GEAR THRUST CLEARANCE |
Using a feeler gauge, measure the thrust clearance.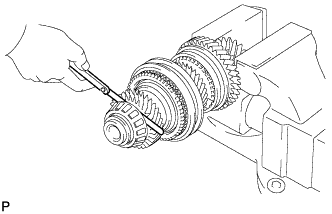
- Standard thrust clearance:
- 0.10 to 0.55 mm (0.0039 to 0.0217 in.)
- Maximum thrust clearance:
- 0.55 mm (0.0217 in.)
| 16. INSPECT 6TH DRIVEN GEAR RADIAL CLEARANCE |
Using a dial indicator, measure the radial clearance.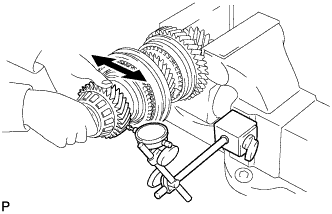
- Standard radial clearance:
- 0.015 to 0.066 mm (0.0006 to 0.0026 in.)
- Maximum radial clearance:
- 0.066 mm (0.0026 in.)
| 17. INSTALL NO. 2 OUTPUT SHAFT FRONT BEARING |
Using SST and a press, press the No. 2 output shaft front bearing into the No. 2 output shaft.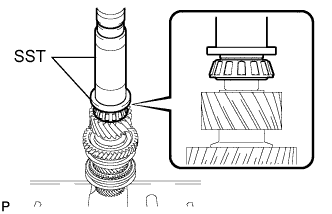
- SST
- 09309-37010
09506-30012
| 18. INSTALL OUTPUT SHAFT FRONT BEARING |
Using SST and a press, press the output shaft front bearing into the No. 1 output shaft.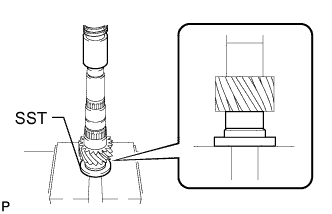
- SST
- 09309-14040
| 19. INSTALL OUTPUT SHAFT FRONT BEARING SHAFT SNAP RING |
Using a snap ring expander, install a new snap ring into the No. 1 output shaft.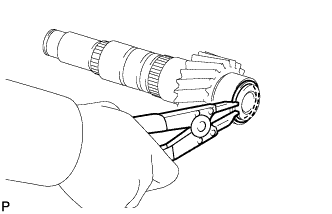
| 20. INSTALL 1ST DRIVEN GEAR |
Coat the needle roller bearing with gear oil, and install it into the No. 1 output shaft.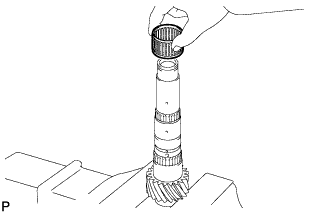
Coat the 1st driven gear with gear oil, and install it into the No. 1 output shaft.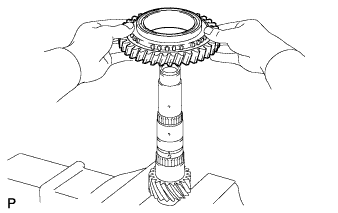
| 21. INSTALL NO. 1 TRANSMISSION CLUTCH HUB |
Apply gear oil to the sleeve and hub.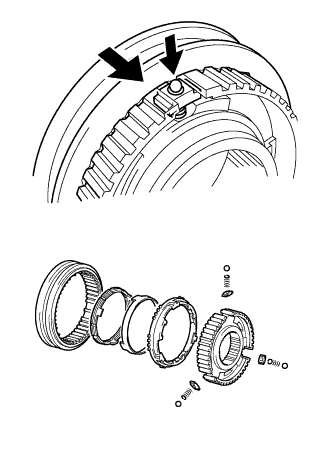
Install the clutch hub sleeve to the clutch hub.
Install the 3 shifting keys to the clutch hub.
Install the 3 shifting key springs to the clutch hub.
Place the balls in the holes of the shifting keys, and install the hub sleeve while pushing in the balls.
- NOTICE:
- Take care to prevent the balls from scattering.
Coat the 1st driven gear synchronizer ring set with gear oil, and install them to the 1st driven gear.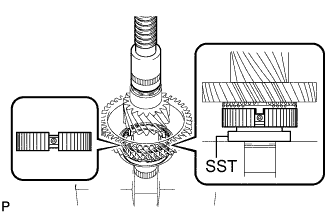
Using SST and a press, press in the No. 1 transmission hub sleeve to the No. 1 output shaft.
- SST
- 09726-40010
- NOTICE:
- After installation, make sure that the gear and synchronizer ring move smoothly.
- HINT:
- Make sure that the protruding part on the synchronizer ring is fitted into the groove of the clutch hub.
| 22. INSTALL 2ND DRIVEN GEAR SYNCHRONIZER RING SET |
Coat the 2nd driven gear synchronizer ring set with gear oil, and install them to the No. 1 output shaft.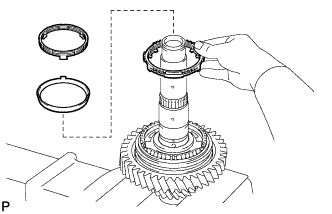
| 23. INSTALL SYNCHROMESH SHIFTING KEY BALL |
Install the key ball onto the No. 1 output shaft.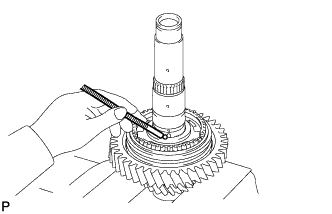
| 24. INSTALL NEEDLE ROLLER BEARING |
Coat the needle roller bearing with gear oil, and install it into the No. 1 output shaft.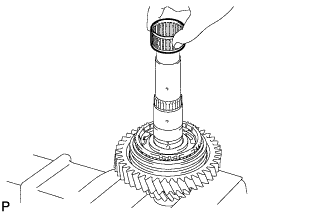
| 25. INSTALL 2ND DRIVEN GEAR |
Coat the 2nd driven gear with gear oil, and install it into the No. 1 output shaft.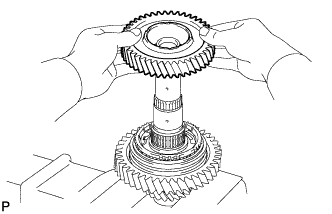
| 26. INSTALL 2ND DRIVEN GEAR BEARING INNER RACE |
Align the groove of the 2nd driven gear bearing inner race with the ball, and install it.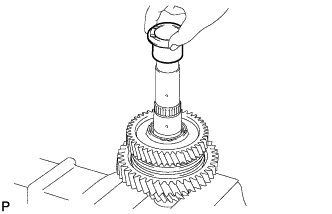
| 27. INSTALL OUTPUT SHAFT BEARING SHAFT SNAP RING |
Using the table below, select a new snap ring that makes the thrust clearance of the 2nd gear less than 0.1 mm (0.004 in.).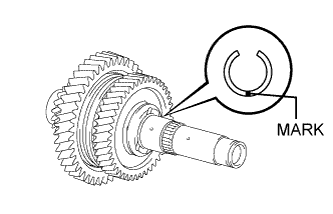
- Standard snap ring thickness:
Mark
Thickness
Mark
Thickness
A
2.25 to 2.30 mm (0.0886 to 0.0906 in.)
E
2.45 to 2.50 mm (0.0965 to 0.0984 in.)
B
2.30 to 2.35 mm (0.0906 to 0.0925 in.)
F
2.50 to 2.55 mm (0.0984 to 0.1004 in.)
C
2.35 to 2.40 mm (0.0925 to 0.0945 in.)
G
2.55 to 2.60 mm (0.1004 to 0.1024 in.)
D
2.40 to 2.45 mm (0.0945 to 0.0965 in.)
H
2.60 to 2.65 mm (0.1024 to 0.1043 in.)
Using a snap ring expander, install the snap ring into the No. 1 output shaft.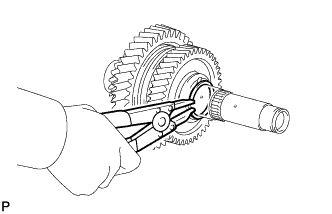
| 28. INSPECT 1ST DRIVEN GEAR THRUST CLEARANCE |
Using a dial indicator, measure the thrust clearance.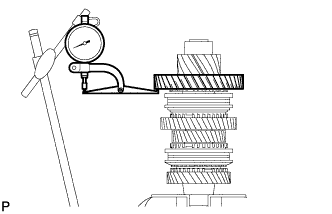
- Standard thrust clearance:
- 0.10 to 0.35 mm (0.0039 to 0.0138 in.)
- Maximum thrust clearance:
- 0.35 mm (0.0138 in.)
| 29. INSPECT 1ST DRIVEN GEAR RADIAL CLEARANCE |
Using a dial indicator, measure the radial clearance.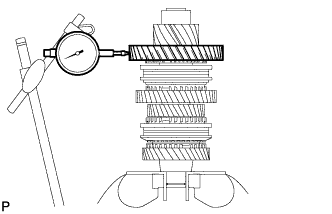
- Standard radial clearance:
- 0.015 to 0.068 mm (0.0006 to 0.0027 in.)
- Maximum radial clearance:
- 0.068 mm (0.0027 in.)
| 30. INSPECT 2ND DRIVEN GEAR THRUST CLEARANCE |
Using a dial indicator, measure the thrust clearance.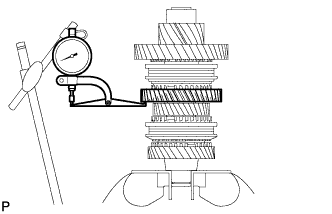
- Standard thrust clearance:
- 0.11 to 0.46 mm (0.0043 to 0.0181 in.)
- Maximum thrust clearance:
- 0.46 mm (0.0181 in.)
| 31. INSPECT 2ND DRIVEN GEAR RADIAL CLEARANCE |
Using a dial indicator, measure the radial clearance.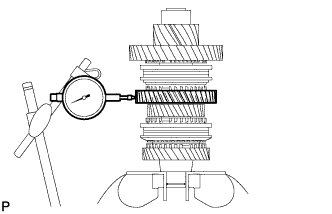
- Standard radial clearance:
- 0.015 to 0.048 mm (0.0006 to 0.0019 in.)
- Maximum radial clearance:
- 0.048 mm (0.0019 in.)
| 32. INSTALL 4TH DRIVEN GEAR |
Install the output shaft spacer into the No. 1 output shaft.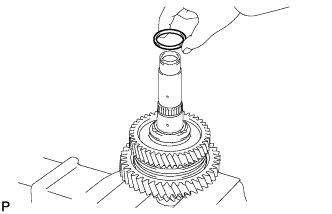
Coat the 4th driven gear needle roller bearing with gear oil, and install it into the No. 1 output shaft.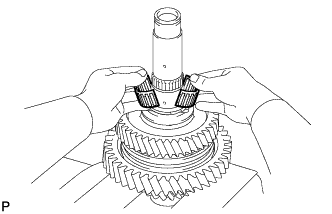
Coat the 4th driven gear with gear oil, and install it into the No. 1 output shaft.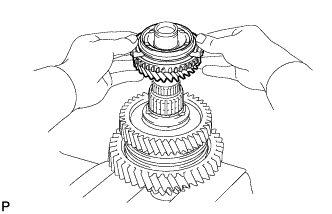
| 33. INSTALL NO. 2 TRANSMISSION CLUTCH HUB |
Apply gear oil to the sleeve and hub.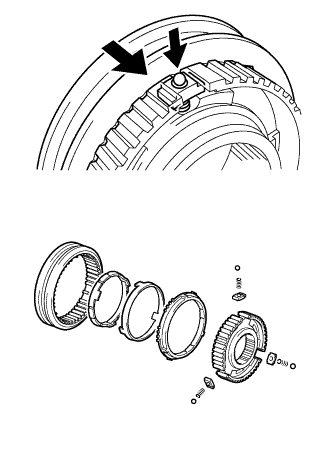
Install the clutch hub sleeve to the clutch hub.
Install the 3 shifting keys to the clutch hub.
Install the 3 shifting key springs to the clutch hub.
Place the balls in the holes of the shifting keys, and install the hub sleeve while pushing in the balls.
- NOTICE:
- Take care to prevent the balls from scattering.
Coat the 4th driven gear synchronizer ring set with gear oil.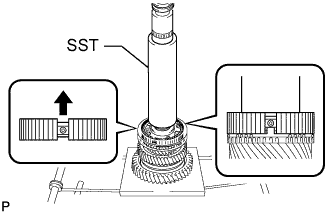
Using SST and a press, press the clutch hub into the 4th driven gear.
- SST
- 09309-14010
- NOTICE:
- After installation, make sure that the gear and synchronizer ring move smoothly.
- HINT:
- Make sure that the protruding part on the synchronizer ring is fitted into the groove of the clutch hub.
| 34. INSTALL SHAFT SNAP RING |
Using the table below, select a new snap ring that makes the thrust clearance of the No. 2 transmission clutch hub less than 0.1 mm (0.004 in.).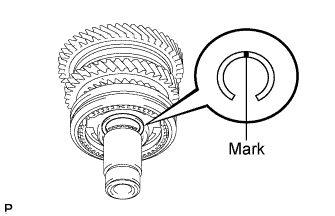
- Standard snap ring thickness:
Mark
Thickness
Mark
Thickness
1
2.25 to 2.30 mm (0.0886 to 0.0906 in.)
4
2.40 to 2.45 mm (0.0945 to 0.0965 in.)
2
2.30 to 2.35 mm (0.0906 to 0.0925 in.)
5
2.45 to 2.50 mm (0.0965 to 0.0984 in.)
3
2.35 to 2.40 mm (0.0925 to 0.0945 in.)
6
2.50 to 2.55 mm (0.0984 to 0.1004 in.)
Using a brass bar and hammer, tap the snap ring into the No. 1 output shaft.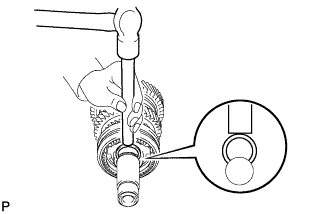
| 35. INSPECT 4TH DRIVEN GEAR THRUST CLEARANCE |
Using a feeler gauge, measure the thrust clearance.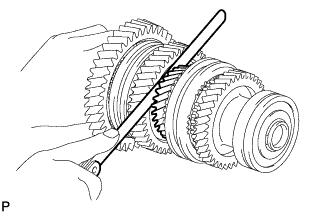
- Standard thrust clearance:
- 0.10 to 0.65 mm (0.0039 to 0.0256 in.)
- Maximum thrust clearance:
- 0.65 mm (0.0256 in.)
| 36. INSPECT 4TH DRIVEN GEAR RADIAL CLEARANCE |
Using a dial indicator, measure the radial clearance.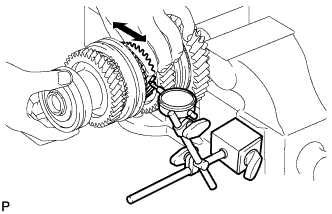
- Standard radial clearance:
- 0.015 to 0.066 mm (0.0006 to 0.0026 in.)
- Maximum radial clearance:
- 0.066 mm (0.0026 in.)
| 37. INSTALL 3RD DRIVEN GEAR |
Coat the 3rd driven gear synchronizer ring set with gear oil, and install it into the No. 1 output shaft.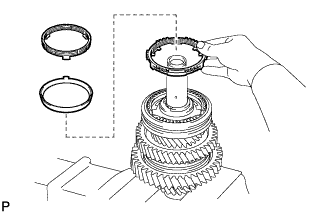
Coat the needle roller bearing with gear oil, and install it into the No. 1 output shaft.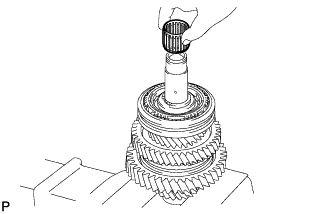
Install the output shaft spacer into the No. 1 output shaft.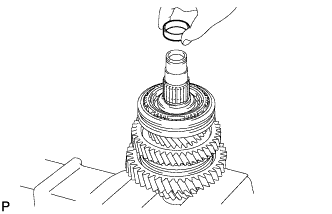
Coat the 3rd driven gear with gear oil, and install it into the No. 1 output shaft.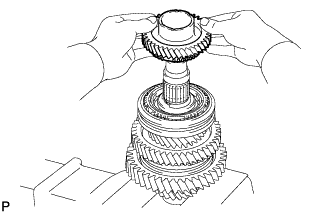
| 38. INSTALL OUTPUT SHAFT FRONT BEARING |
Using SST and a press, press the output shaft front bearing into the No. 1 output shaft.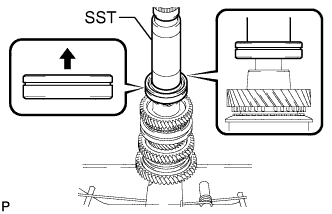
- SST
- 09308-14010
- HINT:
- When pressing in the bearing, apply force to only the inner race. Do not apply force to the seal.
- NOTICE:
- After installation, make sure that the gear and synchronizer ring move smoothly.
| 39. INSTALL OUTPUT SHAFT BEARING SHAFT SNAP RING |
Using the table below, select a new snap ring that makes the thrust clearance of the output shaft bearing less than 0.1 mm (0.004 in.).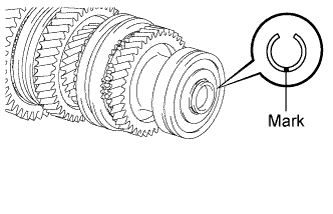
- Standard snap ring thickness:
Mark
Thickness
Mark
Thickness
B
1.85 to 1.90 mm (0.0728 to 0.0748 in.)
0
2.05 to 2.10 mm (0.0807 to 0.0827 in.)
C
1.90 to 1.95 mm (0.0748 to 0.0768 in.)
1
2.10 to 2.15 mm (0.0827 to 0.0846 in.)
D
1.95 to 2.00 mm (0.0768 to 0.0787 in.)
2
2.15 to 2.20 mm (0.0846 to 0.0866 in.)
E
2.00 to 2.05 mm (0.0787 to 0.0807 in.)
-
-
Using a snap ring expander, install the snap ring onto the No. 1 output shaft.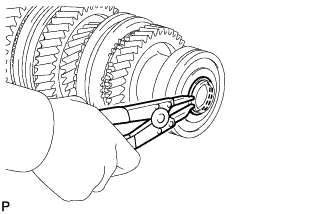
| 40. INSPECT 3RD DRIVEN GEAR THRUST CLEARANCE |
Using a feeler gauge, measure the thrust clearance.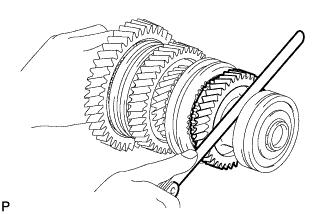
- Standard thrust clearance:
- 0.11 to 0.54 mm (0.0043 to 0.0213 in.)
- Maximum thrust clearance:
- 0.54 mm (0.0213 in.)
| 41. INSPECT 3RD DRIVEN GEAR RADIAL CLEARANCE |
Using a dial indicator, measure the radial clearance.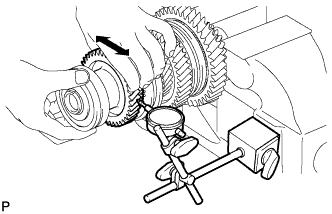
- Standard radial clearance:
- 0.015 to 0.066 mm (0.0006 to 0.0026 in.)
- Maximum radial clearance:
- 0.066 mm (0.0026 in.)