INSTALLATION
Removal / installation · Vehicles built from Nov 2005
| 1. INSTALL KNOCK SENSOR |

Install the sensor with the nut.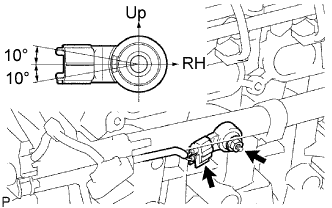

- Torque:
- 20 N*m{ 205 kgf*cm , 15 ft.*lbf }
- NOTICE:
- Make sure that the knock sensor is in the correct position.
Connect the sensor connector.
| 2. INSTALL INTAKE MANIFOLD INSULATOR |
Install the intake manifold insulator onto the cylinder block.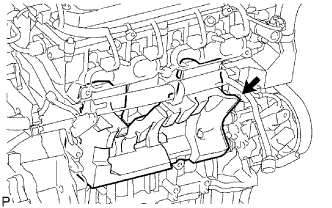
| 3. INSTALL INTAKE MANIFOLD |
Install a new gasket into the intake manifold.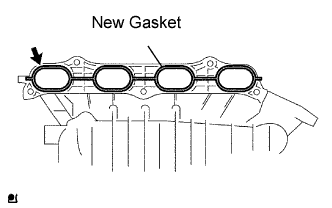
Install the intake manifold with the 5 bolts and 2 nuts.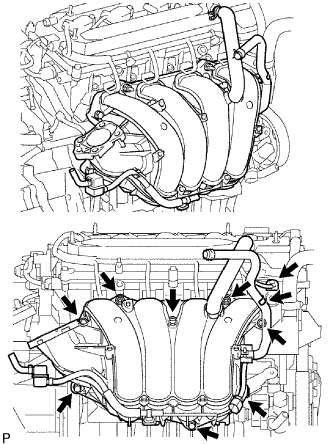
- Torque:
- 30 N*m{ 305 kgf*cm , 22 ft.*lbf }
Fit the union to check valve hose into the vacuum hose clamp.
Install the wire harness clamp.
Connect the camshaft timing oil control valve connector.
Connect the union to check valve hose to the brake booster.
| 4. CONNECT HEATER WATER OUTLET HOSE |
Install the heater water outlet hose to the water by-pass pipe and heater radiator unit.
| 5. CONNECT HEATER WATER INLET HOSE |
Install the heater water inlet hose to the cylinder head and heater radiator unit.
Install the hose clamp.
| 6. INSTALL FUEL DELIVERY PIPE |
Install 4 new insulators into the cylinder head.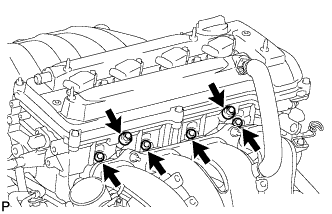
Install the 2 delivery pipe spacers onto the cylinder head.
Install the fuel delivery pipe together with the 4 fuel injectors, then temporarily tighten the 2 bolts.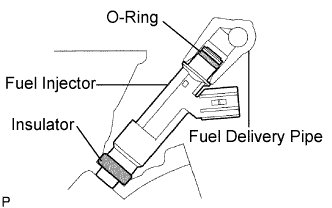
- NOTICE:
- Be careful not to drop the fuel injectors when installing the fuel delivery pipe.
Check that the fuel injector rotates smoothly.
If the fuel injector does not rotate, replace the O-ring.
Tighten the 2 bolts to the specified torque.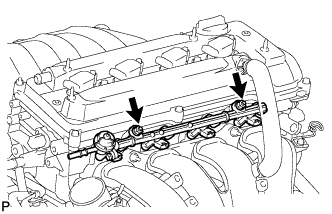
- Torque:
- 20 N*m{ 204 kgf*cm , 15 ft.*lbf }
Connect the 4 fuel injector connectors.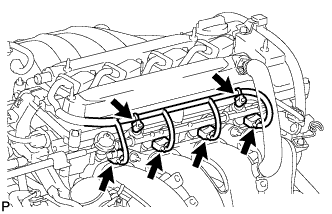
Install the 2 wire harness clamps.
| 7. CONNECT FUEL TUBE |
Connect the fuel main tube.
Push the fuel tube connector until it makes a "click" sound.
Install the fuel pipe clamp.
Install the fuel tube to the fuel hose clamp.
| 8. INSTALL THROTTLE BODY |
Install a new gasket onto the intake manifold.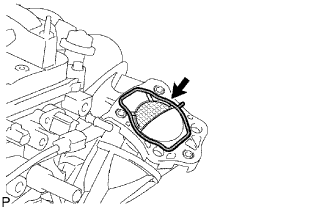
Install the throttle body and fuel pipe support with the 4 bolts.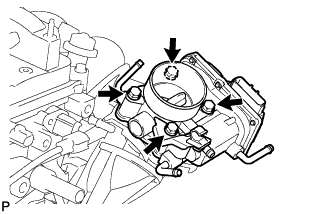
- Torque:
- 30 N*m{ 306 kgf*cm , 22 ft.*lbf }
Connect the fuel tube into the clamp.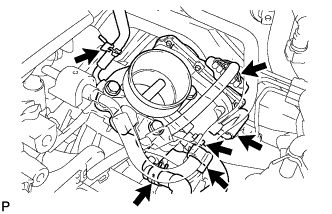
Connect the wire harness clamp.
Connect the throttle position sensor and control motor connector.
Connect the No. 1 throttle body hose to the throttle body.
Connect the No. 2 water by-pass hose to the throttle body.
Connect the water by-pass hose to the throttle body.
Connect the purge line hose to the throttle body.
| 9. INSTALL AIR CLEANER CAP |
Install the air cleaner filter element onto the air cleaner case.
Insert the hinge part of the air cleaner cap into the air cleaner case, and then fasten the 2 hook clamps.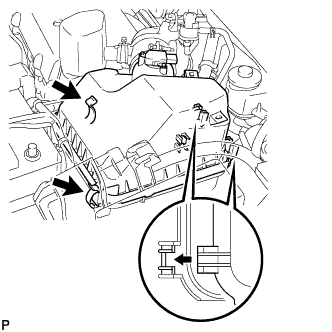
Align the matchmarks of the No. 1 air cleaner hose and throttle body. Then connect the air cleaner hose No. 1 to the throttle body, and push apart the tabs of the No. 1 air cleaner hose clamp.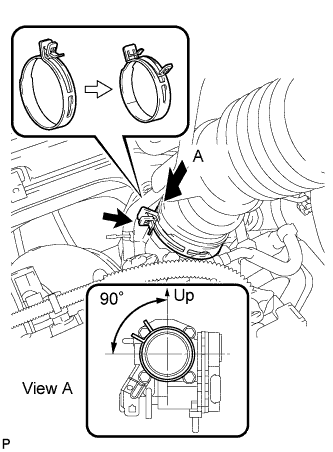
- NOTICE:
- Make sure that the hose clamp is at the correct angle.
Connect the purge line hose to the clamp.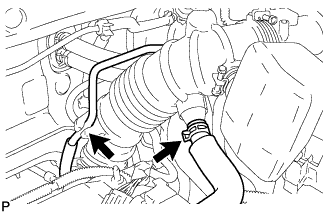
Connect the No. 2 ventilation hose to the air cleaner hose.
Connect the 4 wire harness clamps.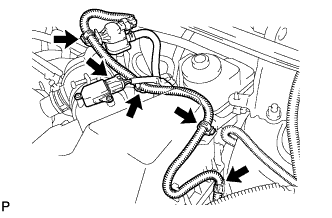
Connect the mass air flow meter connector.
| 10. CONNECT CABLE TO NEGATIVE BATTERY TERMINAL |
| 11. ADD ENGINE COOLANT |
Tighten the radiator drain cock plug by hand.
Tighten the cylinder block drain cock plug.
- Torque:
- 12.7 N*m{ 130 kgf*cm , 10 ft.*lbf }
Add TOYOTA Super Long Life Coolant (SLLC) to the radiator reservoir filler opening.
Continue adding TOYOTA SLLC until it is filled to the B line at the base of the reservoir's filler neck.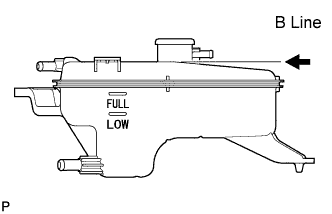
- HINT:
- The B line is the lower edge of the inner wall of the filler neck.
- Standard capacity:
Item
Specified Condition
A/T
6.4 liters (6.8 US qts, 5.6 Imp. qts)
M/T
6.3 liters (6.7 US qts, 5.5 Imp. qts)
- HINT:
- TOYOTA vehicles are filled with TOYOTA SLLC at the factory. In order to avoid damage to the engine cooling system and other technical problems, only use TOYOTA SLLC or similar high quality ethylene glycol based non-silicate, non-amine, non-nitrite, non-borate coolant with long-life hybrid organic acid technology (coolant with long-life hybrid organic acid technology consists of a combination of low phosphates and organic acids).
- TOYOTA vehicles are filled with TOYOTA SLLC at the factory. In order to avoid damage to the engine cooling system and other technical problems, only use TOYOTA SLLC or similar high quality ethylene glycol based non-silicate, non-amine, non-nitrite, non-borate coolant with long-life hybrid organic acid technology (coolant with long-life hybrid organic acid technology consists of a combination of low phosphates and organic acids).
- NOTICE:
- Never use water as a substitute for engine coolant.
Press the No. 1 and No. 2 radiator hoses several times by hand, and then check the level of the coolant. If the coolant level drops below the B line, add TOYOTA SLLC to the B line.
Install the radiator reservoir cap.
Start the engine and warm it up until the cooling fan operates. While the cooling fan operates, circulate the coolant for several minutes.
Set the air conditioning as follows while warming up the engine.
Item
Specified Condition
Manual Air Conditioning System
Fan speed: Any setting except OFF
Temperature: Toward WARM
Air conditioning switch: OFF
Automatic Air Conditioning System
Temperature: Toward MAX
Air conditioning switch: OFF
Maintain the engine speed at 2,000 to 2,500 rpm and warm up the engine until the cooling fan operates.
- NOTICE:
- Make sure that the radiator reservoir still has some coolant in it.
- Pay attention to the needle of the water temperature meter. Make sure that the needle does not show an abnormally high temperature.
- If there is not enough coolant, the engine may burn out or overheat.
- Immediately after starting the engine, if the radiator reservoir does not have any coolant, perform the following: 1) stop the engine, 2) wait until the coolant has cooled down, and 3) add coolant until the coolant is filled to the B line.
- Run the engine at 2,000 rpm until the coolant level has stabilized.
- Make sure that the radiator reservoir still has some coolant in it.
Press the No. 1 and No. 2 radiator hoses several times by hand to bleed air.
- CAUTION:
-
When pressing the radiator hoses:
- Wear protective gloves.
- Be careful as the radiator hoses are hot.
- Keep your hands away from the radiator fan.
- Wear protective gloves.
Stop the engine and wait until the coolant cools down to ambient temperature.
Check that the coolant level is between the FULL and LOW line.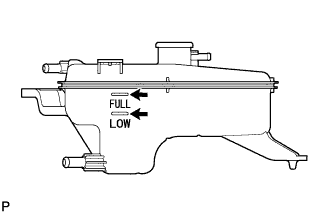
If the coolant level is below the LOW line, repeat all of the procedures above.
If the coolant level is above the FULL line, drain coolant so that the coolant level is between the FULL and LOW line.
| 12. CHECK FOR ENGINE COOLANT LEAKAGE |
Remove the radiator reservoir cap.
- CAUTION:
- To avoid the danger of being burned, do not remove the radiator reservoir cap while the engine and radiator are still hot. Thermal expansion will cause hot engine coolant and steam to blow out from the radiator reservoir.
Fill the radiator reservoir with coolant, and then attach a radiator cap tester.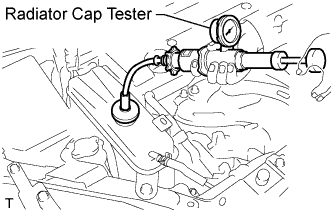
Warm up the engine.
Pump the radiator cap tester to 118 kPa (1.2 kgf/cm2, 17.1 psi), and then check that the pressure does not drop.
If the pressure drops, check the hoses, radiator and water pump for leakage.
If there are no signs of external coolant leaks, check the heater core, cylinder block and head.
Reinstall the radiator cap.
| 13. CHECK FOR FUEL LEAKAGE |
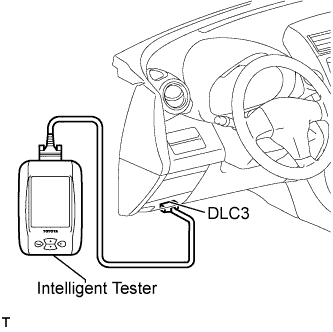 |
Make sure that there are no fuel leaks after performing maintenance on the fuel system.
Connect the intelligent tester to the DLC3.
Turn the ignition switch on (IG), and push the intelligent tester main switch ON.
- NOTICE:
- Do not start the engine.
Select the Active Test mode on the intelligent tester.
- HINT:
- Refer to the intelligent tester operator's manual for further details.
Check that there are no leaks from the fuel system.
Turn the ignition switch off.
Disconnect the intelligent tester from the DLC3.
| 14. INSTALL NO. 1 ENGINE COVER |
Install the cover with the 2 nuts.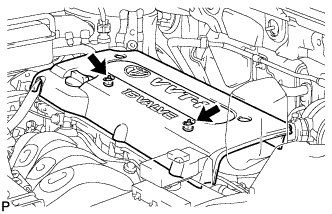
- Torque:
- 7.0 N*m{ 71 kgf*cm , 62 in.*lbf }