P0400 Exhaust Gas Recirculation Flow
Diagnostic trouble codes · Vehicles built from Jan 2007
Versions by build date: Nov 2005 – Dec 2006 from Jan 2007
DESCRIPTION
The EGR system recirculates exhaust gases back to the combustion chambers. The recirculated gas is intermixed with the intake air to slow combustion speed and keep the combustion temperature down.This helps reduce NOx emissions.
In order to increase EGR circulation efficiency, the ECM adjusts the lift amount of the EGR valve and the throttle valve angle.
| DTC Detection Condition |
DTC Detection Drive Pattern |
Trouble Area |
| The target and actual positions of the EGR valve are different for 30 seconds or more (1 trip detection logic). |
After warming up engine and idling for 60 seconds, maintain engine speed at 2500 rpm for 40 seconds, drive vehicle, and perform engine brake deceleration by fully closing accelerator when engine speed is 2000 rpm or more. |
|
| DTC Detection Condition |
DTC Detection Drive Pattern |
Trouble Area |
| Mass air flow rate is not changed when turning on the electric EGR control valve while decelerating (1 trip detection logic). |
Decelerate from a speed of 80 km/h (50 mph) or more (fully closing accelerator for approximately 5 seconds). |
|
| DTC No. |
Data List |
| P0400 (EGR valve malfunction) P0400 (Flow malfunction) |
|
- HINT:
- Actual EGR valve opening percentage can be interpreted by applying the following formula.
Actual EGR valve opening percentage =
37.04 (%/V) x [EGR Close Lrn. Val. (V) - (EGR Lift Sensor Output (%) x 5/100 (V/%)]
- Actual EGR valve opening percentage: Fully closed = 0%, Fully open = 100%.
- If DTC P0400 is stored, the following symptoms may appear:
- Stuck closed malfunction
- Intake booming noise
- Slight combustion noise
- Stuck open malfunction
- Black smoke
- Lack of power
- Vibration at engine stop
- Actual EGR valve opening percentage can be interpreted by applying the following formula.
MONITOR DESCRIPTION
Either of the following conditions is met:- EGR valve malfunction
- When the target and actual positions of the EGR valve are different, the ECM interprets this as a malfunction of the EGR valve and illuminates the MIL (1 trip detection logic).
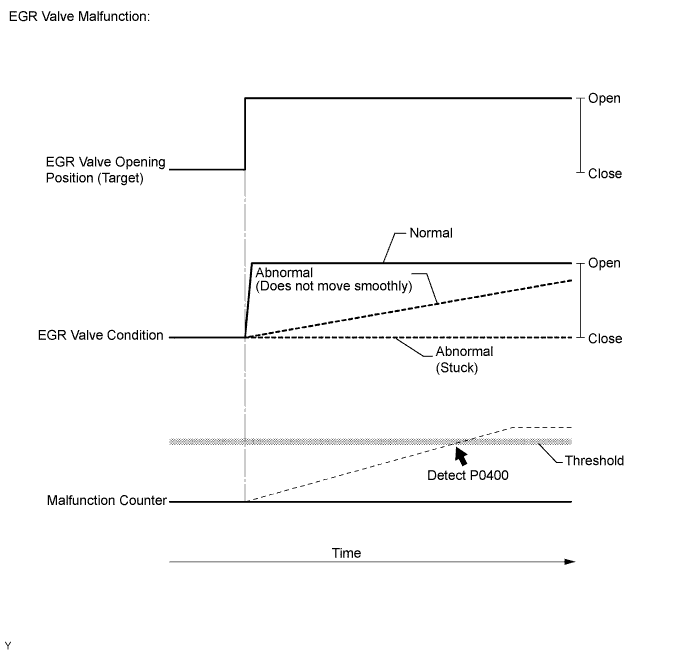

- Flow malfunction
- If the EGR valve is forcibly operated but the intake air amount does not vary, the ECM determines that the EGR valve is malfunctioning. The ECM then illuminates the MIL (1 trip detection logic).
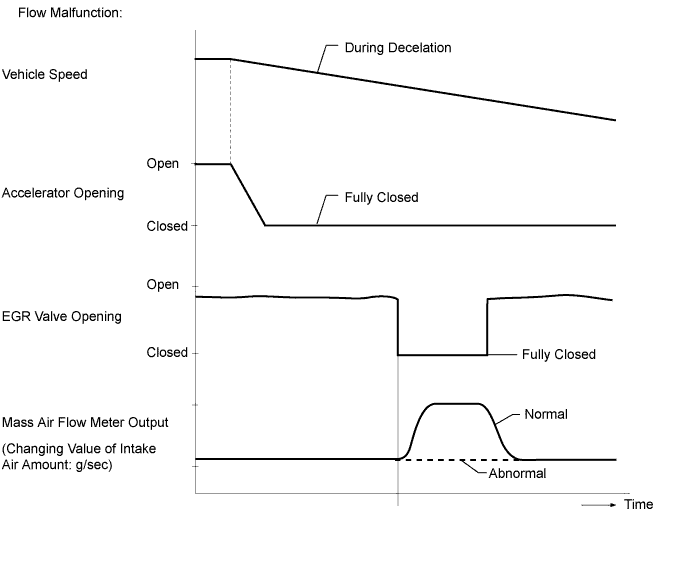
- If the EGR valve is forcibly operated but the intake air amount does not vary, the ECM determines that the EGR valve is malfunctioning. The ECM then illuminates the MIL (1 trip detection logic).
WIRING DIAGRAM
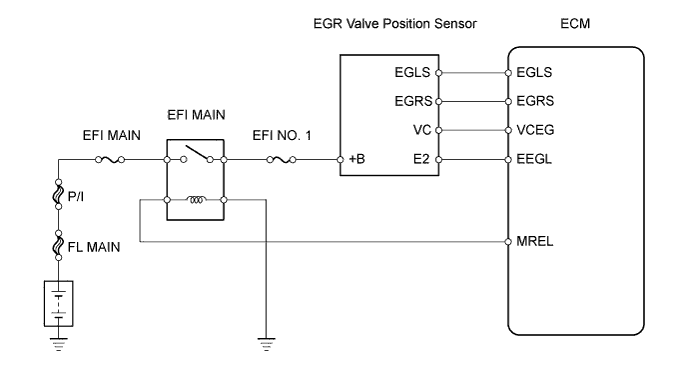
INSPECTION PROCEDURE
- NOTICE:
- When cleaning the EGR valve or the diesel throttle body, use a piece of cloth soaked with cleaning solvent. Spraying the solvent directly onto these parts or soaking the parts in the solvent may damage the parts.
- HINT:
- If a large amount of carbon deposits exists in the EGR valve assembly, the following parts possibly also have deposits inside: The intake manifold, diesel throttle body assembly, catalyst, and other parts related to the exhaust gas.
- Data List items related to P0400 are as follows:
- If a large amount of carbon deposits exists in the EGR valve assembly, the following parts possibly also have deposits inside: The intake manifold, diesel throttle body assembly, catalyst, and other parts related to the exhaust gas.
| Tester Display |
Measurement Item/Range |
Normal Condition |
Type |
Cause of Out of Range |
| MAF |
Air flow rate from Mass Air Flow (MAF) meter: Min.: 0 g/sec., Max.: 200 g/sec. |
- |
Sensor output (MAF meter) |
|
| Symptoms when out of range: Rough idling Hesitation Poor acceleration | ||||
Diagnostic Note
| ||||
| Tester Display |
Measurement Item/Range |
Normal Condition |
Type |
Cause of Out of Range |
| MAP |
Absolute pressure inside intake manifold: Min.: 0 kPa, Max.: 255 kPa |
- |
Sensor output (manifold absolute pressure sensor) |
|
| Symptoms when out of range: Lack of power | ||||
Diagnostic Note
| ||||
| Tester Display |
Measurement Item/Range |
Normal Condition |
Type |
Cause of Out of Range |
| Target Booster Pressure |
Target boost pressure: Min.: 0 kPa, Max.: 320 kPa |
Idling after engine warmed up and vehicle is under normal atmospheric pressure: 89 to 100 kPa |
Calculated value by ECM |
- |
| Symptoms when out of range: - | ||||
Diagnostic Note
| ||||
| Tester Display |
Measurement Item/Range |
Normal Condition |
Type |
Cause of Out of Range |
| Atmosphere Pressure |
Atmospheric pressure value: Min.: 50 kPa, Max.: 120 kPa |
Actual atmospheric pressure |
Sensor output (atmospheric pressure sensor (built into ECM)) |
|
| Symptoms when out of range: - | ||||
Diagnostic Note
| ||||
| Tester Display |
Measurement Item/Range |
Normal Condition |
Type |
Cause of Out of Range |
| Coolant Temp |
Engine coolant temperature: Min.: -40°C, Max.: 140°C |
After warming up engine: 75 to 90°C (167 to 194°F) |
Sensor output (engine coolant temperature sensor) |
|
| Symptoms when out of range: Difficult starting when engine is cold Rough idle Black smoke Lack of power | ||||
Diagnostic Note
| ||||
| Tester Display |
Measurement Item/Range |
Normal Condition |
Type |
Cause of Out of Range |
| EGR Lift Sensor Output |
EGR valve lift position: Min.: 0%, Max.: 100% |
Fully closed: 80 +/- 10% Fully opened: below 26 +/- 10% |
Calculated from EGR valve opening position sensor |
|
| Symptoms when out of range: - | ||||
Diagnostic Note
| ||||
| Tester Display |
Measurement Item/Range |
Normal Condition |
Type |
Cause of Out of Range |
| EGR Close Lrn. Val. |
EGR fully closed position learned value Min.: 0 V, Max.: 5 V |
4.0 +/- 0.5 V |
EGR valve position sensor value when EGR valve fully closed |
- |
| Symptoms when out of range: - | ||||
Diagnostic Note
| ||||
| Tester Display |
Measurement Item/Range |
Normal Condition |
Type |
Cause of Out of Range |
| EGR Close Lrn. Status |
EGR valve fully closed position learning status: OK or NG |
OK |
- |
- |
| Symptoms when out of range: - | ||||
Diagnostic Note
| ||||
| Tester Display |
Measurement Item/Range |
Normal Condition |
Type |
Cause of Out of Range |
| Target EGR Valve Pos. |
EGR valve target opening angle: Min.: 0%, Max.: 100% |
- |
ECU-calculated value based on sensors (MAF meter, manifold absolute pressure sensor, intake air temperature (built into MAF meter), etc.) |
- |
Symptoms when out of range:
| ||||
Diagnostic Note
| ||||
| Tester Display |
Measurement Item/Range |
Normal Condition |
Type |
Cause of Out of Range |
| Injection Feedback Val. #1 Injection Feedback Val. #2 Injection Feedback Val. #3 Injection Feedback Val. #4 |
Injection volume correction for cylinder #1 to #4: Min.: -10 mm3/st, Max.: 10 mm3/st |
Idling: -3.0 to 3.0 mm3/st |
Learned value |
|
| Symptoms when out of range: Rough idling Black smoke White smoke, Poor driveability Lack of power Abnormal combustion noise Difficult to start | ||||
Diagnostic Note
| ||||
| Tester Display |
Measurement Item/Range |
Normal Condition |
Type |
Cause of Out of Range |
| Injection Volume |
Injection volume: Min.: 0 mm3/st, Max.: 100 mm3/st |
- |
Calculated value by ECM |
- |
| Symptoms when out of range: - | ||||
Diagnostic Note
| ||||
| 1. CHECK ANY OTHER DTC OUTPUT (IN ADDITION TO DTC P0400) |

Connect the intelligent tester to the DLC3.
Turn the ignition switch to ON and turn the tester on.
Enter the following menus: Powertrain / Engine and ECT / DTC.
Read Current DTCs.
Result Display (DTC Output)
Proceed to
P0400
A
P0400 and other DTCs output
B
- HINT:
- DTC P0400 (flow malfunction) may be stored as a result of mass air flow meter malfunctions. If the mass air flow meter is malfunctioning, the vehicle will have poor acceleration and DTCs related to the mass air flow meter may be stored.
- If the EGR valve circuit has opens or shorts, DTC P0405 or P0406 is stored.
- DTC P0400 (flow malfunction) may be stored as a result of mass air flow meter malfunctions. If the mass air flow meter is malfunctioning, the vehicle will have poor acceleration and DTCs related to the mass air flow meter may be stored.
|
|
||||

| A | |
 |
| 2. PERFORM ACTIVE TEST USING INTELLIGENT TESTER (CONTROL THE EGR STEP POSITION) |
Connect the intelligent tester to the DLC3.
Turn the ignition switch to ON and turn the tester on.
Enter the following menus: Powertrain / Engine and ECT / DTC.
Record the stored DTC and Freeze Frame Data.
Clear the DTC.
Enter the following menus: Powertrain / Engine and ECT / Active Test / Control the EGR Step Position / Data List / EGR Lift Sensor Output.
When closing the EGR valve using the Control the EGR Step Position of the Active Test function, check that EGR Lift Sensor Output smoothly changes to the set opening angle.
- OK:
- Value smoothly changes to within +/- 10% of set opening angle.
- NOTICE:
- When the engine is running, the Active Test of [Control the EGR Step Position] can operate the EGR valve only to the closing side.
- When the engine is not running (ignition switch ON), the Active Test can operate the EGR valve to both the open and closing sides.
- HINT:
- Under normal conditions, the EGR Lift Sensor Output and Target EGR Position are indicated on the tester as follows.
Target EGR Position
EGR Valve Condition
EGR Lift Sensor Output
(Sensor Output Voltage)
0%
Fully closed
80.0 +/- 10%
(4.0 +/- 0.5 V)
100%
Fully open
26.0 +/- 10%
(1.3 +/- 0.5 V)
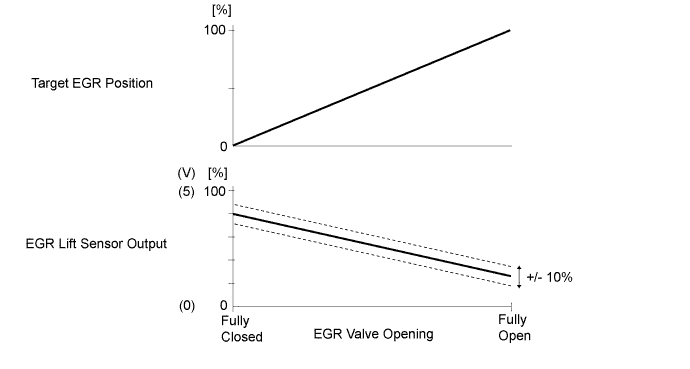
- The EGR Lift Sensor Output indicates the sensor output voltage (maximum of 5 V) as a percentage. EGR Lift Sensor Output = (Sensor output voltage/5) x 100
The sensor output voltage is 4.0 +/- 0.5 V when the EGR valve is fully closed, and is 1.3 +/- 0.5 V when the valve fully opens.
- If the battery voltage becomes low (below 12V) when the above Active Test is performed while the engine is not running, the EGR valve may not be closed fully due to low voltage.
- Under normal conditions, the EGR Lift Sensor Output and Target EGR Position are indicated on the tester as follows.
|
|
||||

| OK | |
|
| 3. READ VALUE USING INTELLIGENT TESTER (EGR CLOSE LEARN VAL. AND EGR CLOSE LRN. STATUS) |
Turn the ignition switch to ON.
Turn the ignition switch to off, and wait for 5 seconds or more.
Connect the intelligent tester to the DLC3.
Turn the ignition switch to ON and turn the tester on.
Enter the following menus: Powertrain / Engine and ECT / Data List / EGR Close Learn Val. and EGR Close Lrn. Status.
Read the values.
- Standard:
- EGR Close Lrn. Status is OK
- HINT:
- When the EGR Close Lrn. Status is NG, the value of the EGR Close Learn Val. is unavailable.
- When the EGR Close Lrn. Status is NG, the ECM suspends the learn value update. The value indicated on the tester is the past data when the EGR valve works properly or the initialized data (4.0 V) remaining from the battery cable was reconnected. i.e., the value is not current data.
- As the EGR valve opens, the sensor output voltage decreases.
- The EGR lift sensor output is indicated as a percentage on the tester. When the valve is closed, the tester indicates a high percentage. The EGR lift sensor output voltage is between 0 to 5 V. When the EGR valve is fully closed, the sensor output is 4.0 +/ - 0.5 V under normal conditions.
- When the EGR Close Lrn. Status is NG, the value of the EGR Close Learn Val. is unavailable.
|
|
||||
| OK | |
|
| 4. CHECK FOR EXHAUST GAS LEAKS |
Check for exhaust gas leaks.
Result Result
Proceed to
No leaks
A
Exhaust gas leaks out from exhaust system
B
|
|
||||
| A | |
|
| 5. CHECK AIR INTAKE SYSTEM (AIR LEAKS AND BLOCKAGES) |
Check for air leaks and blockages in the air intake system.
Result Result
Proceed to
No leaks and blockages in the intake system
A
Leaks or blockages exist in the air intake system
B
- HINT:
- Check for abnormal disconnection, pipe and hose squashing, and any damages in the intake system.
- Using your hand, check whether the pipes and hoses in the intake system are securely connected.
- Applying soapy water and revving the engine, air leaks from the intake system can be checked.
- Check for any modifications in the intake system made by the user.
- Check for abnormal disconnection, pipe and hose squashing, and any damages in the intake system.
|
|
||||
|
|
||||
| 6. REPAIR EXHAUST GAS LEAK |
Repair or replace the malfunctioning part in the exhaust system.
|
|
||||
| 7. REPAIR OR REPLACE AIR INTAKE SYSTEM |
Repair or replace the malfunctioning part in the air intake system.
| NEXT | |
|
| 8. CHECK WHETHER DTC OUTPUT RECURS (DTC P0400) |
Turn the ignition switch to ON.
Turn the ignition switch to off, and wait for 5 seconds or more.
Connect the intelligent tester to the DLC3.
Turn the ignition switch to ON and turn the tester on.
Clear DTCs.
Start the engine and warm it up.
Drive the vehicle with a stop-and-go city drive pattern for more than 15 minutes.
Enter the following menus: Powertrain / Engine and ECT / DTC.
Read DTCs.
Result Display (DTC Output)
Proceed to
P0400
A
No output
B
|
|
||||
| A | |
|
| 9. INSPECT EGR VALVE ASSEMBLY |
Remove the EGR valve assembly.
Check that the EGR valve is fully closed.
- OK:
- The EGR valve fully closes.
- HINT:
- Hold the EGR valve to a light and confirm that the valve contacts with the valve seat securely.
- If light leaks out from the valve, the EGR valve is not fully closed.
- If the EGR valve cannot close fully, hesitation or poor acceleration almost certainly has occurred while driving the vehicle.
- Hold the EGR valve to a light and confirm that the valve contacts with the valve seat securely.
|
|
||||
|
|
||||
| 10. REPLACE EGR VALVE ASSEMBLY |
Replace the EGR valve assembly (Click here).
|
|
||||
| 11. CHECK HARNESS AND CONNECTOR (EGR VALVE - ECM) |
Disconnect the B54 sensor connector.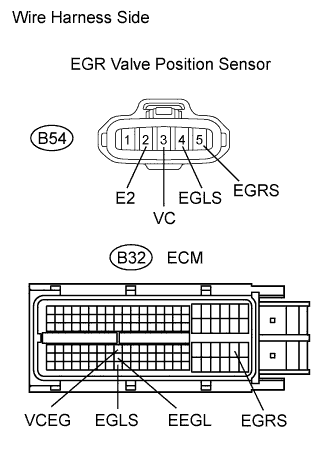
Disconnect the B32 ECM connector.
Measure the resistance of the wire harness side connectors.
- Standard resistance:
Tester Connection
Specified Condition
B54-3 (VC) - B32-72 (VCEG)
Below 1 Ω
B54-4 (EGLS) - B32-118 (EGLS)
Below 1 Ω
B54-5 (EGRS) -B32-85 (EGRS)
Below 1 Ω
B54-2 (E2) - B32-95 (EEGL)
Below 1 Ω
B54-3 (VC) or B32-72 (VCEG) - Body ground
10 kΩ or higher
B54-4 (EGLS) or B32-118 (EGLS) - Body ground
10 kΩ or higher
B54-5 (EGRS) or B32-85 (EGRS) - Body ground
10 kΩ or higher
Reconnect the EGR valve position sensor connector.
Reconnect the ECM connector.
|
|
||||
| OK | |
|
| 12. CHECK HARNESS AND CONNECTOR (EGR VALVE - INTEGRATION RELAY) |
Inspect EFI NO. 1 fuse.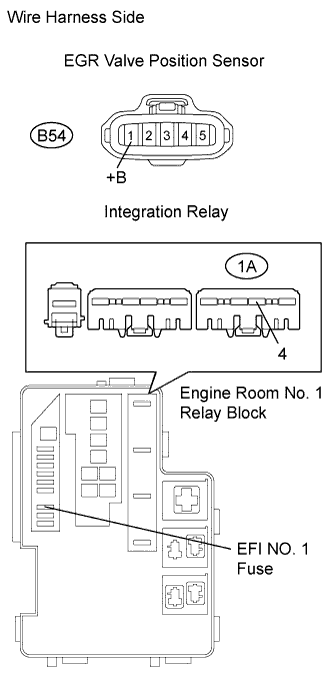
Remove the EFI NO. 1 fuse from the engine room No. 1 relay block.
Measure the resistance of the fuse.
- Standard resistance:
- Below 1 Ω
Reinstall the EFI NO. 1 fuse.
Check the wire harness between the EGR valve position sensor and integration relay.
Disconnect the B54 EGR valve position sensor connector.
Remove the integration relay from the engine room No. 1 relay block.
Measure the resistance of the wire harness side connectors.
- Standard resistance:
Tester Connection
Specified Condition
B54-1 (+B) - 1A-4
Below 1 Ω
B54-1 (+B) or 1A-4 - Body ground
10 kΩ or higher
Reconnect the EGR valve position sensor connector.
Reinstall the integration relay.
|
|
||||
| OK | |
|
| 13. REPLACE EGR VALVE ASSEMBLY |
Replace the EGR valve assembly (Click here).
| NEXT | |
|
| 14. CHECK FOR DEPOSIT (EGR PASSAGE) |
Check the deposit conditions in the EGR valve assembly and the EGR passage of the intake manifold.
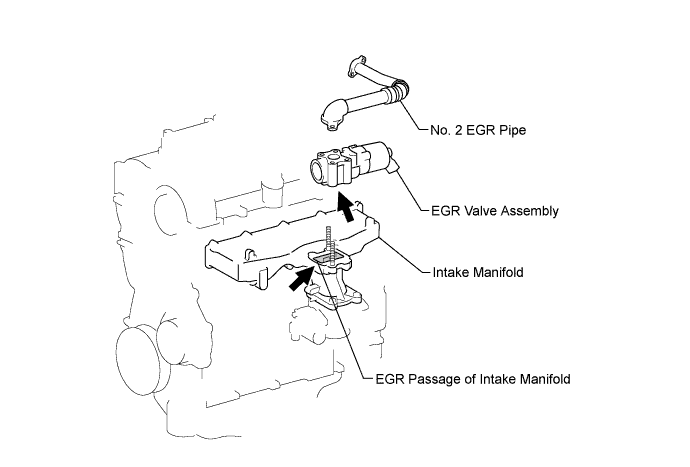
Result Result
Proceed to
No deposit
A
Dry carbon exists
B
Wet carbon exists
C
- HINT:
- Dry carbon: Carbon that is dried, not shiny, and peels easily.
- Wet carbon: Tar carbon that is sticky, or shiny carbon that is hard and smooth to the touch.
- If wet carbon deposit exists in the EGR valve and EGR passage, an EGR valve slow response malfunction may occur in the EGR valve operation due to sticky carbon deposit. In this case, hesitation or poor acceleration will occur while driving the vehicle.
- Dry carbon: Carbon that is dried, not shiny, and peels easily.
|
|
||||
|
|
||||
|
|
||||
| 15. CHECK FOR DEPOSIT (AMOUNT OF DEPOSIT) |
Measure the amount (thickness) of carbon deposits in the EGR passage using a ruler or other suitable tool.
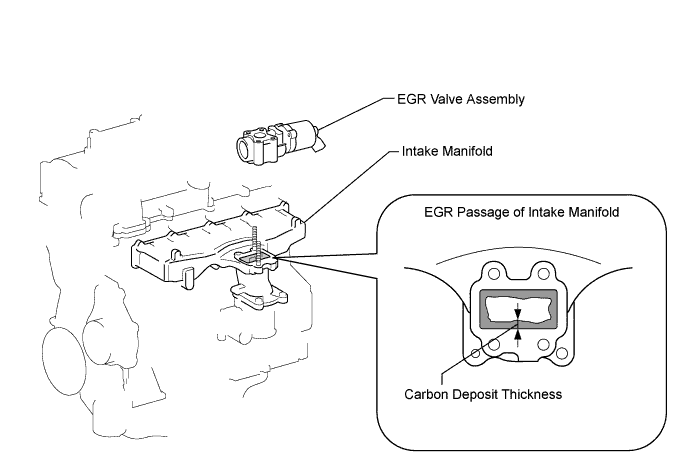
Result Result
Proceed to
Less than 3 mm at the thickest part
A
3 mm or more at the thickest part
B
|
|
||||
| A | |
|
| 16. REMOVE DEPOSIT (CLEAN EGR PASSAGE) |
Remove the intake manifold, EGR valve assembly, and No. 2 EGR pipe.
Remove the deposits from those of parts and clean them.
- NOTICE:
- When cleaning the EGR valve and the diesel throttle body, use a piece of cloth soaked with cleaning solvent. Spraying the solvent directly onto these parts or soaking the parts in the solvent may damage the parts.
- Extreme care must be taken to prevent the removed deposits from falling into the engine unit during cleaning.
- When cleaning the EGR valve and the diesel throttle body, use a piece of cloth soaked with cleaning solvent. Spraying the solvent directly onto these parts or soaking the parts in the solvent may damage the parts.
- HINT:
- Remove the intake manifold from the cylinder head when it has to be cleaned.
- Do not leave any deposits in the EGR valve assembly when cleaning the valve.
- Remove the intake manifold from the cylinder head when it has to be cleaned.
Reinstall the intake manifold, EGR valve assembly, and No. 2 EGR pipe.
| NEXT | |
|
| 17. CHECK WHETHER DTC OUTPUT RECURS (DTC P0400) |
Turn the ignition switch to ON.
Turn the ignition switch to off, and wait for 5 seconds or more.
Connect the intelligent tester to the DLC3.
Turn the ignition switch to ON and turn the tester on.
Clear DTCs.
Start the engine and warm it up.
Drive the vehicle with a stop-and-go city drive pattern for more than 15 minutes.
Enter the following menus: Powertrain / Engine and ECT / DTC.
Read DTCs.
Result Display (DTC Output)
Proceed to
P0400
A
No output
B
|
|
||||
| A | |
|
| 18. REPLACE EGR VALVE ASSEMBLY |
Replace the EGR valve assembly (Click here).
- HINT:
- If the EGR valve assembly has already been replaced in step 10 or step 13, proceed to next step.
|
|
||||
| 19. REPAIR OR REPLACE HARNESS OR CONNECTOR |
Repair or replace any malfunctioning harnesses or connectors.
|
|
||||
| 20. REMOVE DEPOSIT (CLEAN EGR PASSAGE) |
Remove the intake manifold, diesel throttle body assembly and the No. 2 EGR pipe.
Remove the deposits from those parts and clean them.
Remove and clean the No. 1 EGR pipe and EGR cooler if deposits more than 3 mm thick exist in the EGR port of the cylinder head.
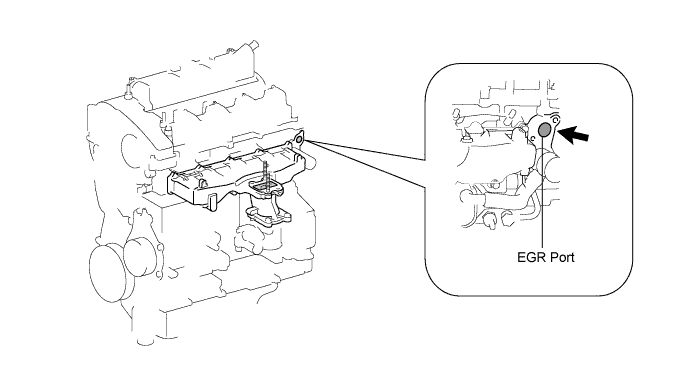
- NOTICE:
- When cleaning the EGR valve and the diesel throttle body, use a piece of cloth soaked with cleaning solvent. Spraying the solvent directly onto these parts or soaking the parts in the solvent may damage the parts.
- Extreme care must be taken to prevent the removed deposits from falling into the engine unit during cleaning.
- When cleaning the EGR valve and the diesel throttle body, use a piece of cloth soaked with cleaning solvent. Spraying the solvent directly onto these parts or soaking the parts in the solvent may damage the parts.
- HINT:
- Remove the intake manifold from the cylinder head when it has to be cleaned.
- Do not leave any deposits in the EGR valve assembly when cleaning the valve.
- Remove the intake manifold from the cylinder head when it has to be cleaned.
Reinstall the intake manifold, diesel throttle body assembly, No. 1 EGR pipe, No. 2 EGR pipe, and EGR cooler assembly.
| NEXT | |
|
| 21. REPLACE EGR VALVE ASSEMBLY |
Replace the EGR valve assembly (Click here).
- HINT:
- If the EGR valve assembly has already been replaced in step 10 or step 13, proceed to next step.
| NEXT | |
|
| 22. CHECK FOR CAUSE OR BLACK SMOKE |
- HINT:
- If causes of black smoke emissions are in the engine, the exhaust system easily clogs with carbon deposits. Check for black smoke emissions in the exhaust gas, and repair the cause of black smoke, if it is necessary.
Start the engine and warm it up.
Turn the ignition switch off.
Connect the intelligent tester to the DLC3.
Read the values of the Data List items when the engine is under the following conditions.
- Ignition switch ON (Engine not running).
- Idling (after 1 minute or more elapsed)
- Engine maintained at 4500 rpm with no load
- Ignition switch ON (Engine not running).
Take snapshots with the intelligent tester for each engine condition above and analyze the cause of black smoke emission referring the table below.
Engine Condition
Data List Item
Standard
Diagnostic Note
Ignition switch ON
MAP
Difference between MAP and Atmosphere Pressure is +/- 10 kPa
If the difference exceeds the standard range, the sensor that indicates the value most different from the actual atmospheric pressure is malfunctioning.
Atmosphere Pressure
Injector Compensation Code*1
The injector compensation codes stored in the ECM match the injector compensation codes of the installed fuel injectors.
If the codes do not match, input the correct codes referring to "Registration" in the appropriate repair manual.
Idling
Injection Feedback Val #1
Injection Feedback Val #2
Injection Feedback Val #3
Injection Feedback Val #4
-3.0 to 3.0 mm3/st
The injector for which the value is out of standard range is malfunctioning.
Injection Volume
Less than 10 mm3/st
If the value of the Injection
Volume is 10 mm3/st or more and the values of all the Injector Feedback Val. (#1 to #4) are within standard range, replace the fuel injectors for all cylinders.
Coolant Temp
- 75°C (167°F) or more: After warming up the engine
- When the engine is stopped and left overnight, the engine coolant temperature should be nearly equal to the intake air temperature.
If the value is out of standard range, check the engine coolant temperature sensor circuit.
4500 rpm with no load
MAP
and
Target Booster Pressure
Difference between MAP and Target Booster Pressure is +/- 15 kPa or less
If the values are out of standard range, check the following items. - Intake system (leaks or blockages)
- Turbocharger sub-assembly
- Mass air flow meter circuit
- Manifold absolute pressure sensor circuit
Corrected MAF value
*2
1AD: 95 +/- 5 g/sec.
2AD: 105 +/- 5 g/sec.
When the following conditions are met:- Engine speed is 4500 rpm
- MAP is 145 kPa
- *1: Check the Injector Compensation Codes by entering the following menus: Powertrain / Engine and ECT / Utility / Injector Compensation.
- HINT:
- *2: The MAF value should be corrected by applying the following formula.
- MAF (g/sec.) x 4500 / Engine Speed (rpm) x 145 / MAP (kPa)
- Example data (for 2AD engines):
- Engine speed: 4350 rpm, MAP: 142.1 kPa, MAF: 96.7
- 96.7 x 4500 / 4350 x 145 / 142.1 = 102.08
- The calculated value of 102.08 is within standard range of 105 +/- 5 g/sec.
- If the value calculated by applying the above formula is higher than standard, leaks may be between the turbocharger and the intake manifold.
- If the value calculated by applying the above formula is lower than standard, leaks may be between the air cleaner and the turbocharger.
- *2: The MAF value should be corrected by applying the following formula.
- 75°C (167°F) or more: After warming up the engine
Check the vacuum hose connection (manifold absolute pressure sensor).
Check for air leaks in the intake pipes and hoses between the turbocharger and the intake manifold.
Check for air leaks in the intake manifold.
Check the turbocharger sub-assembly.
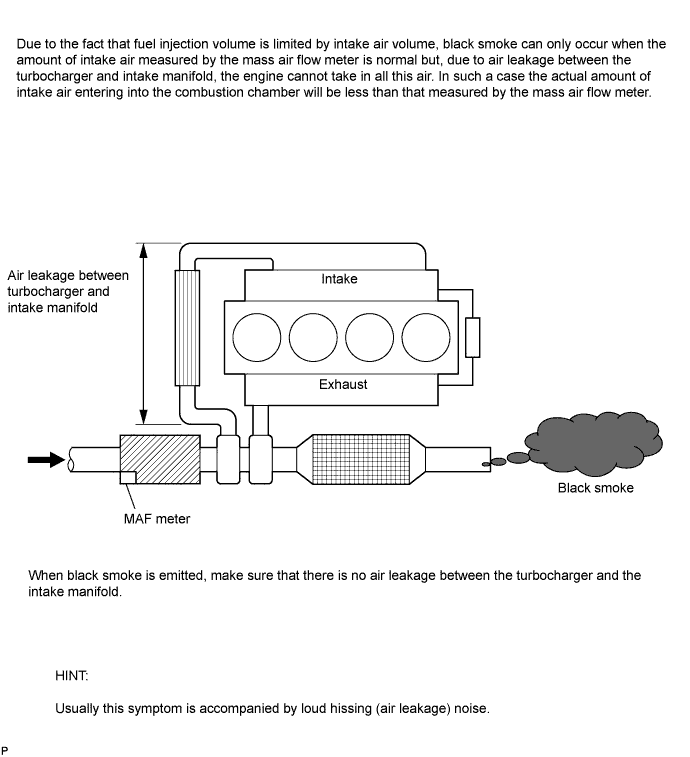
If any malfunctions are found, repair or replace them.
|
|
||||
| 23. CHECK WHETHER DTC OUTPUT RECURS (DTC P0400) |
Turn the ignition switch to ON.
Turn the ignition switch to off, and wait for 5 seconds or more.
Connect the intelligent tester to the DLC3.
Turn the ignition switch to ON and turn the tester on.
Clear DTCs.
Start the engine and warm it up.
Drive the vehicle with a stop-and-go city drive pattern for more than 15 minutes.
Enter the following menus: Powertrain / Engine and ECT / DTC.
Read DTCs.
Result Display (DTC Output)
Proceed to
P0400
A
No output
B
|
|
||||
| A | |
|
| 24. REPLACE ECM |
Replace the ECM.
- NOTICE:
- After replacing the ECM, perform initialization (Click here) and registration (Click here).
| NEXT | |
|
| 25. CHECK WHETHER DTC OUTPUT RECURS (DTC P0400) |
Turn the ignition switch to ON.
Turn the ignition switch to off, and wait for 5 seconds or more.
Connect the intelligent tester to the DLC3.
Turn the ignition switch to ON and turn the tester on.
Clear DTCs.
Start the engine and warm it up.
Drive the vehicle with a stop-and-go city drive pattern for more than 15 minutes.
Enter the following menus: Powertrain / Engine and ECT / DTC.
Read DTCs.
- OK:
- No DTCs are output.
| NEXT | ||
 |
||
| ||