INSTALLATION
Removal / installation · Vehicles built Nov 2005 – Dec 2006
Versions by build date: Nov 2005 – Dec 2006 Jan 2007 – Jul 2007 from Aug 2007
- HINT:
- Use the same procedures for the RH side and LH side.
- The procedures listed below are for the LH side.
- CAUTION:
- Be sure to read the precautionary notices concerning the SRS airbag system before servicing it (Click here).
| 1.
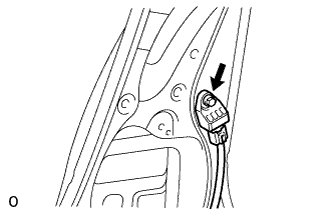
INSTALL SIDE AIRBAG SENSOR ASSEMBLY LH |
 |
Install the sensor with the bolt.
-
Torque:
- 9.0 N*m{
92 kgf*cm
, 82 in.*lbf
}
- NOTICE:
- If the airbag sensor has been dropped, or there are any cracks, dents or other defects in the case, bracket or connector, replace it with a new one.
- When installing the airbag sensor, be careful that the SRS wiring does not interfere with other parts and that it is not pinched between other parts.
Check that there is no looseness in the installation parts of the sensor.
Connect the connector.
| 2.
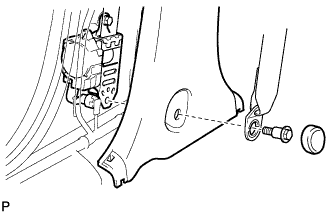
INSTALL CENTER PILLAR GARNISH LOWER LH
|
|
Attach the 2 claws and 2 clips to install the garnish.
Connect the floor anchor with the bolt.
-
Torque:
- 42 N*m{
428 kgf*cm
, 31 ft.*lbf
}
Attach the lap belt outer anchor cover.
| 3.
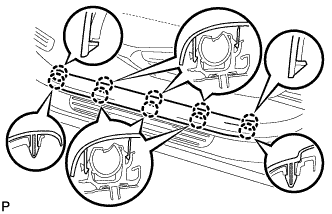
INSTALL REAR DOOR SCUFF PLATE LH (for Short Body)
|
|
- Attach the 10 claws to install the scuff plate.
| 4.
REMOVE REAR DOOR SCUFF PLATE LH
|
|
- Attach the 10 claws to install the scuff plate.
| 5.
INSTALL FRONT DOOR SCUFF PLATE LH
|
|
- Attach the 10 claws to install the scuff plate.
| 6.
CONNECT CABLE TO NEGATIVE BATTERY TERMINAL |
|
| 7.
CHECK SRS WARNING LIGHT |
|
Check the SRS warning light (Click here).