REMOVAL
Removal / installation · Vehicles built from Nov 2005
- HINT:
- Use the same procedures for the RH side and LH side.
- The procedures listed below are for the LH side.
- Use the same procedures for the RH side and LH side.
| 1. DISCONNECT CABLE FROM NEGATIVE BATTERY TERMINAL |

- CAUTION:
- Wait at least 90 seconds after disconnecting the cable from the negative (-) battery terminal to prevent airbag and seat belt pretensioner activation.
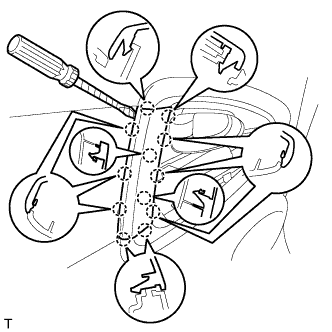
| 2. REMOVE FRONT DOOR LOWER FRAME BRACKET GARNISH LH |
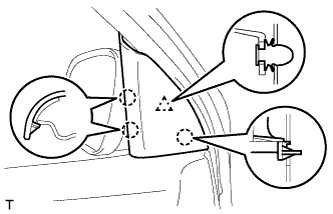  |
Using a screwdriver, detach the clip, 3 claws and remove the garnish.
- HINT:
- Tape the screwdriver tip before use.
| 3. REMOVE FRONT ARMREST BASE PANEL UPPER LH |
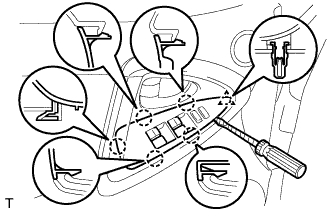 |
Using a screwdriver, detach the clip, 5 claws, and remove the panel (with the switch).
- HINT:
- Tape the screwdriver tip before use.
Disconnect the switch connectors.
for Driver Side: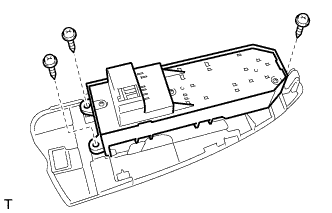
Remove the 3 screws and power window regulator master switch from the panel.- NOTICE:
- Be careful when removing the screws as the switch may fall and become damaged.
for Passenger Side: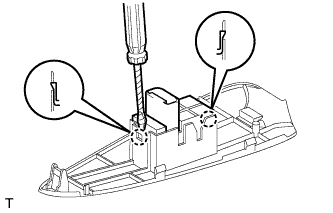
Using a screwdriver, detach the 2 claws and remove the power window regulator switch from the panel.- HINT:
- Tape the screwdriver tip before.
- NOTICE:
- Be careful when detaching the claws as the switch may fall and become damaged.
| 4. REMOVE FRONT DOOR TRIM BOARD SUB-ASSEMBLY LH |
 |
- HINT:
-
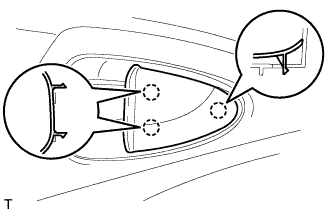
- Tape the screwdriver tip before use.
- Using a screwdriver, detach the 3 claws and remove the door inside handle plug.
- HINT:
- Tape the screwdriver tip before use.
Remove the 3 screws.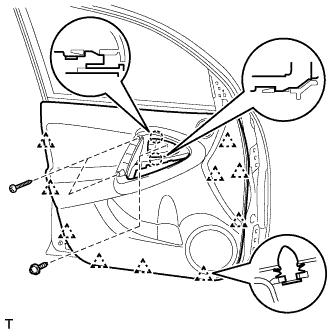
Using a screwdriver, detach the 10 clips, 2 claws and remove the trim.
- HINT:
- Tape the screwdriver tip before use.
- If the screwdriver cannot reach the clips, pull on the lower trim to remove it.
- Tape the screwdriver tip before use.
Using a screwdriver, detach the 7 claws and remove the weatherstrip inner.
- HINT:
- Tape the screwdriver tip before use.
Using a screwdriver, detach the 4 claws and remove the speaker door grille.
- HINT:
- Tape the screwdriver tip before use.
| 5. REMOVE OUTER REAR VIEW MIRROR ASSEMBLY LH |
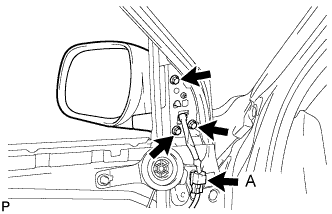 |
Disconnect the mirror connector labeled A.
Remove the 3 screws.
Remove the outer rear view mirror.
| 6. REMOVE FRONT DOOR BELT MOULDING ASSEMBLY LH |
Put protective tape under the belt moulding.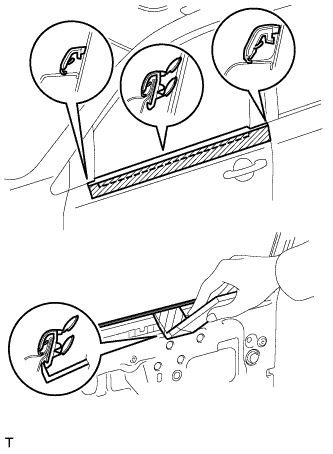
Using a moulding remover, detach the claws to remove the belt moulding as shown in the illustration.
- HINT:
- Tape the remover tip before use.
- NOTICE:
- Be careful when removing the belt moulding as there are claws attached to the front and rear ends of the belt moulding.