ON-VEHICLE INSPECTION
Inspection · Vehicles built from Nov 2005
| CHECK SPEEDOMETER |

Check the operation.
Using a speedometer tester, check that the speedometer reading is within the allowable range shown in the table below. Also, check for proper operation of the odometer.
Reference: km/h Standard indication
Acceptable range
20 km/h
17.5 to 21.5 km/h
40 km/h
38 to 42 km/h
60 km/h
58 to 63 km/h
80 km/h
78 to 84 km/h
100 km/h
98.5 to 104.5 km/h
120 km/h
119 to 125 km/h
140 km/h
139 to 146 km/h
160 km/h
159 to 167 km/h
180 km/h
179 to 188 km/h
200 km/h
199 to 209 km/h
220 km/h
219 to 230 km/h
240 km/h
239 to 251 km/h
Reference: mph Standard indication
Acceptable range
20 mph
20 to 23.0 mph
40 mph
40 to 43.5 mph
60 mph
60 to 64.0 mph
80 mph
80 to 84.5 mph
100 mph
100 to 105.0 mph
120 mph
120 to 125.5 mph
140 mph
140 to 146.0 mph
- CAUTION:
- Do not use worn, underinflated or overinflated tires, as the speedometer reading will be inaccurate.
Check the deflection width of the speedometer indicator.
- Reference:
- Below 0.5 km/h (0.3 mph)
| CHECK OUTPUT SIGNAL OF VEHICLE SPEED SENSOR |
Check the output signal waveform.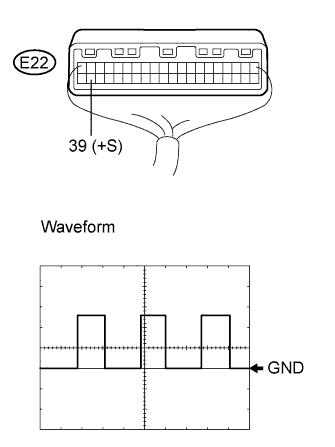

Remove the combination meter, but do not disconnect the connector.
Connect an oscilloscope to terminal E22-39 and the body ground.
Start the engine.
Check the signal waveform according to the condition(s) in the table below.
Item
Condition
Tool setting
5 V/DIV, 20 ms/DIV
Vehicle condition
Driving at approx. 20 km/h (12.4 mph)
- OK:
- Waveform is as shown in the illustration.
- HINT:
- As the vehicle speed increases, the cycle of the signal waveform narrows.
| CHECK TACHOMETER |
Check the operation.
Connect the tune-up test tachometer, and start the engine.
- CAUTION:
- Reversing the connection of the tachometer will damage the transistors and the insides of the diodes.
- When removing or installing the tachometer, be careful not to drop or strike it.
- Reversing the connection of the tachometer will damage the transistors and the insides of the diodes.
Compare the result of the test with the standard indication.
Reference: DC 13.5 V, at 25°C (77°F) Standard indication (rpm)
Acceptable range (rpm)
Data in ( ) are for reference
700
630 to 770
1,000
(900 to 1,100)
2,000
(1,850 to 2,150)
3,000
2,800 to 3,200
4,000
(3,800 to 4,200)
5,000
4,800 to 5,200
6,000
(5,750 to 6,250)
7,000
6,700 to 7,300
8,000
(7,700 to 8,300)
| CHECK FUEL RECEIVER GAUGE |
Disconnect the connector from the sender gauge.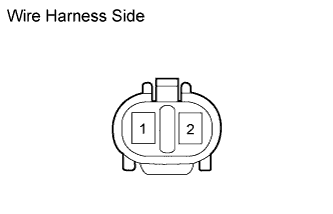
Turn the ignition switch on (IG), then check the position of the receiver gauge needle.
- OK:
- Needle position is on EMPTY.
Connect terminals 1 and 2 on the wire harness side connector of the fuel sender gauge.
Turn the ignition switch on (IG), then check the position of the receiver gauge needle.
- OK:
- Needle position is on FULL.
| CHECK FUEL LEVEL WARNING LIGHT |
Disconnect the connector from the sender gauge.
Turn the ignition switch on (IG), check that the fuel level needle indicates EMPTY and fuel level warning light comes on.
- OK:
- Fuel level warning light comes on.
| CHECK BRAKE WARNING LIGHT |
Inspect the parking brake warning light.
Disconnect the connector from the parking brake switch.
Turn the ignition switch on (IG).
Ground the terminal of the wire harness side connector, and then check that the parking brake warning light illuminates.
- OK:
- Parking brake warning light illuminates.
| CHECK OIL PRESSURE WARNING LIGHT (Except Europe) |
Disconnect the connector from the engine oil pressure switch.
Turn the ignition switch on (IG).
Ground the terminal of the wire harness side connector, then check the engine oil pressure warning light.
- OK:
- Engine oil pressure warning light comes on.