ADJUSTMENT
Removal / installation · Vehicles built Nov 2005 – Jul 2007
Versions by build date: Nov 2005 – Jul 2007 from Aug 2007
| 1. INSPECT TIRES |

Inspect the tires (Click here).
| 2. MEASURE VEHICLE HEIGHT |
  |
- NOTICE:
- Before inspecting the wheel alignment, adjust the vehicle height to the specification.
Press down on the vehicle several times to stabilize the suspension, and measure the vehicle height.
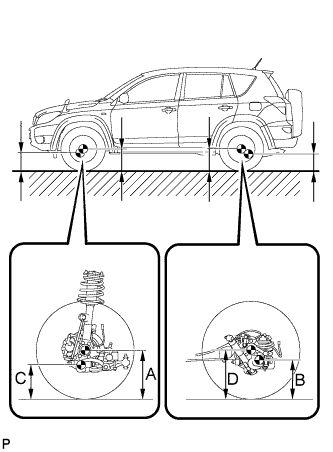
Measure the front vehicle height.
Measure the distance from the ground to the center of the lower suspension arm front mounting bolt.
Measure the rear vehicle height.
Measure the distance from the ground to the center of the body side No. 2 suspension arm mounting bolt.
- Standard vehicle height (unloaded vehicle):
Tire Size
Front C - A
Rear D - B
215/70R16*1
89 mm (3.50 in.)
59 mm (2.32 in.)
225/65R17
235/55R18
97 mm (3.82 in.)
67 mm (2.64 in.)*1
65 mm (2.56 in.)*2
Australia
87 mm (3.43 in.)
55 mm (2.17 in.)
- HINT:
- *1: Europe only
- *2: Other
- If the vehicle height is not as specified, press down on the vehicle several times to stabilize the suspension. Then measure the vehicle height again.
- *1: Europe only
| 3. INSPECT TOE-IN |
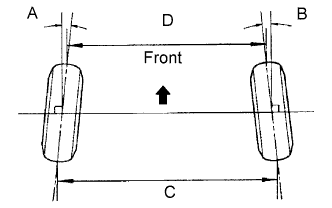 |
- Standard toe-in (unloaded vehicle):
Tire Size
Front A + B
Rear C - D
*215/70R16
225/65R17
235/55R18
A + B: 0°05' +-10' (0.08°+-0.16°)
C - D: 1.0 +-2.0 mm (0.04 +-0.08 in.)
- HINT:
- *: Europe only
- If the toe-in is not as specified, adjust it at the rack ends.
- *: Europe only
| 4. ADJUST TOE-IN |
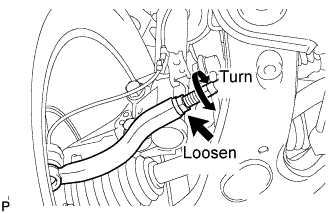 |
Remove the boot clips.
Loosen the tie rod end lock nuts.
Turn the right and left rack ends by an equal amount to adjust the toe-in to the center value.
Make sure that the length of the right and left rack ends are approximately the same.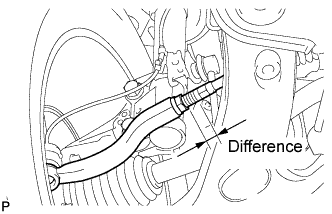
- Standard difference:
- 1.5 mm (0.059 in.) or less
Tighten the tie rod end lock nuts.
- Torque:
- 88 N*m{ 897 kgf*cm , 65 ft.*lbf }
Place the boots on the seats and install the clips.
- HINT:
- Make sure that the boots are not twisted.
| 5. INSPECT WHEEL ANGLE |
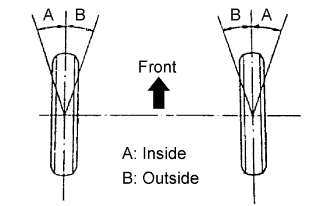 |
Turn the steering wheel to the left and right full lock positions, and measure the turning angle.
- Standard wheel angle (unloaded vehicle):
Tire Size
Inside Wheel Angle
Outside Wheel Angle (Reference)
*215/70R16
38°55' (36°55' to 40°55')
(38.9° {36.9° to 40.9°})
32°20'
(32.3°)
225/65R17
38°44' (36°44' to 40°44')
(38.7° {36.7° to 40.7°})
32°13'
(30.2°)
235/55R18
35°50' (33°55' to 37°55')
(35.8° {33.8° to 37.9°})
30°29'
(30.5°)
Australia
38°58' (36°58' to 40°58')
(39.0° {37.0° to 41.0°})
32°22'
(32.4°)
- *: Europe only.
- If the angles are not as specified, check and adjust the right and left rack end lengths.
| 6. INSPECT CAMBER, CASTER AND STEERING AXIS INCLINATION |
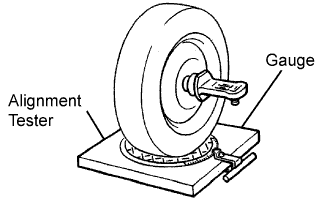 |
Install the camber-caster-kingpin gauge or place the front wheels on the center of the wheel alignment tester.
Inspect the camber, caster and steering axis inclination.
- Standard camber inclination (unloaded vehicle):
Tire Size
Camber Inclination
*215/70R16
-0°08' +-45' (-0.13°+-0.75°)
225/65R17
235/55R18
-0°11' +-45' (-0.18°+-0.75°)
Australia
-0°07' +-45' (-0.12°+-0.75°)
- HINT:
- *: Europe only
- Standard caster inclination (unloaded vehicle):
Tire Size
Caster Inclination
*215/70R16
5°41' +-45' (5.68°+-0.75°)
225/65R17
235/55R18
5°47' +-45' (5.78°+-0.75°)
Australia
5°42' +-45' (5.70°+-0.75°)
- HINT:
- *: Europe only
- Standard steering axis inclination (unloaded vehicle):
Tire Size
Steering Axis Inclination
*215/70R16
11°16' +-45' (11.27°+-0.75°)
225/65R17
235/55R18
11°26' +-45' (11.44°+-0.75°)
Australia
11°14' +-45' (11.23°+-0.75°)
- HINT:
- *: Europe only
| 7. ADJUST CAMBER AND CASTER |
- NOTICE:
- After the camber has been adjusted, inspect the toe-in.
Remove the front wheel.
Remove the 2 nuts on the lower side of the shock absorber.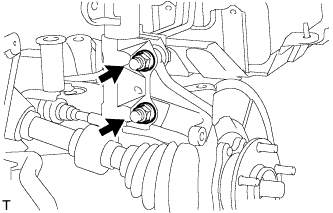
- NOTICE:
- When removing the nut, stop the bolt from rotating and loosen the nut.
Clean the installation surfaces of the shock absorber and the steering knuckle.
Temporarily install the 2 nuts.
Fully push or pull the front axle hub in the direction of the required adjustment.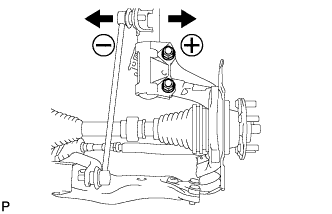
Tighten the 2 nuts.
- NOTICE:
- Keep the bolts from rotating and torque the nuts.
- Torque:
- 240 N*m{ 2,447 kgf*cm , 177 ft.*lbf }
Install the front wheel.
- Torque:
- 103 N*m{ 1,050 kgf*cm , 76 ft.*lbf }
Check the camber.
- If the measured value is not within the specified range, calculate the required adjustment amount using the formula below.
-
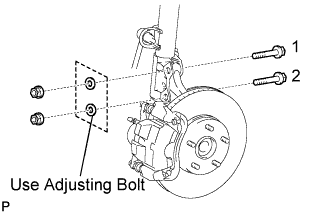
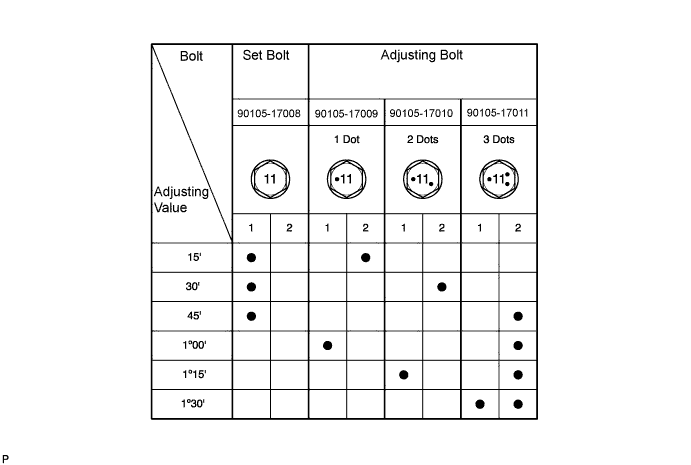
- If the camber is not within the specification, estimate how much additional camber adjustment will be required and select the camber adjusting bolt using the following table.
- If the measured value is not within the specified range, calculate the required adjustment amount using the formula below.
Repeat the steps mentioned above. When temporarily installing the 2 nuts, replace 1 or 2 selected bolts.
- HINT:
- Replace 1 bolt at a time when replacing 2 bolts.