INSTALLATION
Removal / installation · Vehicles built from Aug 2007
Versions by build date: Nov 2005 – Dec 2006 Jan 2007 – Jul 2007 from Aug 2007
| 1.
TEMPORARILY INSTALL FRONT SUSPENSION LOWER NO. 1 ARM SUB-ASSEMBLY LH |
 |
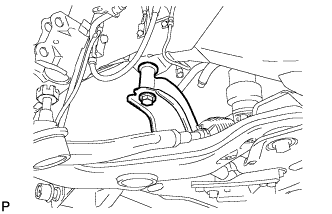
Temporarily install the lower arm with the bolt and nut to the front side.
- Temporarily install the lower arm with the bolt and nut to the rear side.
| 2.
TEMPORARILY INSTALL FRONT SUSPENSION LOWER NO. 1 ARM SUB-ASSEMBLY RH |
|
- HINT:
- Use the same procedures described for the LH side.
| 3.
CONNECT FRONT SUSPENSION CROSSMEMBER SUB-ASSEMBLY |
|
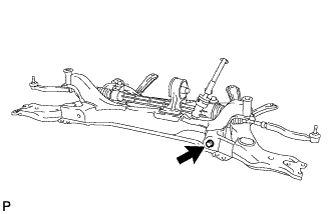
Slowly raise the crossmember jack, and connect the crossmember to the body.
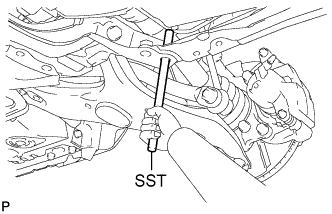
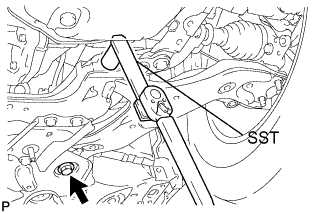
- Using SST, align the holes of the suspension member and body.
- SST
- 09670-00020
Perform the procedure above on the other side.
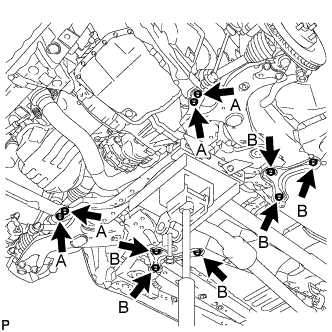
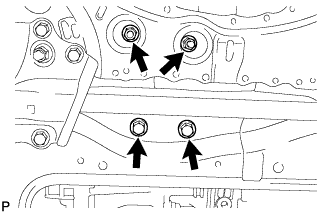
- Install the member reinforcement with the 4 bolts labeled A.
Install the suspension member brace with the 6 bolts labeled B.
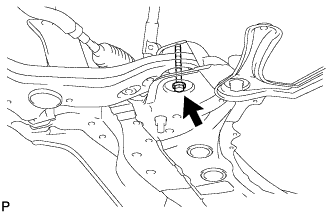
- Install the suspension member with the bolt to the body.
Perform the procedure above on the other side.
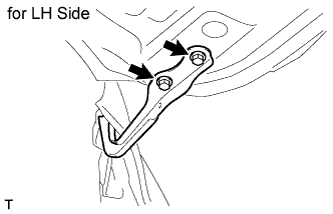
- Install the engine mounting insulator rear with the 2 nuts and 2 bolts.
| 4.
INSTALL FRONT STABILIZER LINK ASSEMBLY LH
|
|
Install the link with the 2 nuts.
-
Torque:
- 74 N*m{
755 kgf*cm
, 55 ft.*lbf
}
| 5.
CONNECT FRONT SUSPENSION LOWER NO. 1 ARM SUB-ASSEMBLY LH |
|
Connect the lower arm with the 2 bolts and nut to the ball joint.
-
Torque:
- 92 N*m{
938 kgf*cm
, 68 ft.*lbf
}
| 6.
INSTALL FRONT WHEEL |
|
-
Torque:
- 103 N*m{
1050 kgf*cm
, 76 ft.*lbf
}
| 7.
STABILIZE SUSPENSION
|
|
Lower the vehicle.
Press down on the vehicle several times to stabilize the suspension.
| 8.
TIGHTEN FRONT SUSPENSION CROSSMEMBER SUB-ASSEMBLY |
|
Tighten the bolts and nuts.
-
Torque:
- 87 N*m{
887 kgf*cm
, 64 ft.*lbf
}
for bolt A
- 93 N*m{
948 kgf*cm
, 69 ft.*lbf
}
for bolt B
- 145 N*m{
1479 kgf*cm
, 107 ft.*lbf
}
for body
- 95 N*m{
969 kgf*cm
, 70 ft.*lbf
}
for engine mounting insulator
| 9.
TIGHTEN FRONT SUSPENSION LOWER NO. 1 ARM SUB-ASSEMBLY LH |
|
Using SST, and tighten the bolt on the front side.
- SST
- 09961-01270
-
Torque:
- 223 N*m{
2376 kgf*cm
, 172 ft.*lbf
}
for use without SST
- 175 N*m{
1785 kgf*cm
, 129 ft.*lbf
}
for use with SST
- NOTICE:
- Do not tighten the nut.
Fix the nut in place and tighten the bolt on the rear side.
-
Torque:
- 223 N*m{
2376 kgf*cm
, 172 ft.*lbf
}
- NOTICE:
- Do not tighten the nut.
| 10.
TIGHTEN FRONT SUSPENSION LOWER NO. 1 ARM SUB-ASSEMBLY RH |
|
- HINT:
- Use the same procedures described for the LH side.
| 11.
INSTALL HOOD SUB-ASSEMBLY
|
|
Install the hood with the 4 bolts.
-
Torque:
- 13.0 N*m{
133 kgf*cm
, 10 ft.*lbf
}
Adjust the hood position (Click here).
| 12.
INSPECT AND ADJUST HOOD SUB-ASSEMBLY
|
|
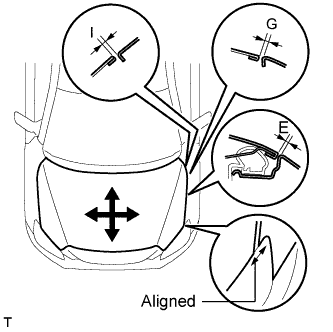
- Adjust the hood's position.
Loosen the hood's 4 hinge bolts.
- Move the hood and adjust the clearance between the hood and front fender. Make sure that the clearance is within the standard range.
- Standard measurement:
Area
|
Specified Condition
|
E
|
3.5 +- 1.5 mm (0.138 +- 0.059 in.)
|
G
|
3.5 +- 1.5 mm (0.138 +- 0.059 in.)
|
I
|
3.5 +- 1.5 mm (0.138 +- 0.059 in.)
|
Tighten the hood's 4 hinge bolts after the adjustment.
-
Torque:
- 13 N*m{
133 kgf*cm
, 10 ft.*lbf
}
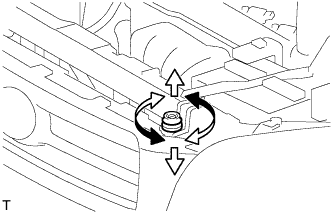
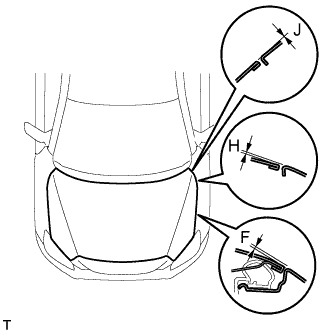
- Adjust the cushion rubber so that the height of the hood and fender are aligned.
- Raise or lower the hood's front end by turning the cushion rubber. Make sure that the clearance is within the standard range.
- Standard measurement:
Area
|
Specified Condition
|
F
|
0.6 +- 1.5 mm (0.024 +- 0.059 in.)
|
H
|
0.5 +- 1.5 mm (0.020 +- 0.059 in.)
|
J
|
0.0 +- 1.5 mm (0.000 +- 0.059 in.)
|
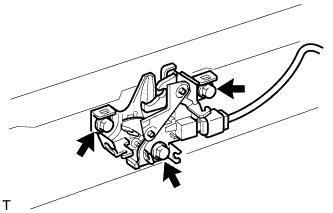
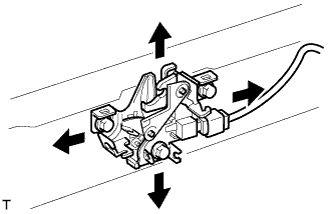
- Adjust the hood lock.
Loosen the 3 bolts.
- Adjust the hood lock position so that the striker can enter it smoothly.
Tighten the 3 bolts after the adjustment.
-
Torque:
- 8.0 N*m{
82 kgf*cm
, 71 in.*lbf
}
| 13.
INSPECT AND ADJUST FRONT WHEEL ALIGNMENT |
|
Inspect and adjust the front wheel alignment (Click here).