INSTALLATION
Removal / installation · Vehicles built Jan 2007 – Jul 2007
Versions by build date: Nov 2005 – Dec 2006 Jan 2007 – Jul 2007 from Aug 2007
- HINT:
- Use the same procedures for the RH side and LH side.
- The procedures listed below are for the LH side.
- Use the same procedures for the RH side and LH side.
| 1. INSTALL FRONT SHOCK ABSORBER WITH COIL SPRING LH |

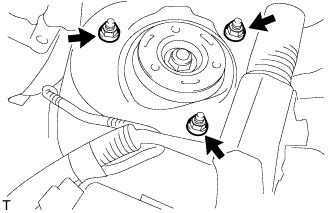  |
Install the front shock absorber with coil spring (upper side) with the 3 nuts.
- Torque:
- 50 N*m{ 510 kgf*cm , 37 ft.*lbf }
Install the front shock absorber with coil spring to the steering knuckle with the 2 bolt and 2 nuts.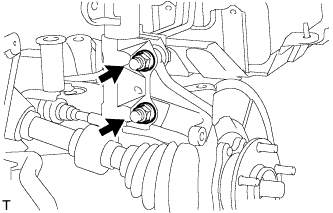
- Torque:
- 240 N*m{ 2447 kgf*cm , 177 ft.*lbf }
- NOTICE:
- Do not tighten the bolts.
| 2. INSTALL FRONT STABILIZER LINK ASSEMBLY LH |
Install the link with the 2 nuts.
- Torque:
- 74 N*m{ 755 kgf*cm , 55 ft.*lbf }
| 3. INSTALL FRONT SPEED SENSOR LH |
- NOTICE:
- To prevent interference with other parts, do not twist the sensor wire's painted line areas when installing it.
Set the sensor body to the knuckle, and then install the sensor with the bolt.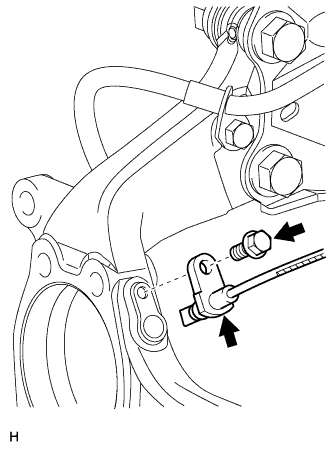
- Torque:
- 8.5 N*m{ 87 kgf*cm , 75 in.*lbf }
- NOTICE:
- Keep the sensor tip and sensor installation hole free from foreign matter.
- Firmly insert the sensor body into the knuckle before tightening the bolt.
- After installing the sensor to the knuckle, make sure that there is no clearance between the sensor stay and knuckle. Also make sure that no foreign matter is stuck between the parts.
- To prevent interference between the sensor and magnetic rotor, do not rotate the sensor body during or after the insertion of the sensor body to the knuckle.
- Keep the sensor tip and sensor installation hole free from foreign matter.
Install the sensor clamp and sensor clip as follows.
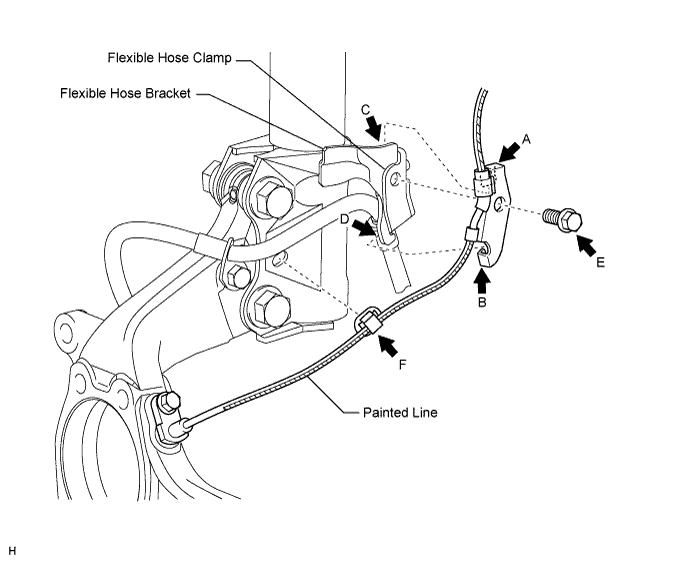
Set the flexible hose clamp on the flexible hose bracket.
Simultaneously perform the following: 1) hang the hook part of the sensor clamp (labeled A) on the part of the flexible hose bracket (labeled C); and 2) insert the hook part of the sensor clamp (labeled B) to the part of the flexible hose bracket (labeled D).
- NOTICE:
- Do not twist the sensor wire when installing the clamp.
Tighten together the sensor clamp and the flexible hose clamp to the flexible hose bracket with the bolt (labeled E).
- Torque:
- 18.5 N*m{ 189 kgf*cm , 14 ft.*lbf }
Insert the sensor clip (labeled F) into the hole on the absorber lower bracket.
Install the sensor clamp, and sensor clip as follows.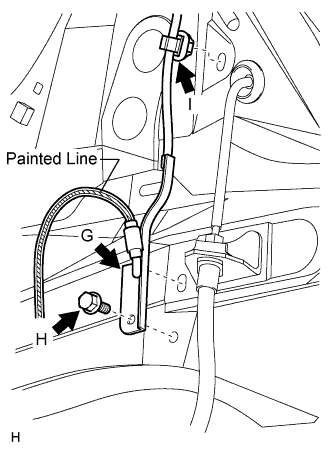
Set the sensor clamp (labeled G) on the side member, and then tighten it with the bolt (labeled H).
- Torque:
- 8.5 N*m{ 87 kgf*cm , 75 in.*lbf }
- NOTICE:
- Do not twist the sensor wire when installing the clamp.
Insert the sensor clip (labeled I) into the hole on the apron.
Connect the sensor connector.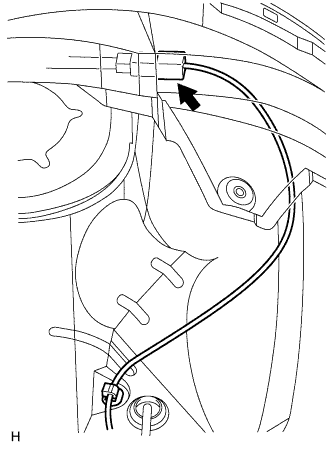
| 4. INSTALL FRONT WHEEL |
- Torque:
- 103 N*m{ 1050 kgf*cm , 76 ft.*lbf }
| 5. STABILIZE SUSPENSION |
Lower the vehicle.
Press down on the vehicle several times to stabilize the suspension.
| 6. INSPECT AND ADJUST FRONT WHEEL ALIGNMENT |
Inspect and adjust the front wheel alignment (Click here).