RADIATOR > INSTALLATION |
| 1. INSTALL FAN SHROUD |
|
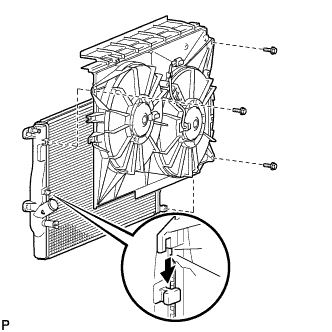
Attach the hooks of the shroud.
Install the fan shroud with the 3 bolts.
| 2. INSTALL OIL COOLER TUBE SUB-ASSEMBLY (for Automatic Transaxle) |
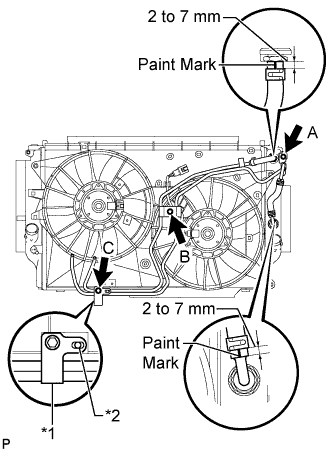 |
Insert the fan shroud pin into the hole in the tube bracket.
| *1 | Tube Bracket |
| *2 | Fan Shroud Pin |
Temporarily install the tube with bolt A.
Install bolts B and C.
Tighten bolt A.
Connect the 2 oil cooler hoses.
| 3. INSTALL NO. 2 RADIATOR SUPPORT |
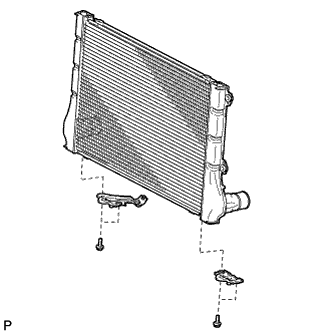 |
Install the 2 radiator supports with the 4 bolts.
| 4. INSTALL RADIATOR AND INTERCOOLER |
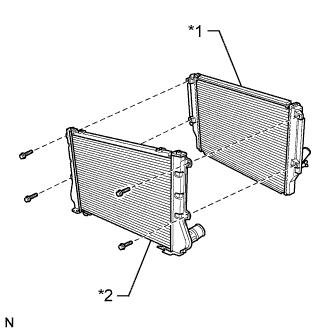 |
Align the intercooler with the radiator, and then install the intercooler to the radiator with the 4 bolts.
| *1 | Radiator |
| *2 | Intercooler |
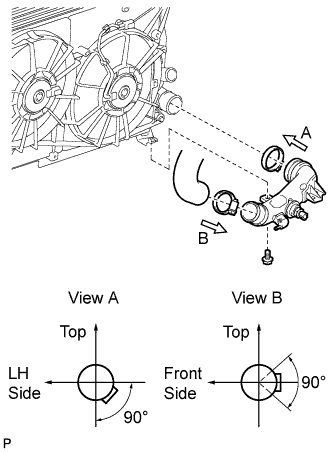 |
Temporarily install the No. 2 air tube to the intercooler and No. 3 air hose.
Install the bolt.
Tighten the 2 clamps as shown in the illustration.
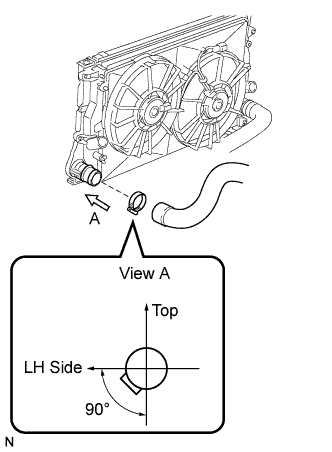 |
Install the No. 2 air hose to the intercooler. Tighten the clamp as shown in the illustration.
Install the radiator and intercooler assembly to the vehicle.
Connect the No. 2 and No. 3 air hoses to the engine.
Tighten the 2 clamps as shown in the illustration.
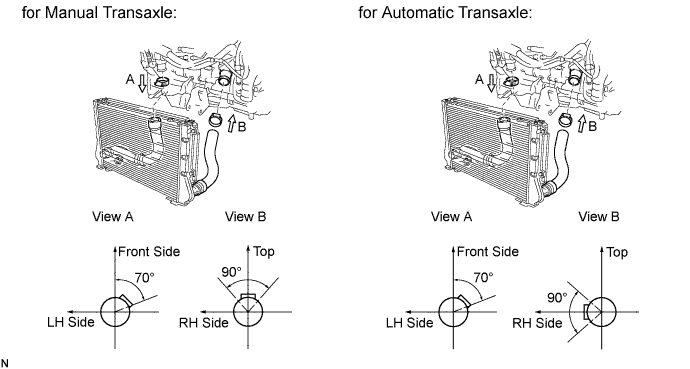
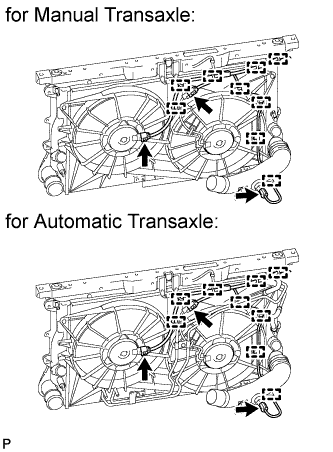 |
Attach the 9 wire harness clamps and connect the 3 connectors.
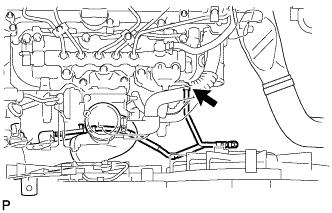 |
Connect the vacuum hose to the intake manifold.
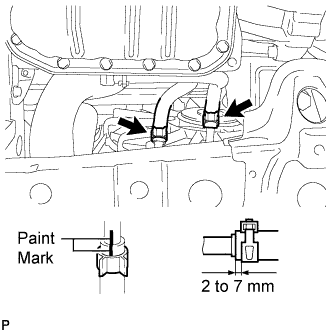 |
for Automatic Transaxle:
Connect the 2 oil cooler hoses.
| 5. INSTALL OUTLET RADIATOR HOSE |
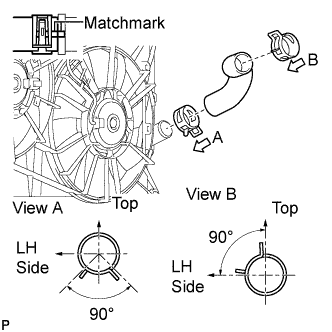 |
Align the matchmarks and install the outlet radiator hose.
| 6. INSTALL INLET RADIATOR HOSE |
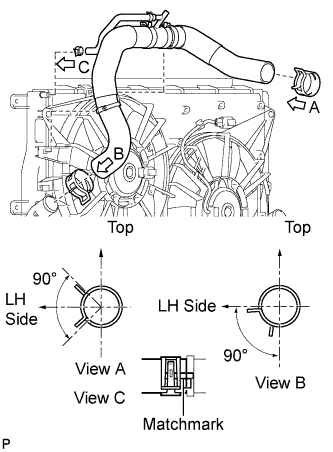 |
Align the matchmarks, install the inlet radiator hose and connect the No. 5 water by-pass hose to the radiator.
| 7. INSTALL UPPER RADIATOR SUPPORT |
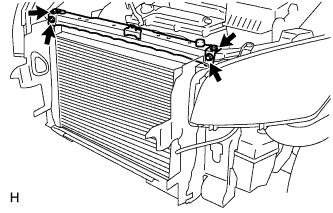 |
Install the upper radiator support with the 4 bolts.
| 8. INSTALL HOOD LOCK ASSEMBLY (for LHD) |
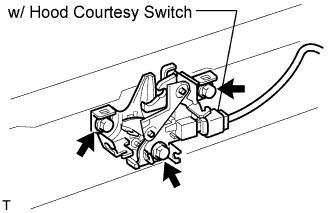 |
Connect the cable to the lock.
Install the lock with the 3 bolts.
Adjust the lock.
w/ Hood courtesy switch:
Connect the connector.
| 9. INSTALL HOOD LOCK ASSEMBLY (for RHD) |
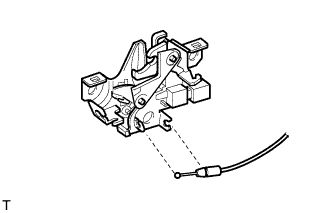 |
Connect the cable to the lock.
|
Install the lock with the 3 bolts.
Adjust the lock.
w/ Hood courtesy switch:
Connect the connector.
| 10. INSTALL WATER BY-PASS HOSE |
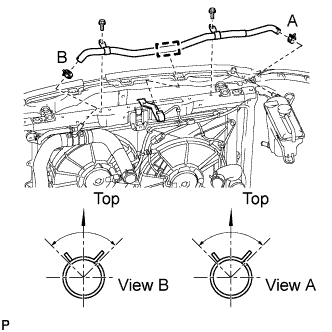 |
Connect the water by-pass hose to the radiator and radiator reservoir.
Install the water by-pass hose to the upper radiator support with the 2 bolts.
Attach the water by-pass hose to the hose clamp.
| 11. INSTALL BATTERY BRACKET REINFORCEMENT |
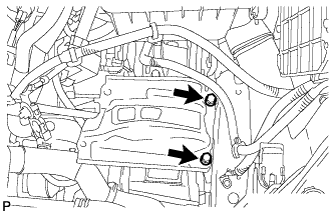 |
Install the battery bracket reinforcement with the 2 bolts.
| 12. INSTALL FRONT BATTERY BRACKET |
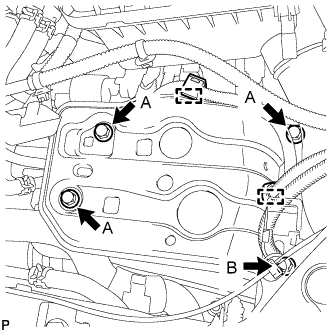 |
Install the front battery bracket with the 4 bolts.
Attach the 2 wire harness clamps.
| 13. INSTALL BATTERY TRAY |
| 14. INSTALL BATTERY |
| 15. INSTALL BATTERY CLAMP SUB-ASSEMBLY |
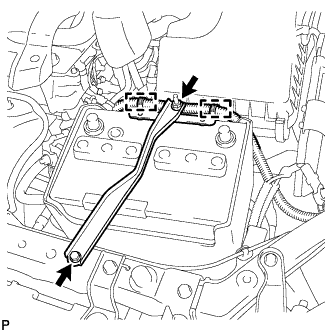 |
Attach the hook of the battery clamp to the front battery bracket.
Partially tighten the nut and temporarily install the bolt.
Adjust the battery clamp position.
Tighten the nut and bolt.
Attach the 2 wire harness clamps.
| 16. INSTALL COOLER CONDENSER ASSEMBLY (w/ Air Conditioning System) |
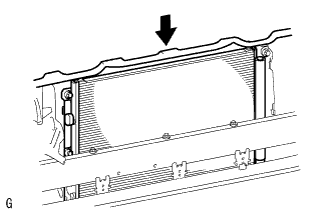 |
Install the cooler condenser.
| 17. INSTALL NO. 1 RADIATOR SUPPORT |
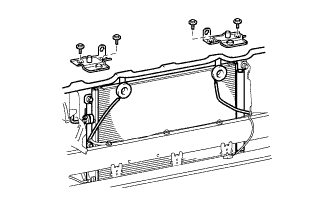 |
Install the 2 radiator supports with the 4 bolts.
| 18. INSTALL UPPER RADIATOR SUPPORT BRACKET |
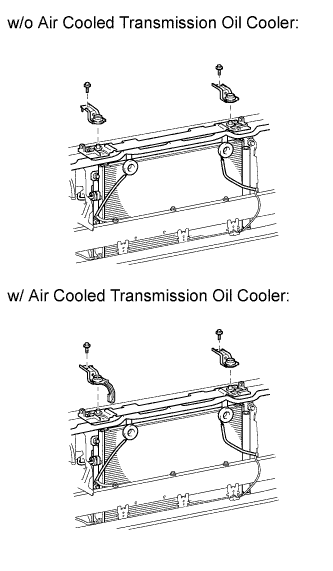 |
Install the 2 brackets with the 2 bolts.
| 19. CONNECT COOLER REFRIGERANT LIQUID PIPE (w/ Air Conditioning System) |
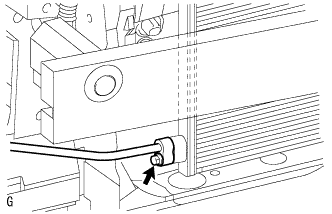 |
Remove the attached vinyl tape from the pipe and the connecting part of the cooler condenser.
Sufficiently apply compressor oil to a new O-ring and the fitting surface of the pipe joint.
Install the O-ring on the cooler refrigerant liquid pipe.
Install the cooler refrigerant liquid pipe on the cooler condenser with the bolt.
| 20. CONNECT NO. 1 COOLER REFRIGERANT DISCHARGE HOSE (w/ Air Conditioning System) |
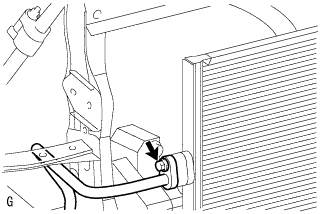 |
Remove the attached vinyl tape from the hose and the connecting part of the cooler condenser.
Sufficiently apply compressor oil to a new O-ring and the fitting surface of the hose joint.
Install the O-ring on the cooler refrigerant discharge hose.
Install the cooler refrigerant discharge hose on the cooler condenser with the bolt.
| 21. INSTALL FRONT BUMPER REINFORCEMENT |
for Manual Transaxle:
Install the reinforcement with the 8 bolts.
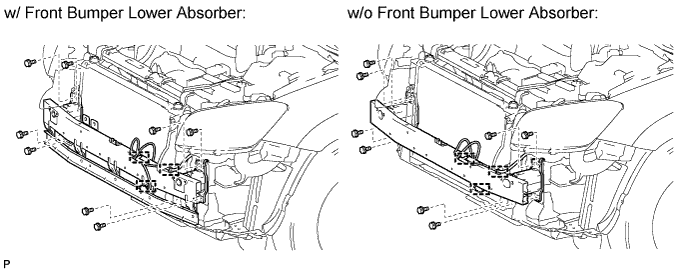
Attach the 3 clamps to install the wire harness.
for Automatic Transaxle:
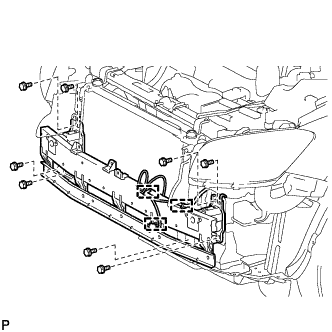 |
Install the reinforcement with the 8 bolts.
Attach the 3 clamps to install the wire harness.
| 22. INSTALL OIL COOLER ASSEMBLY (for Automatic Transaxle) |
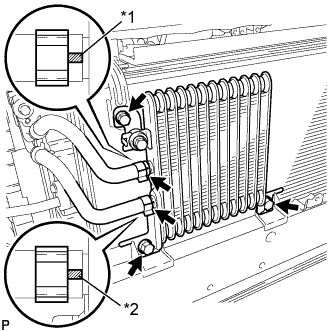 |
Install the oil cooler with the 3 bolts.
Connect the No. 3 oil cooler inlet and outlet hoses to the oil cooler.
| *1 | Yellow Paint Mark |
| *2 | White Paint Mark |
| 23. INSTALL FRONT BUMPER UPPER REINFORCEMENT SUB-ASSEMBLY |
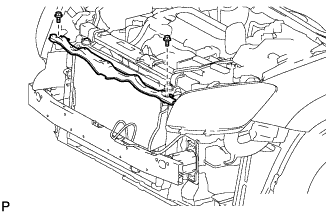 |
Install the reinforcement with the 2 bolts.
| 24. INSTALL HIGH PITCHED HORN ASSEMBLY |
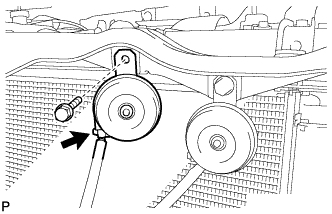 |
Install the horn with the bolt.
Connect the horn connector.
| 25. INSTALL LOW PITCHED HORN ASSEMBLY |
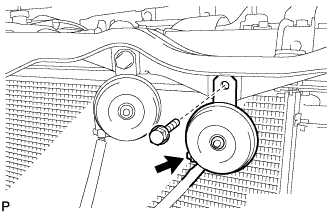 |
Install the horn with the bolt.
Connect the horn connector.
| 26. INSTALL FRONT BUMPER CENTER STAY SUB-ASSEMBLY |
Install the stay with the 2 bolts.
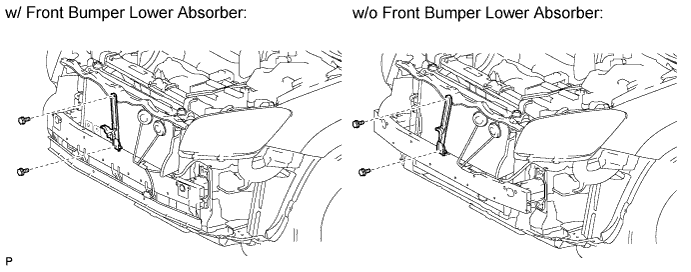
| 27. INSTALL FRONT BUMPER LOWER ABSORBER (w/ Front Bumper Lower Absorber) |
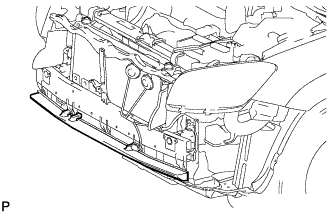 |
Install the lower absorber.
| 28. INSTALL FRONT BUMPER ENERGY ABSORBER (w/ Front Bumper Lower Absorber) |
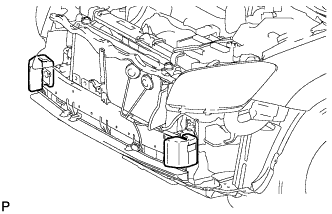 |
Install the 2 energy absorbers.
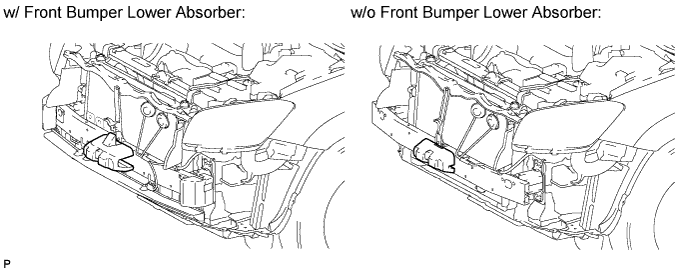
| 29. INSTALL FRONT NO. 2 BUMPER ENERGY ABSORBER |
Install the energy absorber.
| 30. CONNECT CABLE TO POSITIVE BATTERY TERMINAL |
| 31. CONNECT CABLE TO NEGATIVE BATTERY TERMINAL |
| 32. ADD ENGINE COOLANT |
Tighten the radiator drain cock plug by hand.
Tighten the cylinder block drain cock plug.
Add TOYOTA Super Long Life Coolant (SLLC) to the radiator reservoir filler opening.
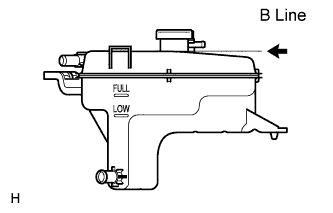 |
Continue adding TOYOTA SLLC until it is filled to the B line.
| Item | Specified Condition |
| w/o Combustion Type Power Heater | 7.3 liters (7.7 US qts, 6.4 Imp. qts) |
| w/ Combustion Type Power Heater | 7.7 liters (8.1 US qts, 6.8 Imp. qts) |
Press the inlet and outlet radiator hoses several times by hand, and then check the level of the coolant.
If the coolant level drops below the B line, add TOYOTA SLLC to the B line.
Install the radiator reservoir cap.
Start the engine, and warm it up until the cooling fan operates.
Set the air conditioning as follows while warming up the engine.
| Item | Condition |
| Manual Air Conditioning System | Fan speed - Any setting except "OFF" |
| Temperature - Toward WARM Air conditioning switch "OFF" | |
| Automatic Air Conditioning System | Temperature - Toward MAX Air conditioning switch "OFF" |
Maintain the engine speed at 2000 to 2500 rpm and warm up the engine until the cooling fan operates.
Press the inlet and outlet radiator hoses several times by hand to bleed air.
Stop the engine and wait until the coolant cools down to ambient temperature.
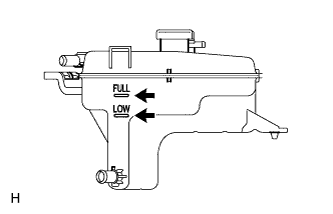 |
Check that the coolant level is between the FULL and LOW line.
If the coolant level is below the LOW line, repeat all of the procedures above.
If the coolant level is above the FULL line, drain coolant so that the coolant level is between the FULL and LOW line.
| 33. ADJUST AUTOMATIC TRANSAXLE FLUID (for Automatic Transaxle) |
Adjust the transaxle fluid (Click here).
| 34. INSPECT FOR ENGINE COOLANT LEAK |
Remove the radiator reservoir cap.
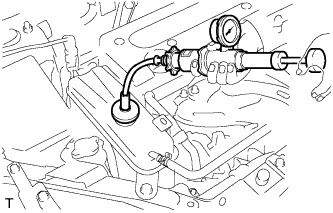 |
Fill the radiator with coolant, and then attach a radiator cap tester.
Warm up the engine.
Pump the radiator cap tester to 118 kPa (1.2 kgf/cm2, 17 psi), and then check that the pressure does not drop.
If the pressure drops, check the hoses, radiator and water pump for leakage.
If there are no signs of external coolant leaks, check the heater core, cylinder block and head.
Reinstall the radiator cap.
| 35. CHARGE REFRIGERANT (w/ Air Conditioning System) |
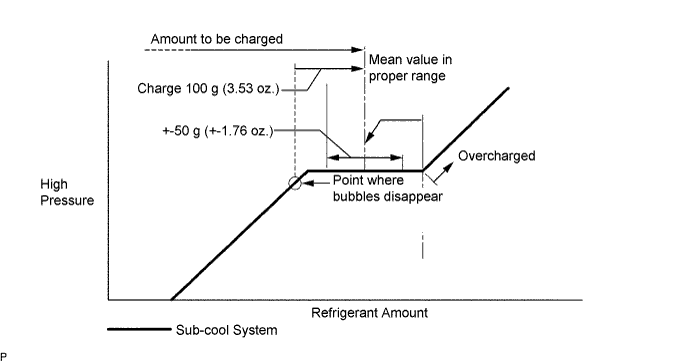
Perform vacuum purging using a vacuum pump.
Charge refrigerant HFC-134a (R134a).
| 36. WARM UP ENGINE (w/ Air Conditioning System) |
Warm up the engine at less than 1,850 rpm for 2 minutes or more after charging the refrigerant.
| 37. CHECK FOR LEAKAGE OF REFRIGERANT |
After recharging the refrigerant gas, check for refrigerant gas leakage using a halogen leak detector.
Perform the operation under these conditions:
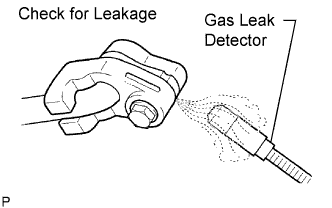 |
Using a gas leak detector, check the refrigerant line for leakage.
If a gas leak is not detected on the drain hose, remove the blower motor control (blower resistor) from the cooling unit. Insert the gas leak detector sensor into the unit and perform the test.
Disconnect the connector and leave the pressure switch on for approximately 20 minutes. Bring the gas leak detector close to the pressure switch and perform the test.
| 38. INSTALL REAR ENGINE UNDER COVER RH |
Install the under cover with the 2 clips.
| 39. INSTALL REAR ENGINE UNDER COVER LH |
Install the under cover with the 2 clips.
| 40. INSTALL NO. 1 ENGINE UNDER COVER |
Install the engine under cover with the 6 bolts and 10 clips.
| 41. INSTALL NO. 1 ENGINE COVER |
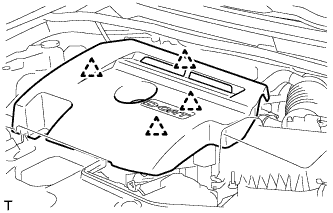 |
Attach the 4 clips to install the engine cover.
| 42. INSTALL FRONT BUMPER COVER |
w/ Under Guard:
Install the front bumper cover .
w/o Under Guard:
Install the front bumper cover .