Home › ENGINE · 2AD-FHV › ENGINE CONTROL SYSTEM › ECD SYSTEM

ECD SYSTEM > Pre-heating Control Circuit

for Preparation Click here


DESCRIPTION

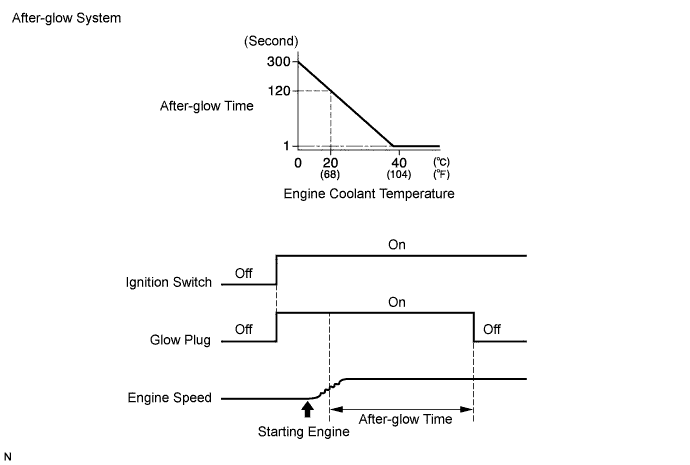
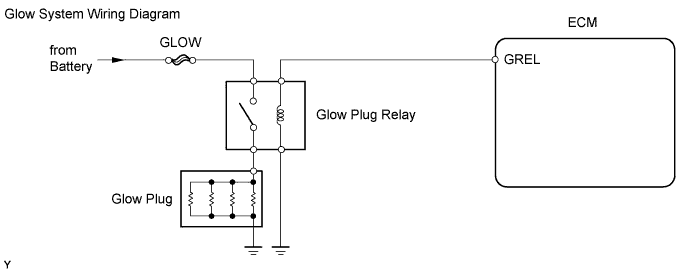
The glow plug is mounted inside the engine combustion chamber. To ensure efficient engine starting with a cold engine, the ECM calculates a time interval of the current that needs to flow through the glow plug depending on the starting engine coolant temperature when the ignition switch is turned to ON. The ECM then turns on the glow plug relay and permits the current to flow through the glow plug based on the time calculated by the ECM. The glow plug is then heated, and enhances fuel combustion with a cold engine.

A129368E07

HINT:
  1. These troubleshooting procedures are for: 1) difficulty starting the engine in cold weather, and 2) difficulty driving/vehicle malfunctions in cold weather immediately after the engine is started.
  2. After the engine is started, the ECM performs "after-glow" for a certain period of time. In proportion to the actual engine coolant temperature, the time period varies. The after-glow reduces diesel engine knocking, white smoke emissions and engine noises when the engine is cold.


A117830E06


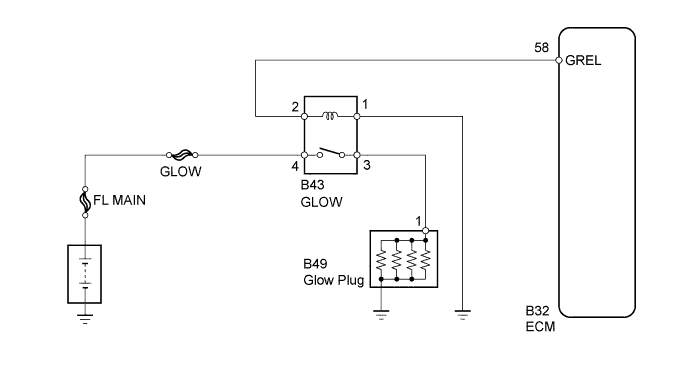
WIRING DIAGRAM


A206859E02


INSPECTION PROCEDURE

NOTICE:
  1. Inspect the fuses of circuits related to this system before performing the following inspection procedure.
  2. After replacing the ECM, the new ECM needs registration (Click here) and initialization (Click here).

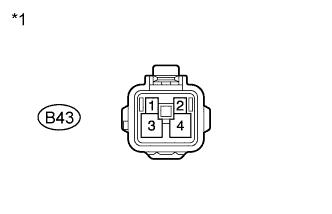
1.CHECK TERMINAL VOLTAGE (GLOW PLUG RELAY)


    A131566E06
  1. Remove the glow plug relay.

  1. Measure the voltage according to the value(s) in the table below.

    Standard Voltage:
    Tester Connection
    Switch Condition
    Specified Condition
    B43-4 - Body ground
    Ignition switch ON
    11 to 14 V

    Text in Illustration 
    *1
    Front view of wire harness connector
    (to Glow Plug Relay)

  1. Reinstall the glow plug relay.


NG
REPAIR OR REPLACE HARNESS OR CONNECTOR (GLOW PLUG RELAY - BATTERY)
OK


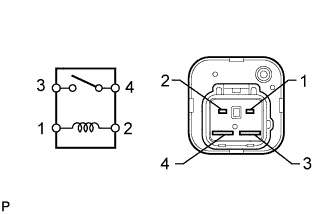
2.INSPECT GLOW PLUG RELAY


    A201709E03
  1. Remove the glow plug relay.

  1. Measure the voltage according to the value(s) in the table below.

    Standard Resistance:
    Tester Connection
    Condition
    Specified Condition
    3 - 4
    When battery voltage is not applied to terminals 1 and 2
    10 kΩ or higher
    3 - 4
    When battery voltage is not applied to terminals 1 and 2
    Below 1 Ω

  1. Reinstall the glow plug relay.


NG
REPLACE GLOW PLUG RELAY
OK


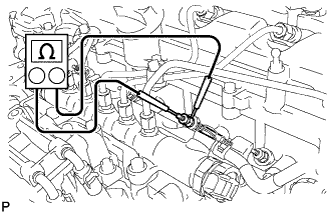
3.INSPECT GLOW PLUG ASSEMBLY (RESISTANCE)


    A197252
  1. Disconnect the glow plug wire.

  1. Measure the voltage according to the value(s) in the table below.

    Standard Resistance:
    Tester Connection
    Condition
    Specified Condition
    Glow plug terminal - Body ground
    20°C (68°F)
    Approximately 1.0 Ω

    HINT:
    If any of the glow plugs has an open circuit, the engine power will be insufficient only when the engine is cold.

    NOTICE:
    1. Exercise extreme care not to damage the glow plug pipes. Damaging them could cause an open circuit, or shorten the life of the glow plugs.
    2. Keep the glow plugs free of oil and fuel while cleaning.
    3. Wipe any oil off of the terminal and Bakelite washer with a clean, dry cloth during inspection.
    4. Do not apply higher than 11 V to the glow plugs as it may cause an open circuit.

  1. Reconnect the glow plug wire.


NG
REPLACE GLOW PLUG ASSEMBLY (Click here)
OK


4.CHECK GLOW PLUG ASSEMBLY (INSTALLATION)
  1. Check the glow plug installation.

    OK:
    Glow plugs are installed securely.

Torque:
12.3 N*m{ 125 kgf*cm , 9 ft.*lbf }


NG
TIGHTEN GLOW PLUG
OK


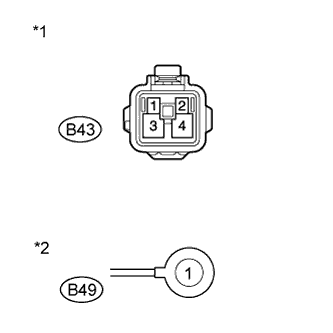
5.CHECK WIRE HARNESS (GLOW PLUG - GLOW PLUG RELAY - BODY GROUND)


    A206860E02
  1. Remove the glow plug relay.

  1. Disconnect the glow plug connector.

  1. Measure the resistance according to the value(s) in the table below.

    Standard Resistance (Check for Open):
    Tester Connection
    Condition
    Specified Condition
    B43-3 - B49-1
    Always
    Below 1 Ω
    B43-1 - Body ground
    Always
    Below 1 Ω

    Standard Resistance (Check for Short):
    Tester Connection
    Condition
    Specified Condition
    B43-3 or B49-1 - Body ground
    Always
    Below 1 Ω

    Text in Illustration 
    *1
    Front view of wire harness connector
    (to Glow Plug Relay)
    *2
    Front view of wire harness connector
    (to Glow Plug)

  1. Reinstall the glow plug relay.

  1. Reconnect the glow plug connector.


NG
REPAIR OR REPLACE HARNESS OR CONNECTOR
OK


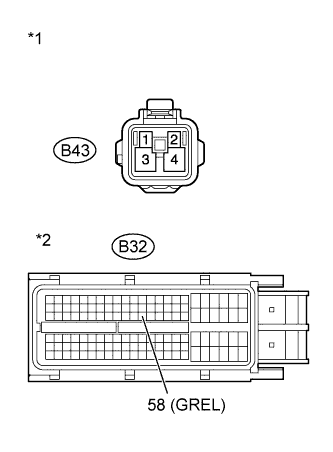
6.CHECK WIRE HARNESS (GLOW PLUG RELAY - ECM AND BODY GROUND)


    A130157E05
  1. Remove the glow plug relay.

  1. Disconnect the ECM connector.

  1. Measure the resistance according to the value(s) in the table below.

    Standard Resistance (Check for Open):
    Tester Connection
    Condition
    Specified Condition
    B43-2 - B32-58 (GREL)
    Always
    Below 1 Ω

    Standard Resistance (Check for Short):
    Tester Connection
    Condition
    Specified Condition
    B43-2 or B32-58 (GREL) - Body ground
    Always
    10 kΩ or higher

    Text in Illustration 
    *1
    Front view of wire harness connector
    (to Glow Plug Relay)
    *2
    Front view of wire harness connector
    (to ECM)

  1. Reinstall the glow plug relay.

  1. Reconnect the ECM connector.


NG
REPAIR OR REPLACE HARNESS OR CONNECTOR
OK

REPLACE ECM (Click here)