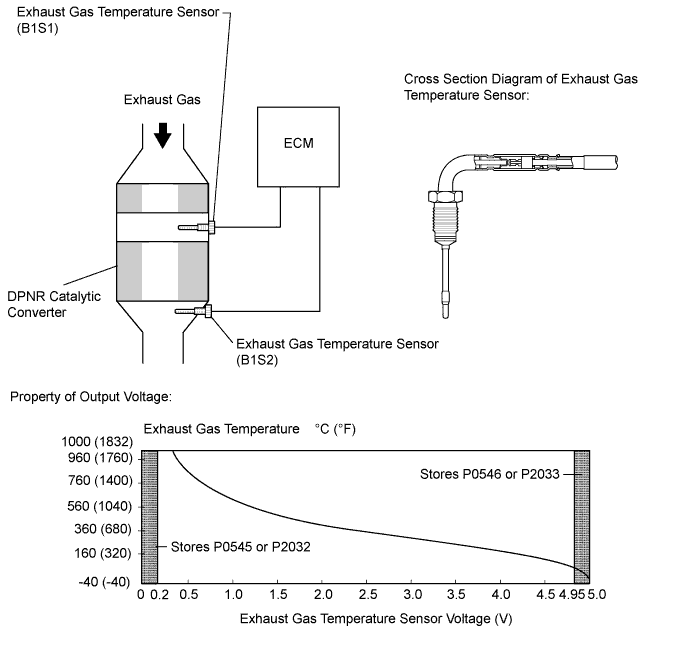
DTC P0545 Exhaust Gas Temperature Sensor Circuit Low (Bank 1 Sensor 1) |
DTC P0546 Exhaust Gas Temperature Sensor Circuit High (Bank 1 Sensor 1) |
DTC P2032 Exhaust Gas Temperature Sensor Circuit Low (Bank 1 Sensor 2) |
DTC P2033 Exhaust Gas Temperature Sensor Circuit High (Bank 1 Sensor 2) |
| DTC Detection Drive Pattern | DTC Detection Condition | Trouble Area |
| Idle the engine for 3 seconds after warming up the engine (the engine coolant temperature is 70°C (158°F) or higher) and allowing 11 minutes to elapse after starting the engine. | Sensor 1 output is below 0.2 V for 3 seconds or more. (1 trip detection logic) |
|
| DTC Detection Drive Pattern | DTC Detection Condition | Trouble Area |
| Idle the engine for 3 seconds after warming up the engine (the engine coolant temperature is 70°C (158°F) or higher) and allowing 11 minutes to elapse after starting the engine. | Sensor 1 output is higher than 4.95 V for 3 seconds or more. (1 trip detection logic) |
|
| DTC Detection Drive Pattern | DTC Detection Condition | Trouble Area |
| Idle the engine for 3 seconds after warming up the engine (the engine coolant temperature is 70°C (158°F) or higher) and allowing 11 minutes to elapse after starting the engine. | Sensor 2 output is below 0.2 V for 3 seconds or more. (1 trip detection logic) |
|
| DTC Detection Drive Pattern | DTC Detection Condition | Trouble Area |
| Idle the engine for 3 seconds after warming up the engine (the engine coolant temperature is 70°C (158°F) or higher) and allowing 11 minutes to elapse after starting the engine. | Sensor 2 output is higher than 4.95 V for 3 seconds or more. (1 trip detection logic) |
|
| DTC No. | Data List |
| P0545 | Exhaust Temperature B1S1 |
| P0546 | |
| P2032 | Exhaust Temperature B1S2 |
| P2033 |
| Condition | Exhaust Gas Temperature | Exhaust Gas Temperature Sensor Condition |
| Idling after warm-up | Constant at between 50 and 700°C (122 and 1292°F) | Normal |
| 0°C (32°F) | Open circuit | |
| 1000°C (1832°F) | Short circuit |
| 1.READ VALUE USING INTELLIGENT TESTER (EXHAUST TEMPERATURE) |
Connect the intelligent tester to the DLC3.
Turn the ignition switch to ON and turn the intelligent tester on.
Enter the following menus: Powertrain / Engine and ECT / Data List / Exhaust Temperature B1S1 and Exhaust Temperature B1S2.
Read the value.
| Temperature Displayed | Proceed to |
| 0°C (32°F) (After warming up the engine) | A |
| 1000°C (1832°F) | B |
| OK: Same as the actual exhaust gas temperature (50 to 700°C [122 to 1292°F] during idling after warm-up), and varies after maintaining an engine speed of 3000 rpm for 1 minute after accelerating the engine from idling to 3000 rpm | C |
|
| ||||
|
| ||||
| A | |
 |
| 2.READ VALUE USING INTELLIGENT TESTER (CHECK FOR OPEN IN WIRE HARNESS) |
 |
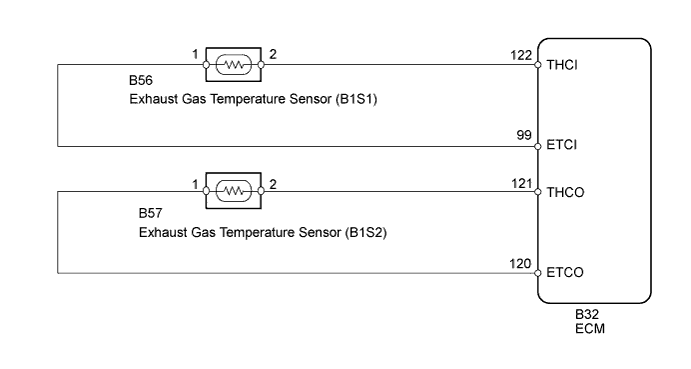
Disconnect the B56 or B57 exhaust gas temperature sensor connector.
Connect terminals 1 and 2 of the exhaust gas temperature sensor wire harness side connector.
Connect the intelligent tester to the DLC3.
Turn the ignition switch to ON and turn the intelligent tester on.
Enter the following menus: Powertrain / Engine and ECT / Data List / Exhaust Temperature B1S1 and Exhaust Temperature B1S2.
Read the value.
| *1 | Exhaust Gas Temperature Sensor |
| *2 | ECM |
| *3 | Front view of wire harness connector (to Exhaust Gas Temperature Sensor (B1S1)) |
| *4 | Front view of wire harness connector (to Exhaust Gas Temperature Sensor (B1S2)) |
Reconnect the exhaust gas temperature sensor connector.
|
| ||||
| OK | |
|
| 3.REPLACE EXHAUST GAS TEMPERATURE SENSOR |
Replace the exhaust gas temperature sensor (Click here).
|
| ||||
| 4.CHECK HARNESS AND CONNECTOR (EXHAUST GAS TEMPERATURE SENSOR - ECM) |
 |
Disconnect the exhaust gas temperature sensor connector.
Disconnect the ECM connector.
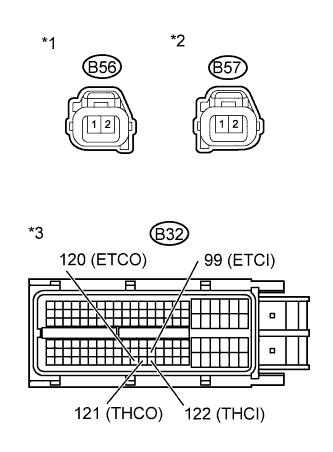
Measure the resistance according to the value(s) in the table below.
| Tester Connection | Condition | Specified Condition |
| B56-2 - B32-122 (THCI) | Always | Below 1 Ω |
| B56-1 - B32-99 (ETCI) | Always | Below 1 Ω |
| B57-2 - B32-121 (THCO) | Always | Below 1 Ω |
| B57-1 - B32-120 (ETCO) | Always | Below 1 Ω |
| *1 | Front view of wire harness connector (to Exhaust Gas Temperature Sensor (B1S1)) |
| *2 | Front view of wire harness connector (to Exhaust Gas Temperature Sensor (B1S2)) |
| *3 | Front view of wire harness connector (to ECM) |
Reconnect the exhaust gas temperature sensor connector.
Reconnect the ECM connector.
|
| ||||
| OK | |
|
| 5.REPLACE ECM |
Replace the ECM (Click here).
|
| ||||
| 6.READ VALUE USING INTELLIGENT TESTER (CHECK FOR SHORT IN WIRE HARNESS) |
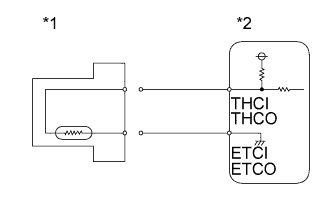 |
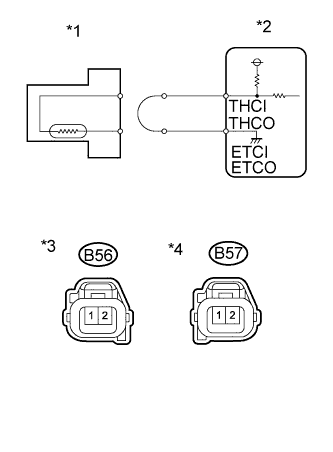
Disconnect the B56 or B57 exhaust gas temperature sensor connector.
Connect the intelligent tester to the DLC3.
Turn the ignition switch to ON and turn the intelligent tester on.
Enter the following menus: Powertrain / Engine and ECT / Data List / Exhaust Temperature B1S1 and Exhaust Temperature B1S2.
Read the value.
| *1 | Exhaust Gas Temperature Sensor |
| *2 | ECM |
Reconnect the exhaust gas temperature sensor connector.
Reconnect the exhaust gas temperature sensor connector.
|
| ||||
| OK | |
|
| 7.REPLACE EXHAUST GAS TEMPERATURE SENSOR |
Replace the exhaust gas temperature sensor (Click here).
|
| ||||
| 8.CHECK HARNESS AND CONNECTOR (EXHAUST GAS TEMPERATURE SENSOR - ECM) |
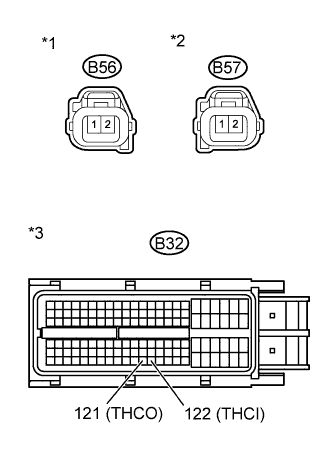 |
Disconnect the exhaust gas temperature sensor connector.
Disconnect the ECM connector.
Measure the resistance according to the value(s) in the table below.
| Tester Connection | Condition | Specified Condition |
| B56-2 or B32-122 (THCI) - Body ground | Always | 10 kΩ or higher |
| B57-2 or B32-121 (THCO) - Body ground | Always | 10 kΩ or higher |
| *1 | Front view of wire harness connector (to Exhaust Gas Temperature Sensor (B1S1)) |
| *2 | Front view of wire harness connector (to Exhaust Gas Temperature Sensor (B1S2)) |
| *3 | Front view of wire harness connector (to ECM) |
Reconnect the exhaust gas temperature sensor connector.
Reconnect the ECM connector.
|
| ||||
| OK | |
|
| 9.REPLACE ECM |
Replace the ECM (Click here).
|
| ||||
| 10.REPAIR OR REPLACE HARNESS OR CONNECTOR |
Repair or replace the harness or connector.
| NEXT | |
|
| 11.CONFIRM WHETHER MALFUNCTION HAS BEEN SUCCESSFULLY REPAIRED |
Connect the intelligent tester to the DLC3.
Clear the DTCs (Click here).
Start the engine.
Idle the engine for 3 seconds or more after warming up the engine (the engine coolant temperature is 70°C (159°F) or higher) and allowing 11 minutes to elapse after starting the engine.
Enter the following menus: Powertrain / Engine and ECT / DTC.
Confirm that the DTC is not output again.
| NEXT | ||
 | ||
| ||
