Home › SUSPENSION & AXLE › AXLE › FRONT AXLE HUB

FRONT AXLE HUB > INSTALLATION

for Preparation Click here


HINT:
  1. Use the same procedures for the RH side and LH side.
  2. The procedures listed below are the LH side.


1. INSTALL FRONT AXLE HUB SUB-ASSEMBLY LH


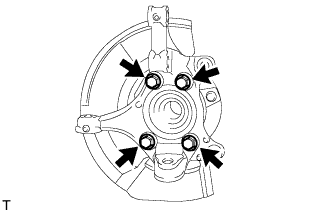
    C127536
  1. Install the dust cover to the steering knuckle.

  1. Install the axle hub with the 4 bolts.

    Torque:
    96 N*m{ 979 kgf*cm , 71 ft.*lbf }

    NOTICE:
    Do not place the hub and bearing's magnet rotor side so that it is facing downward, and do not allow the magnet rotor side to become damaged or contact foreign matter.


2. INSTALL FRONT LOWER BALL JOINT ASSEMBLY LH
  1. Install the front lower ball joint assembly with the nut to the steering knuckle.

    Torque:
    133 N*m{ 1356 kgf*cm , 98 ft.*lbf }

  1. Install a new clip.

    1. If the holes for the clip are not aligned, tighten the nut further up to 60°.


3. INSTALL STEERING KNUCKLE WITH AXLE HUB
  1. Align the shaft splines and drive in the drive shaft.

  1. Install the steering knuckle with axle hub with the 2 bolts and 2 nuts.

    Torque:
    240 N*m{ 2447 kgf*cm , 177 ft.*lbf }

    NOTICE:
    Do not tighten the bolts.


4. CONNECT FRONT SUSPENSION NO. 1 LOWER ARM SUB-ASSEMBLY LH
  1. Connect the lower arm to the ball joint with the 2 bolts and nut.

    Torque:
    92 N*m{ 938 kgf*cm , 68 ft.*lbf }


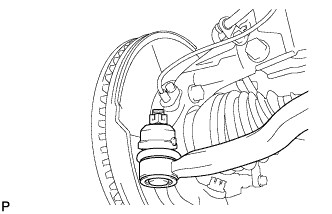
5. CONNECT TIE ROD END SUB-ASSEMBLY LH


C132132
  1. Connect the tie rod end onto the steering knuckle with the castle nut.

    Torque:
    49 N*m{ 500 kgf*cm , 36 ft.*lbf }

    NOTICE:
    If the holes for the clip are not aligned, tighten the nut up to 60° further.

  1. Install a new cotter pin.


6. INSTALL FRONT SPEED SENSOR LH

NOTICE:
To prevent interference with other parts, do not twist the painted line areas of the sensor wire when installing it.


    C127961E01
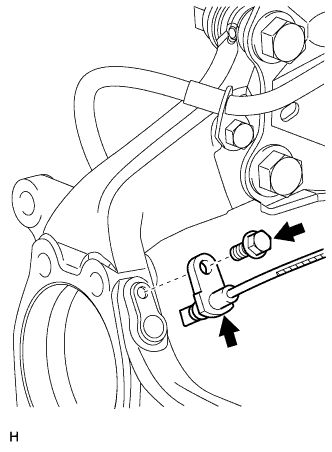
  1. Set the sensor body into the knuckle, and then install the sensor with the bolt.

    Torque:
    8.5 N*m{ 87 kgf*cm , 75 in.*lbf }

    NOTICE:
    1. Keep the sensor tip and sensor installation hole free from foreign matter.
    2. Firmly insert the sensor body into the knuckle before tightening the bolt.
    3. After installing the sensor to the knuckle, make sure that there is no clearance between the sensor stay and knuckle. Also make sure that no foreign matter is stuck between the parts.
    4. To prevent interference between the sensor and magnetic rotor, do not rotate the sensor body during or after the insertion of the sensor body to the knuckle.


  1. Install the sensor clamp and sensor clip as follows.
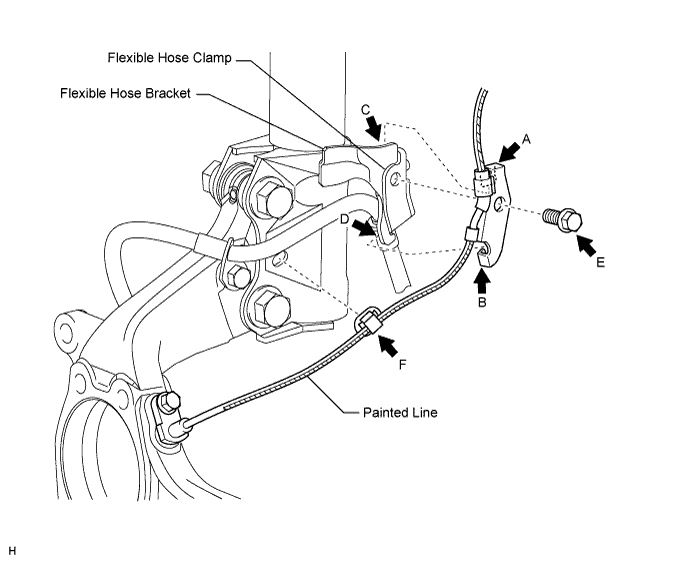

    C127962E02


    1. Simultaneously perform the following: 1) hang the hook part of the sensor clamp (labeled A) on the part of the flexible hose bracket (labeled C); and 2) insert the hook part of the sensor clamp (labeled B) to the part of the flexible hose bracket (labeled D).

      NOTICE:
      Do not twist the sensor wire when installing the clamp.

    2. Install the sensor clamp to the flexible hose clamp and flexible hose bracket with the bolt (labeled E).

      Torque:
      18.5 N*m{ 189 kgf*cm , 14 ft.*lbf }

    3. Insert the sensor clip (labeled F) into the hole on the absorber lower bracket.
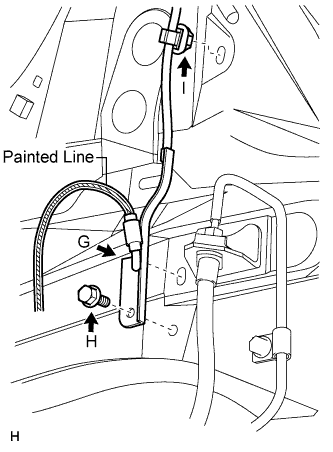


    C193404E02
  1. Install the sensor clamp and sensor clip as follows.

    1. Set the sensor clamp (labeled G) on the side member, and then install the bolt (labeled H).

      Torque:
      8.5 N*m{ 87 kgf*cm , 75 in.*lbf }

      NOTICE:
      Do not twist the sensor wire when installing the clamp.

    2. Insert the sensor clip (labeled I) into the hole on the apron.
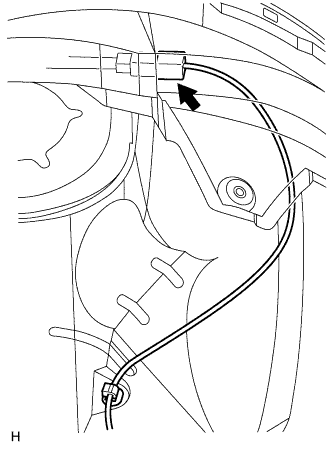


    C127964E03
  1. Connect the sensor connector.


7. CHECK FRONT AXLE HUB BEARING
  1. Check the axle hub bearing .


8. INSTALL FRONT DISC


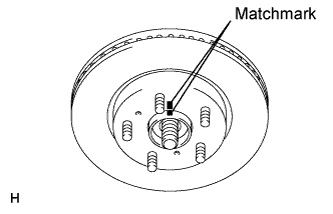
    C127063E01
  1. Align the matchmarks and install the disc.

    HINT:
    When replacing the disc with a new one, select the installation position where the disc has the minimum runout.


9. INSTALL FRONT DISC BRAKE CYLINDER ASSEMBLY LH
Click here


10. INSTALL FRONT AXLE SHAFT NUT LH
  1. Clean the threaded parts on the drive shaft and a new axle shaft nut using a non-residue solvent.

    NOTICE:
    1. Be sure to perform this work for a new drive shaft.
    2. Keep the threaded parts free of oil and foreign objects.

  1. Install a new shaft nut.

    Torque:
    for φ 26:
    216 N*m{ 2203 kgf*cm , 159 ft.*lbf }
    for φ 30:
    292 N*m{ 2978 kgf*cm , 215 ft.*lbf }


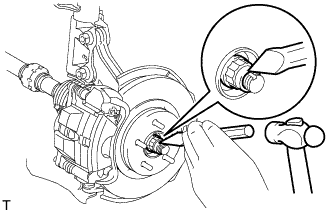
    C129484
  1. Using a chisel and hammer, stake the shaft nut.


11. INSTALL FRONT WHEEL

Torque:
103 N*m{ 1050 kgf*cm , 76 ft.*lbf }


12. INSPECT AND ADJUST FRONT WHEEL ALIGNMENT
  1. Inspect and adjust the wheel alignment (Click here).


13. CONNECT CABLE TO NEGATIVE BATTERY TERMINAL


14. CHECK SPEED SENSOR SIGNAL
  1. Check the speed sensor signal for ABS (Click here).

  1. Check the speed sensor signal for VSC (Click here).