Insert SST tip into the lash adjuster plunger and use the tip to press down on the check ball inside the plunger.
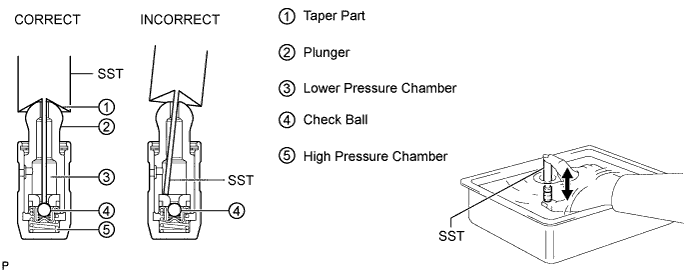
- SST
- 09276-75010
CAMSHAFT > INSTALLATION |
| 1. INSPECT VALVE LASH ADJUSTER ASSEMBLY |
Place the lash adjuster into a container full of new engine oil.
Insert SST tip into the lash adjuster plunger and use the tip to press down on the check ball inside the plunger.
Squeeze SST and the lash adjuster together to move the plunger up and down 5 to 6 times.
Check the movement of the plunger and bleed air.
After bleeding air, remove SST. Then quickly and firmly press the plunger repeatedly with your fingers.
| 2. INSTALL VALVE LASH ADJUSTER ASSEMBLY |
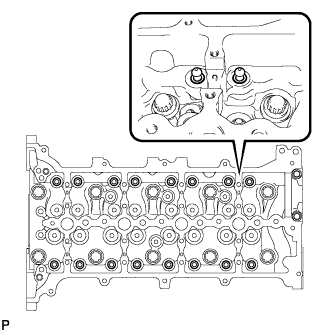 |
Install the 16 valve lash adjusters.
| 3. INSTALL NO. 1 VALVE ROCKER ARM SUB-ASSEMBLY |
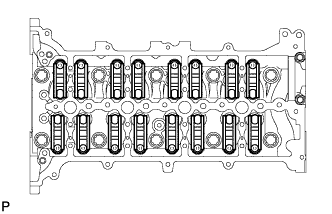 |
Install the 16 rocker arms to the lash adjusters.
| 4. INSTALL CAMSHAFT |
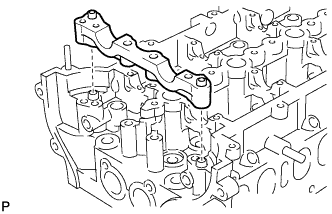 |
Install the No. 2 bearing cap.
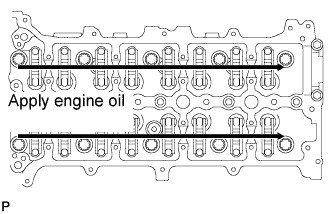 |
Apply clean engine oil to the cam of each camshaft, journals of the cylinder head and valve rocker arms.
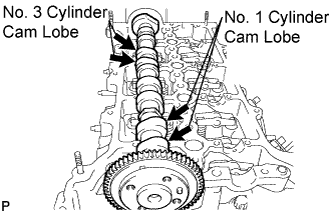 |
Place the No. 2 camshaft on the camshaft carrier as shown in the illustration so that the No. 1 and No. 3 cylinder cam lobes face upward.
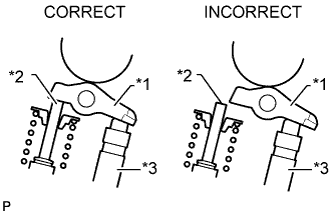 |
| *1 | Rocker Arm |
| *2 | Valve Stem |
| *3 | Lash Adjuster |
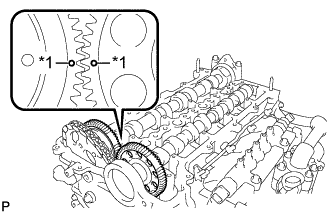 |
Align the camshaft and No. 2 camshaft timing mark (1 dot mark each).
| *1 | 1 Dot Mark |
Place the camshaft on the camshaft carrier.
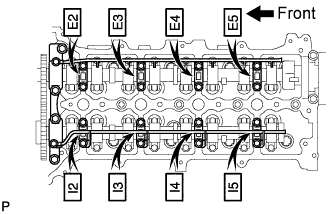 |
Set the camshaft bearing caps on the camshafts as shown in the illustration.
Set the oil delivery pipes on the camshaft bearing caps.
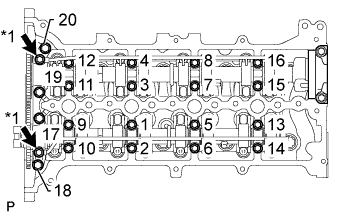 |
Temporarily install the 2 union bolts and 20 bolts.
| *1 | Union Bolt |
Uniformly tighten the bolts in several steps, in the sequence shown in the illustration.
Tighten the 2 union bolts.
| 5. INSTALL CAMSHAFT TIMING SPROCKET |
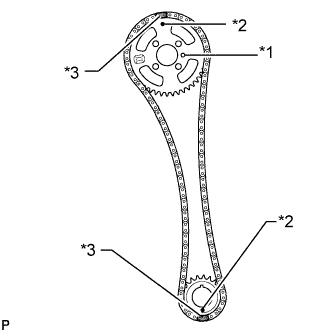 |
Install the crankshaft timing sprocket and camshaft timing sprocket to the chain so that timing marks of the sprockets and paint marks of the chain are aligned.
| *1 | Straight Pin |
| *2 | Timing Mark |
| *3 | Yellow Paint Mark |
Install the camshaft timing sprocket to the No. 2 camshaft by fitting the straight pin of the No. 2 camshaft into the hole on the camshaft timing sprocket.
Install the camshaft timing sprocket to the crankshaft.
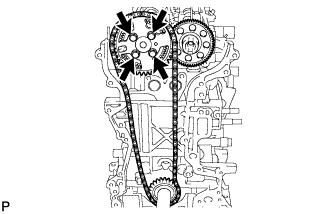 |
While holding the hexagon portion of the No. 2 camshaft, install and uniformly tighten the 4 bolts of the No. 2camshaft.
| 6. INSTALL OIL PUMP DRIVE GEAR |
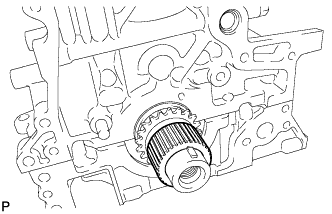 |
Install the oil pump drive gear to the crankshaft.
| 7. INSTALL NO. 1 CHAIN VIBRATION DAMPER |
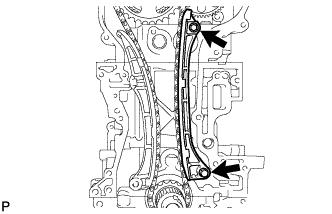 |
Install the No. 1 chain vibration damper with the 2 bolts.
| 8. INSTALL CHAIN TENSIONER SLIPPER |
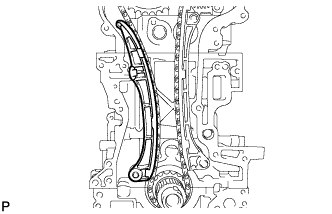 |
Install the chain tensioner slipper.
| 9. INSTALL NO. 1 CHAIN TENSIONER ASSEMBLY |
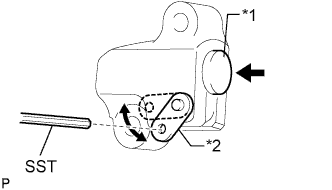 |
Move the stopper plate upward to release the lock, and push the plunger deep into the tensioner.
| *1 | Plunger |
| *2 | Stopper Plate |
Move the stopper plate downward to set the lock, and insert SST into the stopper plate hole.
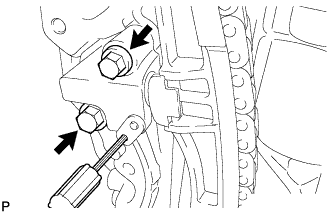 |
Install the chain tensioner with the 2 bolts.
Remove SST.
| 10. INSTALL SUPPLY PUMP ASSEMBLY |
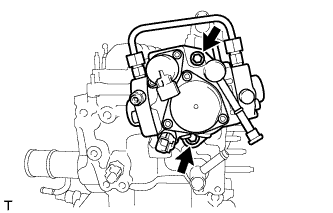 |
Install a new O-ring to the supply pump.
Install the supply pump drive coupling.
Install the supply pump with the 2 bolts.
| 11. INSTALL TIMING CHAIN COVER SUB-ASSEMBLY |
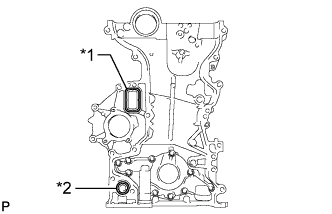 |
Install a new gasket and new O-ring to the timing chain cover.
| *1 | Gasket |
| *2 | O-Ring |
Remove any old seal packing material.
Apply seal packing in a continuous line to the timing chain cover as shown in the following illustration.
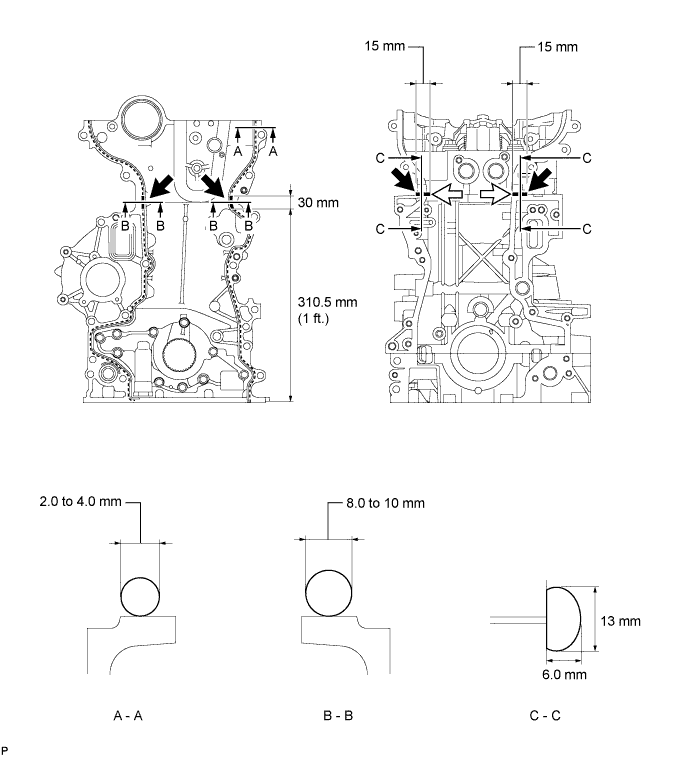
| Area | Seal Packing Diameter (Round) | Seal Packing Dimension (Flat) | Seal Packing Application Length |
| A - A | 2.0 to 4.0 mm (0.0787 to 0.157 in.) | - | - |
| B - B | 8.0 to 10 mm (0.315 to 0.394 in.) | - | 30 mm (1.18 in.) |
| C - C | - | 13 mm (0.512 in.) or more wide and 6.0 mm (0.236 in.) or more thick | 15 mm (0.591 in.) |
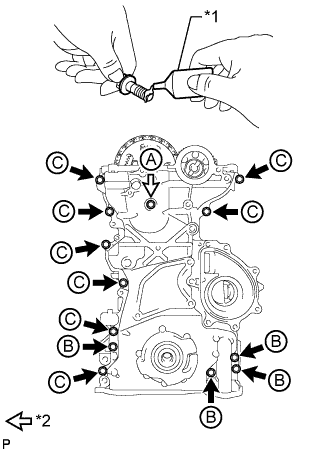 |
Apply adhesive to the 4 bolts labeled B.
| *1 | Adhesive |
| *2 | Bolt and New Seal Washer |
Temporarily install the timing chain cover and a new seal washer with the 13 bolts.
| Item | Length |
| Bolt A | 60 mm (2.36 in.) |
| Bolt B | 30 mm (1.18 in.) |
| Bolt C | 30 mm (1.18 in.) |
Tighten the 12 bolts labeled B and C.
Tighten the bolt labeled A.
| 12. INSTALL CRANKSHAFT PULLEY |
Align the keyway of the pulley with the key located on the crankshaft, then slide the pulley into place to install it.
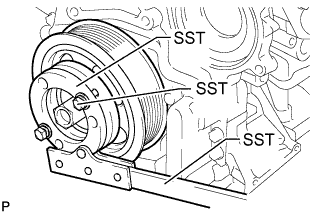 |
Using SST, install the pulley bolt.
| 13. INSTALL WATER PUMP ASSEMBLY |
Install a new gasket to the timing chain cover.
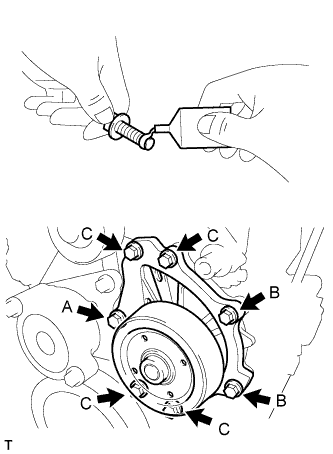 |
Apply adhesive to 2 or 3 threads of the bolt labeled A as shown in the illustration.
| Item | Specified Condition |
| Bolt A and C | 45 mm (1.77 in.) |
| Bolt B | 30 mm (1.18 in.) |
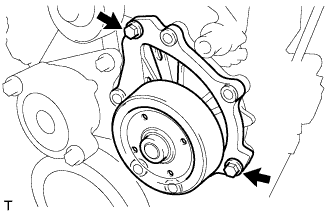 |
Install the water pump with the 2 bolts shown in the illustration.
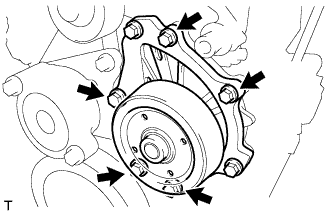 |
Install the 5 bolts shown in the illustration.
| 14. CONNECT CRANKSHAFT POSITION SENSOR WIRE HARNESS |
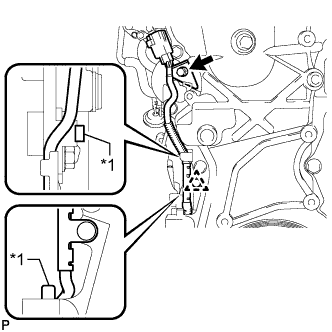 |
Install the sensor wire harness with the bolt and clip.
| *1 | Protrusion |
| 15. INSTALL CAMSHAFT POSITION SENSOR |
Apply a light coat of engine oil to the O-ring of the sensor.
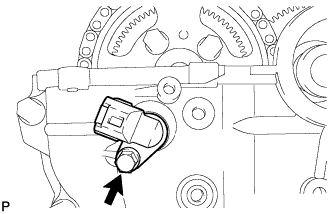 |
Install the sensor with the bolt.
| 16. INSTALL OIL STRAINER SUB-ASSEMBLY |
Install a new O-ring to the oil strainer.
Apply a light coat of engine oil to the O-ring.
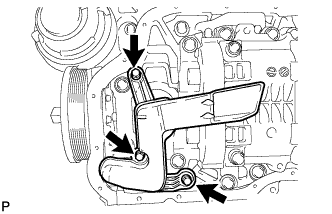 |
Install the oil strainer with the 3 bolts.
| 17. INSTALL OIL FILTER BRACKET |
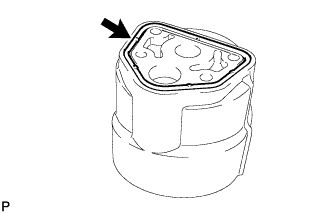 |
Install a new gasket to the oil filter bracket.
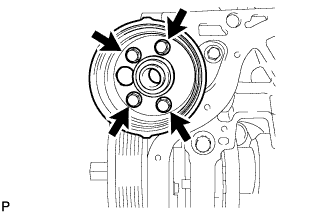 |
Install the oil filter bracket with the 4 bolts.
| 18. INSTALL OIL FILTER ELEMENT |
Clean the inside of the oil filter cap, its threads and its O-ring groove.
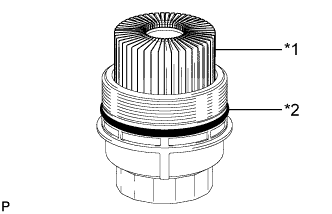 |
Apply a small amount of engine oil to a new O-ring and install it to the oil filter cap.
| *1 | New Oil Filter Element |
| *2 | New O-Ring |
Set a new oil filter element in the oil filter cap.
Remove any dirt or foreign matter from the installation surface of the engine.
Apply a small amount of engine oil to the O-ring again and temporarily install the oil filter cap.
Check and clean the oil filter installation surface.
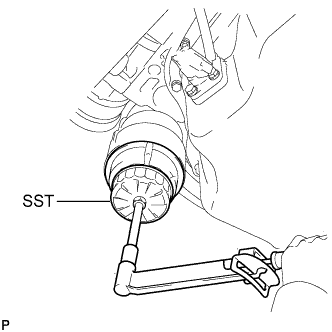 |
Using SST, tighten the oil filter cap.
Close the oil filter element service cover and install the clip.
| 19. INSTALL NO. 2 OIL PAN SUB-ASSEMBLY |
Remove any old seal packing material.
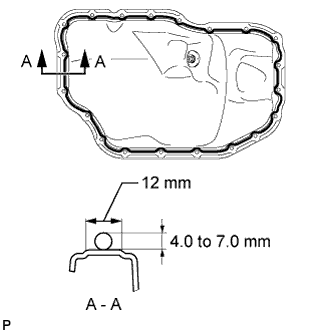 |
Apply seal packing in a continuous line as shown in the illustration.
| Aria | Seal Packing Diameter | Acceptable Seal Packing Application Range |
| A - A | 4.0 to 7.0 mm (0.157 to 0.276 in.) | 12 mm (0.472 in.) |
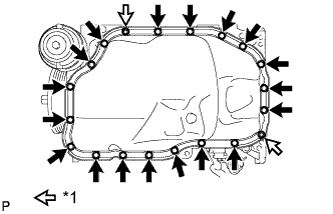 |
Install the oil pan with the 18 bolts and 2 nuts.
| *1 | Nut |
| 20. INSTALL CYLINDER HEAD COVER SUB-ASSEMBLY |
Remove any old seal packing material.
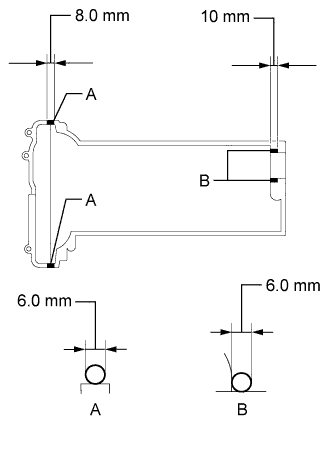 |
Apply seal packing to the cylinder head as shown in the illustration.
| Area | Seal Packing Diameter | Seal Packing Application Length |
| A | 6.0 mm (0.236 in.) | 8.0 mm (0.315 in.) |
| B | 6.0 mm (0.236 in.) | 10 mm (0.394 in.) |
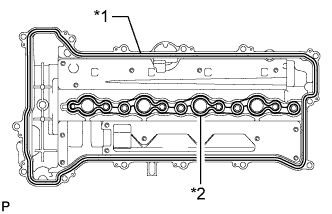 |
Install a new cylinder head cover gasket and new No. 2 cylinder head cover gasket to the cylinder head cover.
| *1 | Cylinder Head Cover Gasket |
| *2 | No. 2 Cylinder Head Cover Gasket |
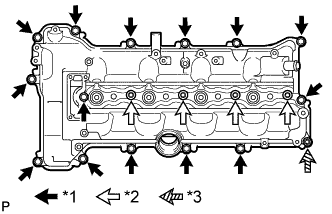 |
Install the cylinder head cover with the 4 nozzle holder clamp seats, 14 bolts and nut.
| *1 | Bolt |
| *2 | Nozzle Holder Clamp Seat |
| *3 | Nut |
| 21. INSTALL OIL FILLER CAP SUB-ASSEMBLY |
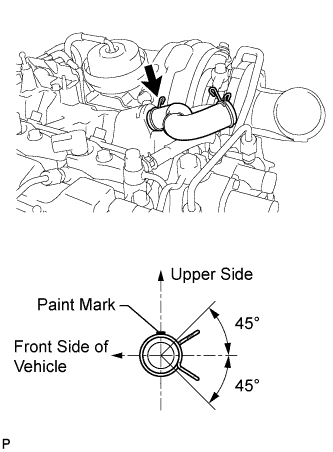
| 22. INSTALL PCV HOSE |
Install the PCV hose.
 |
| 23. INSTALL VACUUM SWITCHING VALVE BRACKET |
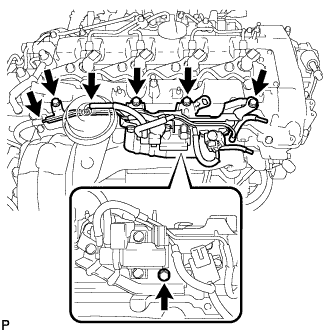 |
Install the vacuum switching valve bracket with the 5 bolts.
Connect the 2 vacuum hoses.
| 24. INSTALL NO. 1 VACUUM TRANSMITTING PIPE SUB-ASSEMBLY |
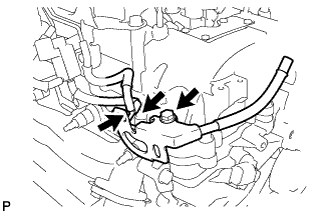 |
Install the No. 1 vacuum transmitting pipe with the bolt.
Connect the 2 vacuum hoses.
| 25. INSTALL INJECTOR ASSEMBLY |
Install 4 new nozzle seats to the cylinder head.
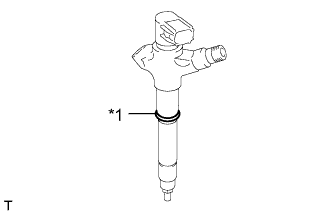 |
Install a new O-ring to each injector.
| *1 | New O-Ring |
Apply a light coat of engine oil to the O-rings on each injector.
Install the 4 injectors to the cylinder head.
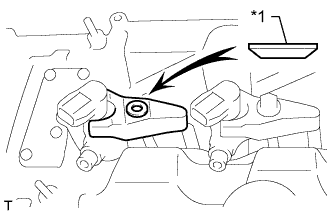 |
Install the nozzle holder clamps and washers as shown in the illustration.
| *1 | Washer |
Temporarily install the nozzle holder clamp bolts.
Temporarily install the 4 injection pipes.
Temporarily install the No. 1 leakage pipe with 4 new gaskets, the 4 union bolts and bolt.
Tighten the 4 nozzle holder clamp bolts.
| 26. INSTALL NO. 1 NOZZLE LEAKAGE PIPE |
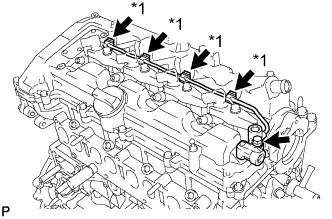 |
Install 4 new gaskets and the No. 1 nozzle leakage pipe with the 4 union bolts and bolt.
| *1 | Union Bolt |
| 27. INSTALL NO. 2 NOZZLE LEAKAGE PIPE |
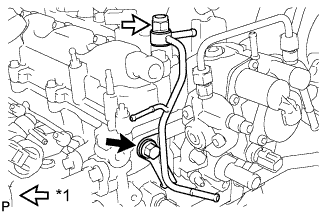 |
Temporarily install the No. 2 nozzle leakage pipe and a new gasket with the check valve and bolt.
| *1 | Check Valve |
Tighten the check valve.
Tighten the bolt.
| 28. INSTALL NO. 3 FUEL HOSE |
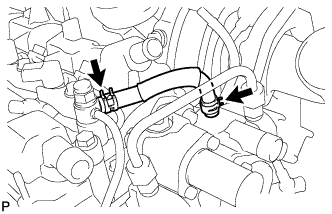 |
| 29. INSTALL NO. 2 FUEL PIPE (for CCo) |
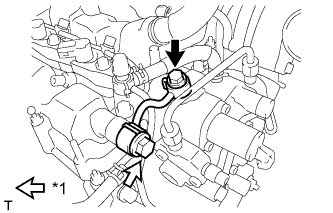 |
Temporarily install the fuel pipe with 2 new gaskets, the check valve and union bolt.
| *1 | Check Valve |
Tighten the check valve.
Tighten the union bolt.
| 30. INSTALL FUEL TUBE SUB-ASSEMBLY (for DPF) |
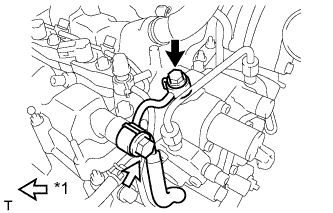 |
Temporarily install the fuel tube with 2 new gaskets, the check valve and union bolt.
| *1 | Check Valve |
Tighten the check valve.
Tighten the union bolt.
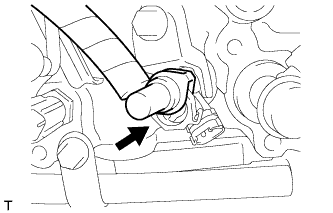 |
Insert the fuel tube connector onto the injector.
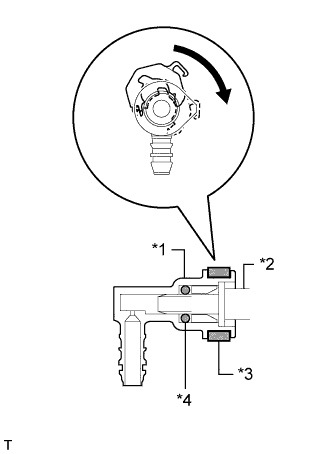 |
Turn the retainer in the direction indicated by the arrow until it makes a "click" sound.
| *1 | Fuel Tube Connector |
| *2 | Injector |
| *3 | Retainer |
| *4 | O-Ring |
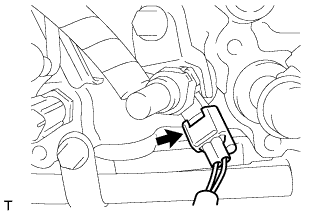 |
Connect the exhaust fuel addition injector connector.
| 31. INSTALL FUEL HOSE PROTECTOR (for DPF) |
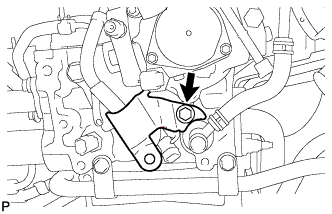 |
Install the fuel hose protector with the bolt.
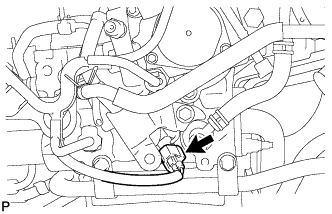 |
Connect the connector.
| 32. INSTALL WATER INLET HOUSING |
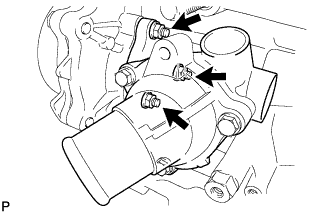 |
Install a new gasket and the inlet housing with the 3 nuts.
| 33. INSTALL NO. 4 WATER BY-PASS HOSE |
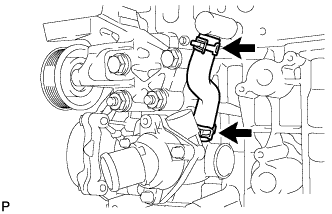 |
Install the No. 4 water by-pass hose.
| 34. INSTALL NO. 2 WATER BY-PASS PIPE |
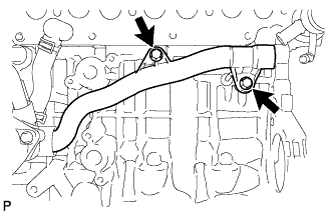 |
Install a new No. 2 water by-pass pipe with the 2 bolts.
| 35. INSTALL NO. 1 OIL COOLER BRACKET |
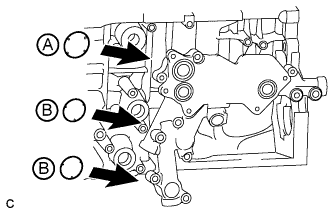 |
Apply engine oil to the 2 new O-rings labeled B in the illustration.
Install 3 new O-rings to the oil cooler bracket.
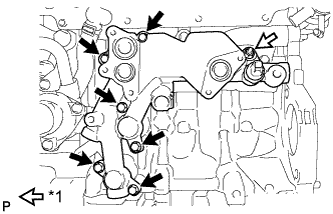 |
Install the No. 1 oil cooler bracket with the 6 bolts and nut.
| *1 | Nut |
| 36. INSTALL NO. 1 TURBO OIL PIPE |
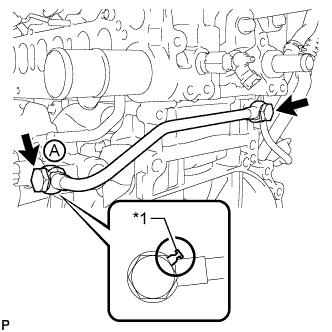 |
Install the No. 1 turbo oil pipe and 2 new gaskets with the 2 union bolts.
| *1 | Gasket |
| 37. INSTALL NO. 3 WATER BY-PASS PIPE |
Apply soapy water to a new O-ring and install it to the No. 3 water by-pass pipe.
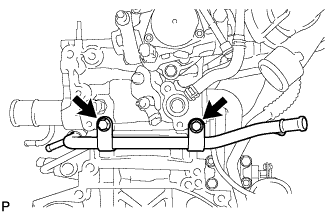 |
Install the No. 3 water by-pass pipe with the 2 bolts.
| 38. INSTALL NO. 8 WATER BY-PASS HOSE |
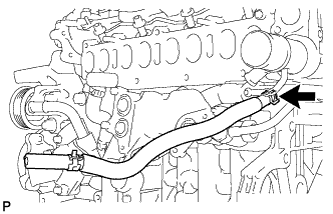 |
Install the No. 8 water by-pass hose.
| 39. INSTALL NO. 6 WATER BY-PASS HOSE |
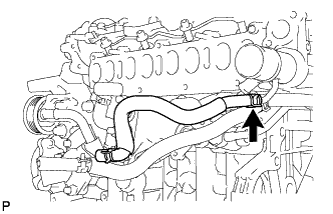 |
Install the No. 6 water by-pass hose.
| 40. INSTALL OIL COOLER ASSEMBLY |
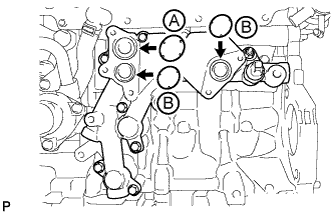 |
Apply engine oil to 2 new O-rings labeled B in the illustration.
Install 3 new O-rings to the oil cooler bracket.
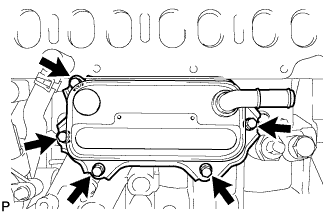 |
Install the oil cooler with the 5 bolts.
| 41. INSTALL NO. 1 WATER BY-PASS HOSE |
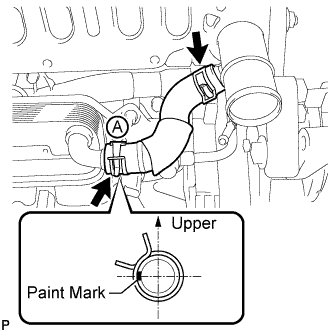 |
| 42. INSTALL NO. 1 CYLINDER BLOCK INSULATOR |
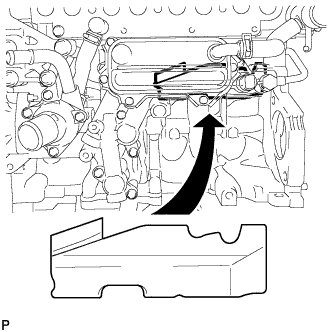 |
Install the No. 1 cylinder block insulator to the cylinder block.
| 43. INSTALL INTAKE MANIFOLD |
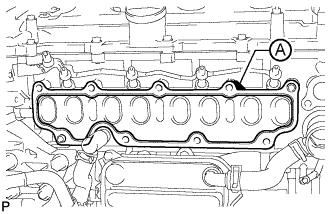 |
Install a new gasket to the cylinder head.
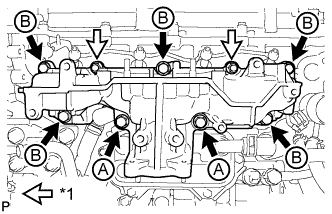 |
Install the intake manifold with the 7 bolts and 2 nuts.
| *1 | Nut |
| Item | Length |
| Bolt A | 90 mm (3.54 in.) |
| Bolt B | 25 mm (0.984 in.) |
| 44. INSTALL NO. 2 INTAKE MANIFOLD |
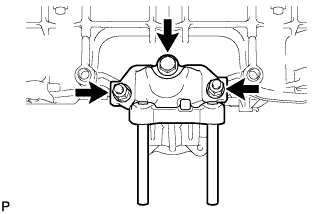 |
Install a new gasket and the No. 2 intake manifold with the bolt and 2 nuts.
| 45. INSTALL ENGINE COVER BRACKET |
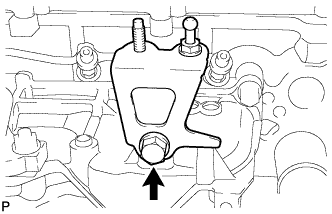 |
Install the engine cover bracket with the bolt.
| 46. INSTALL GAS FILTER BRACKET |
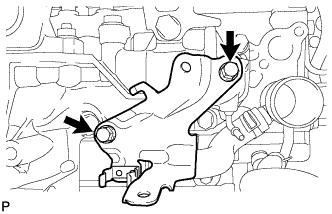 |
Install the gas filter bracket with the 2 bolts.
| 47. INSTALL NO. 1 GAS FILTER |
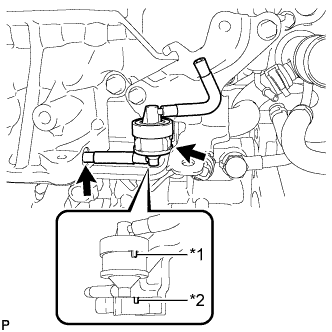 |
Install the No. 1 gas filter to the gas filter bracket.
| *1 | Protrusion |
| *2 | Groove |
Connect the vacuum hose.
| 48. INSTALL DIESEL TURBO PRESSURE SENSOR |
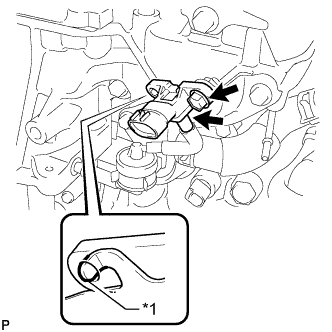 |
Install the sensor with the bolt.
| *1 | Protrusion |
Connect the vacuum hose.
| 49. INSTALL INTAKE MANIFOLD INSULATOR |
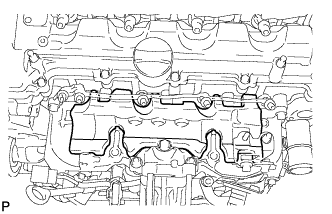 |
Install the intake manifold insulator to the intake manifold.
| 50. INSTALL COMMON RAIL ASSEMBLY |
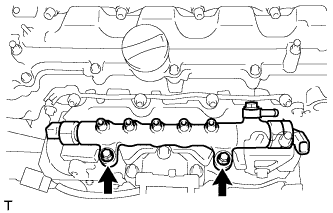 |
Install the common rail with the 2 bolts.
| 51. INSTALL NO. 4 FUEL HOSE |
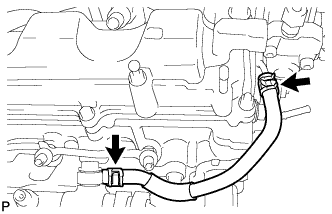 |
| 52. INSTALL INJECTION PIPE SUB-ASSEMBLY |
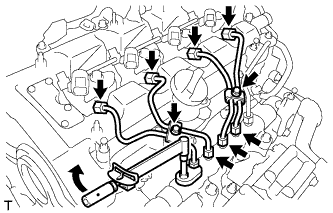 |
Using a 14 mm union nut wrench, tighten the 4 nuts at the common rail end of the injection pipes.
Using a 14 mm union nut wrench, tighten the 4 nuts at the injector end of the injection pipes.
Install the 4 injection pipe clamps with the 2 bolts.
| 53. INSTALL FUEL INLET PIPE SUB-ASSEMBLY |
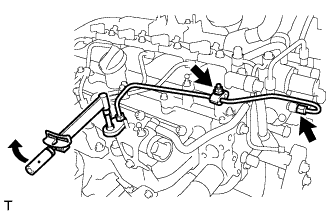 |
Temporarily install the fuel inlet pipe with the 2 clamps and nut.
Using a 14 mm union nut wrench, first tighten the nut at the common rail end of the fuel inlet pipe.
Using a 14 mm union nut wrench, tighten the nut at the supply pump end of the fuel inlet pipe.
Tighten the No. 2 injection pipe clamp nut.
| 54. INSTALL ENGINE OIL LEVEL DIPSTICK GUIDE |
Install a new O-ring to the engine oil level dipstick guide.
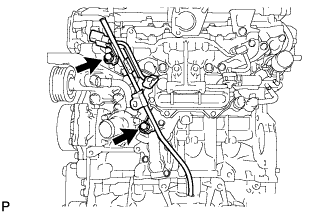 |
Install the engine oil level dipstick guide with the 2 bolts.
Install the engine oil level dipstick.
| 55. INSTALL ELECTRIC EGR CONTROL VALVE ASSEMBLY |
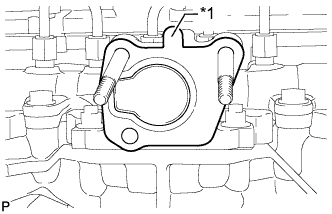 |
Install a new gasket.
| *1 | Protrusion |
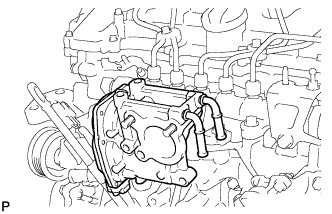 |
Install the electric EGR control valve.
| 56. INSTALL NO. 2 EGR PIPE SUB-ASSEMBLY |
Install a new gasket to the electric EGR control valve.
Install a new gasket to the No. 2 EGR pipe.
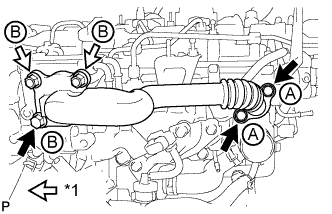 |
Temporarily install the No. 2 EGR pipe with the 3 bolts and 2 nuts.
| *1 | Nut |
| Item | Length |
| Bolt A | 25 mm (0.984 in.) |
| Bolt B | 70 mm (2.76 in.) |
Tighten the 2 bolts labeled A shown in the illustration.
Tighten the bolt and 2 nuts labeled B shown in the illustration.
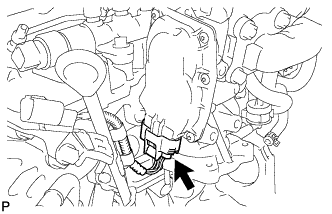 |
Connect the electric EGR control valve connector.
| 57. INSTALL EGR VALVE BRACKET |
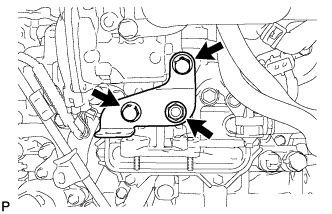 |
Install the EGR valve brackets with the 3 bolt.
| 58. CONNECT NO. 8 WATER BY-PASS HOSE |
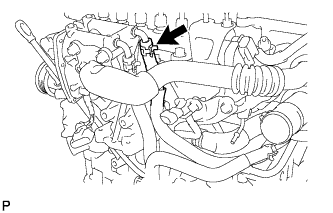 |
| 59. INSTALL NO. 7 WATER BY-PASS HOSE |
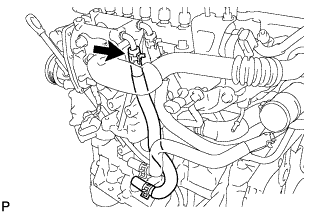 |
| 60. INSTALL DIESEL THROTTLE BODY ASSEMBLY |
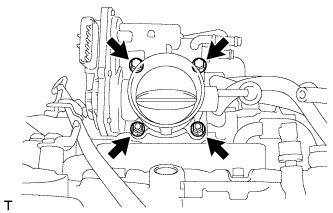 |
Install a new gasket and the diesel throttle body with the 2 bolts and 2 nuts.
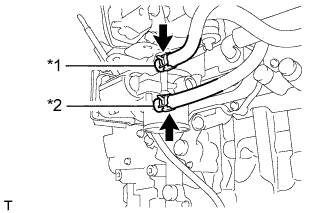 |
Connect the No. 6 and No. 7 water by-pass hoses.
| *1 | No. 6 Water By-pass Hose |
| *2 | No. 7 Water By-pass Hose |
| 61. INSTALL V-RIBBED BELT TENSIONER ASSEMBLY |
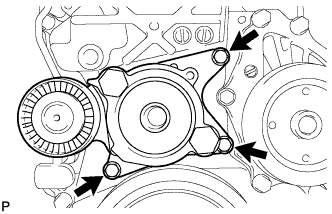 |
Install the V-ribbed belt tensioner with the 3 bolts.
| 62. INSTALL ENGINE MOUNTING BRACKET |
Temporarily install the engine mounting bracket with the 2 bolts labeled A.
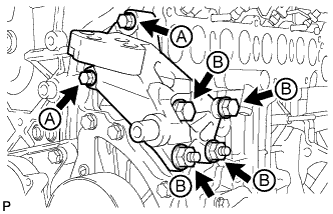 |
Temporarily install the 2 bolts and 2 nuts labeled B in the illustration.
Tighten the 2 bolts labeled A in the illustration.
Tighten the 2 bolts and 2 nuts labeled B in the illustration.
| 63. INSTALL NO. 4 WATER BY-PASS PIPE |
|
Install the No. 4 water by-pass hose.
| 64. INSTALL NO. 2 IDLER PULLEY SUB-ASSEMBLY |
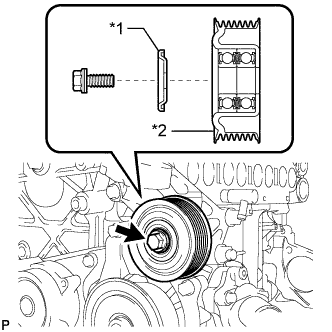 |
Install the No. 2 idler pulley and No. 2 idler pulley cover plate with the bolt.
| *1 | No. 2 Idler Pulley Cover Plate |
| *2 | No. 2 Idler Pulley |
| 65. INSTALL NO. 1 IDLER PULLEY SUB-ASSEMBLY |
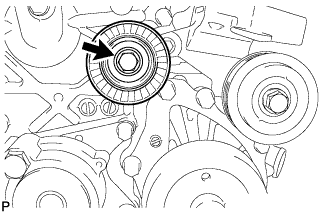 |
Install the No. 1 idler pulley with the bolt.
| 66. INSTALL IDLER PULLEY COVER PLATE |
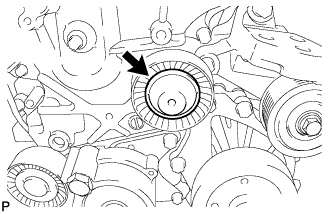 |
Install the idler pulley cover plate to the No. 1 idler pulley.
| 67. INSTALL VACUUM PUMP ASSEMBLY |
Apply a light coat of engine oil to 2 new O-rings.
Install 2 new O-rings to the vacuum pump.
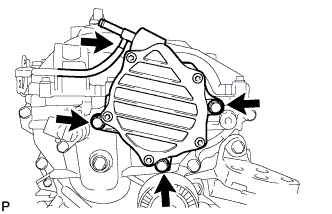 |
Install the vacuum pump with 3 new bolts.
Connect the vacuum hose.
| 68. INSTALL GENERATOR ASSEMBLY |
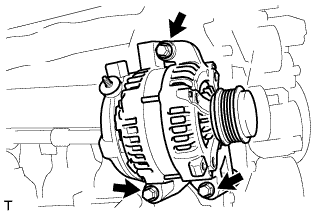 |
Install the generator with the 3 bolts.
| 69. CONNECT ENGINE WIRE |
Connect the connectors and clamps, and then connect the engine wire to the engine with the bracket bolts.
| 70. INSTALL ENGINE ASSEMBLY |
Install the engine assembly (Click here).
| 71. CONNECT CABLE TO NEGATIVE BATTERY TERMINAL |