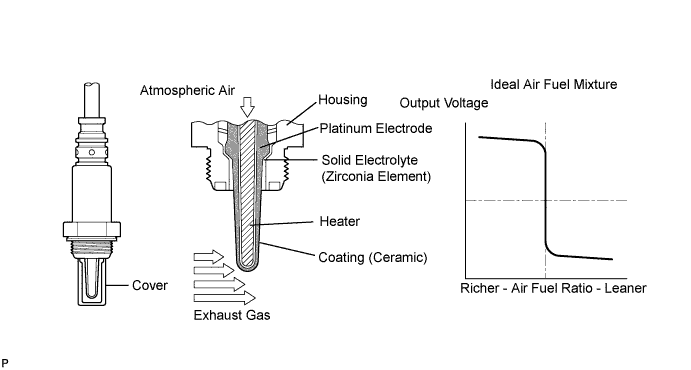
DTC P0136 Oxygen Sensor Circuit Malfunction (Bank 1 Sensor 2) |
DTC P0137 Oxygen Sensor Circuit Low Voltage (Bank 1 Sensor 2) |
DTC P0138 Oxygen Sensor Circuit High Voltage (Bank 1 Sensor 2) |
DTC P0156 Oxygen Sensor Circuit Malfunction (Bank 2 Sensor 2) |
DTC P0157 Oxygen Sensor Circuit Low Voltage (Bank 2 Sensor 2) |
DTC P0158 Oxygen Sensor Circuit High Voltage (Bank 2 Sensor 2) |
| DTC No. | DTC Detection Condition | Trouble Area |
| P0136 P0156 |
|
|
| P0137 P0157 |
|
|
| P0138 P0158 |
|
|
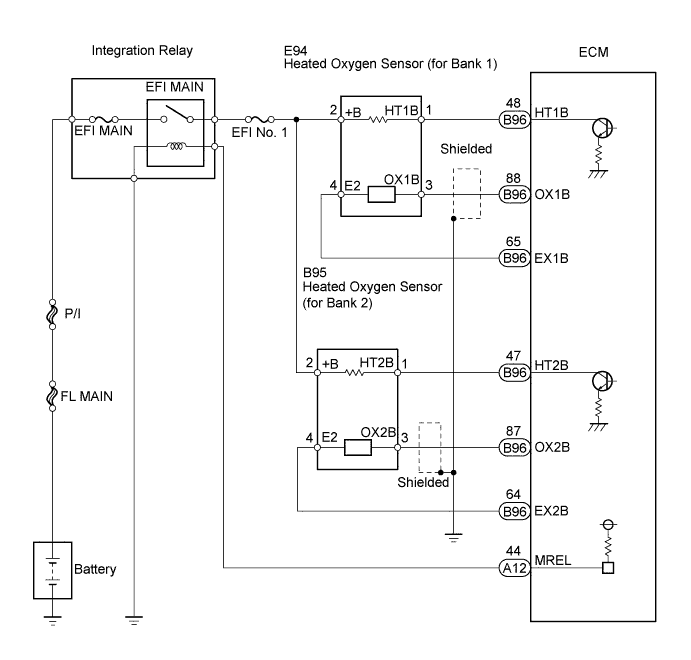
| Tester Display (Sensor) | Injection Volume | Status | Voltage |
| AFS B1S1 or AFS B2S1 (A/F) | +25 % | Rich | Less than 3.0 V |
| AFS B1S1 or AFS B2S1 (A/F) | -12.5 % | Lean | More than 3.35 V |
| O2S B1S2 or O2S B2S2 (HO2) | +25 % | Rich | More than 0.55 V |
| O2S B1S2 or O2S B2S2 (HO2) | -12.5 % | Lean | Less than 0.4 V |
| Case | Air Fuel Ratio Sensor (Sensor 1) Output Voltage | Heated Oxygen Sensor (Sensor 2) Output Voltage | Main Suspected Trouble Area |
| 1 | 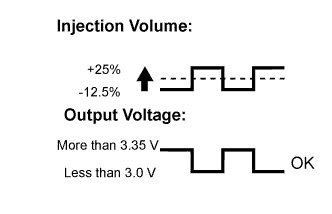 | 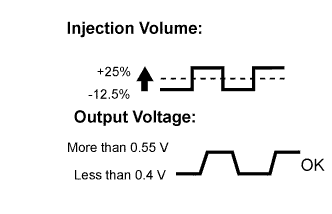 | - |
| 2 | 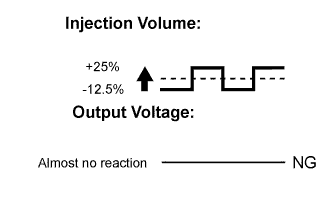 | |
|
| 3 | | |
|
| 4 | | |
|
| 1.READ DTC OUTPUT |
Connect the intelligent tester to the DLC3.
Turn the ignition switch to the ON position and turn the tester on.
Enter the following menus: Powertrain / Engine and ECT / DTC.
Read the DTCs.
| Display (DTC Output) | Proceed to |
| P0138 or P0158 | A |
| P0137 or P0157 | B |
| P0136 or P0156 | C |
|
| ||||
|
| ||||
| A | |
 |
| 2.READ VALUE USING OXYGEN SENSOR (OUTPUT VOLTAGE) |
Connect the intelligent tester to the DLC3.
Turn the ignition switch to the ON position and turn the tester on.
Enter the following menus: Powertrain / Engine and ECT / Data List / O2S B1S2 or O2S B2S2.
Allow the engine to idle.
Read the Heated Oxygen (HO2) sensor output voltage while idling.
| HO2 Sensor Output Voltage | Proceed to |
| More than 1.2 V | A |
| Less than 1.0 V | B |
|
| ||||
| A | |
|
| 3.CHECK HARNESS AND CONNECTOR (CHECK FOR SHORT) |
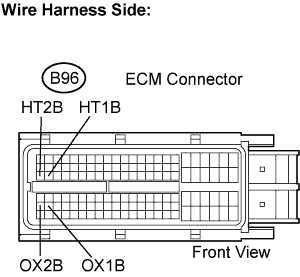 |
Turn the ignition switch off and wait for 5 minutes.
Disconnect the ECM connector.
Measure the resistance according to the value(s) in the table below.
| Tester Connection | Specified Condition |
| HT1B (B96-48) - OX1B (B96-88) | 10 kΩ or higher |
| HT2B (B96-47) - OX2B (B96-87) | 10 kΩ or higher |
Reconnect the ECM connector.
|
| ||||
| OK | ||
 | ||
| ||
| 4.INSPECT HEATED OXYGEN SENSOR (CHECK FOR SHORT) |
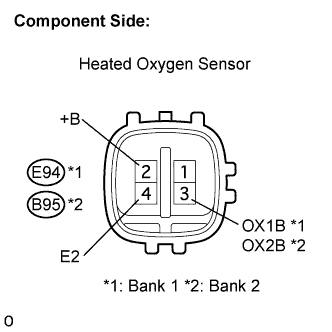 |
Disconnect the heated oxygen sensor connector.
Measure the resistance according to the value(s) in the table below.
| Tester Connection | Specified Condition |
| +B (2) - OX1B (3) | 10 kΩ or higher |
| +B (2) - E2 (4) | 10 kΩ or higher |
| Tester Connection | Specified Condition |
| +B (2) - OX2B (3) | 10 kΩ or higher |
| +B (2) - E2 (4) | 10 kΩ or higher |
|
| ||||
| OK | ||
| ||
| ||
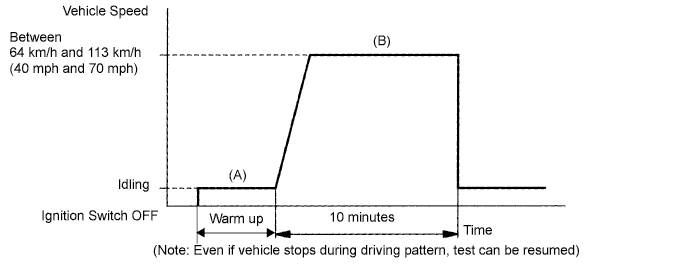
| 5.PERFORM CONFIRMATION DRIVING PATTERN |
| NEXT | |
|
| 6.CHECK WHETHER DTC OUTPUT RECURS (DTC P0138 or P0158) |
On the intelligent tester, enter the following menus: Powertrain / Engine / DTC.
Read the DTCs.
| Display (DTC Output) | Proceed to |
| P0138 or P0158 | A |
| No output | B |
|
| ||||
| A | ||
| ||
| ||
| 7.READ VALUE USING OXYGEN SENSOR (OUTPUT VOLTAGE) |
Connect the intelligent tester to the DLC3.
Turn the ignition switch to the ON position and turn the tester on.
Start the engine.
Enter the following menus: Powertrain / Engine and ECT / Data List / O2S B1S2 or O2S B2S2.
After warming up the engine, run the engine at an engine speed of 2500 rpm for 3 minutes.
Read the output voltage of the HO2 sensor when the engine rpm is suddenly increased.
|
| ||||
| OK | |
|
| 8.PERFORM CONFIRMATION DRIVING PATTERN |
| NEXT | |
|
| 9.CHECK WHETHER DTC OUTPUT RECURS (DTC P0136 or P0156) |
On the intelligent tester, enter the following menus: Powertrain / Engine and ECT / DTC.
Read the DTCs.
| Display (DTC Output) | Proceed to |
| P0136 or P0156 | A |
| No output | B |
|
| ||||
| A | |
|
| 10.REPLACE HEATED OXYGEN SENSOR |
Replace the hated oxygen sensor (Click here).
| NEXT | |
|
| 11.PERFORM CONFIRMATION DRIVING PATTERN |
| NEXT | |
|
| 12.CHECK WHETHER DTC OUTPUT RECURS (DTC P0136 or P0156) |
On the intelligent tester, enter the following menus: Powertrain / Engine and ECT / DTC.
Read the DTCs.
| Display (DTC Output) | Proceed to |
| P0136 or P0156 | A |
| No output | B |
|
| ||||
| A | |
|
| 13.PERFORM ACTIVE TEST USING INTELLIGENT TESTER (INJECTION VOLUME) |
Connect the intelligent tester to the DLC3.
Start the engine and turn the tester on.
Warm up the engine.
Enter the following menus: Powertrain / Engine and ECT / Active Test / Control the Injection Volume.
Change the fuel injection volume using the tester, while monitoring the output voltage of Air-Fuel Ratio (A/F) and HO2 sensor displayed on the tester.
| Tester Display (Sensor) | Voltage Variation | Proceed to |
| AFS B1S1 (A/F) AFS B2S1 (A/F) | Alternates between more and less than 3.3 V | OK |
| AFS B1S1 (A/F) AFS B2S1 (A/F) | Remains more than 3.3 V | NG |
| AFS B1S1 (A/F) AFS B2S1 (A/F) | Remains less than 3.3 V | NG |
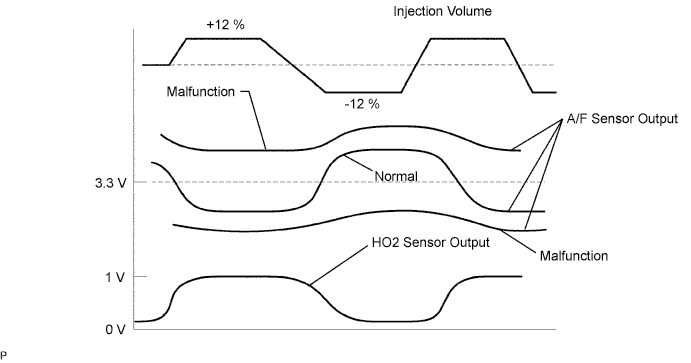
|
| ||||
| OK | ||
| ||
| ||
| 14.CHECK FOR EXHAUST GAS LEAKS |
|
| ||||
| OK | |
|
| 15.INSPECT HEATED OXYGEN SENSOR (HEATER RESISTANCE) |
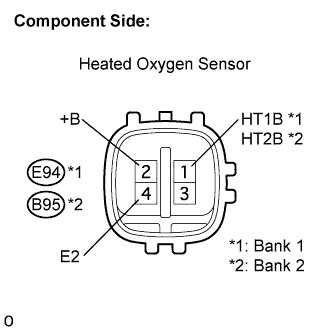 |
Disconnect the heated oxygen sensor connector.
Measure the resistance according to the value(s) in the table below.
| Tester Connection | Condition | Specified Condition |
| HT1B (1) - +B (2) | 20°C (68°F) | 11 to 16 Ω |
| HT1B (1) - E2 (4) | Always | 10 kΩ or higher |
| Tester Connection | Condition | Specified Condition |
| HT2B (1) - +B (2) | 20°C (68°F) | 11 to 16 Ω |
| HT2B (1) - E2 (4) | Always | 10 kΩ or higher |
Reconnect the HO2 sensor connector.
|
| ||||
| OK | |
|
| 16.CHECK HARNESS AND CONNECTOR (HEATED OXYGEN SENSOR - ECM) |
Disconnect the heated oxygen sensor connector.
Disconnect the ECM connector.
Measure the resistance according to the value(s) in the table below.
| Terminal Connection | Specified Condition |
| HT1B (E94-1) - HT1B (B96-48) | Below 1 Ω |
| OX1B (E94-3) - OX1B (B96-88) | Below 1 Ω |
| E2 (E94-4) - EX1B (B96-65) | Below 1 Ω |
| Terminal Connection | Specified Condition |
| HT2B (B95-1) - HT2B (B96-47) | Below 1 Ω |
| OX2B (B95-3) - OX2B (B96-87) | Below 1 Ω |
| E2 (B95-4) - EX2B (B96-64) | Below 1 Ω |
| Terminal Connection | Specified Condition |
| HT1B (E94-1) or HT1B (B96-48) - Body ground | 10 kΩ or higher |
| OX1B (E94-3) or OX1B (B96-88) - Body ground | 10 kΩ or higher |
| E2 (E94-4) or EX1B (B96-65) - Body ground | 10 kΩ or higher |
| Terminal Connection | Specified Condition |
| HT2B (B95-1) or HT2B (B96-47) - Body ground | 10 kΩ or higher |
| OX2B (B95-3) or OX2B (B96-87) - Body ground | 10 kΩ or higher |
| E2 (B95-4) or EX2B (B96-64) - Body ground | 10 kΩ or higher |
Reconnect the HO2 sensor connector.
Reconnect the ECM connector.
|
| ||||
| OK | ||
| ||
| ||

