 |
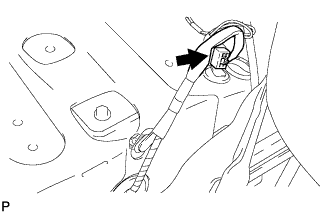
Disconnect the connector.
ENGINE ASSEMBLY > REMOVAL |
| 1. DISCHARGE FUEL SYSTEM PRESSURE |
Remove the console box .
|
Disconnect the connector.
Start the engine. After the engine has stopped, turn the ignition switch off.
Check that the engine does not start.
Remove the fuel tank cap, and let the air out of the fuel tank.
|
Connect the connector.
Install the console box .
| 2. DISCONNECT CABLE FROM NEGATIVE BATTERY TERMINAL |
| 3. REMOVE HOOD SUB-ASSEMBLY |
Remove the engine hood .
| 4. REMOVE RADIATOR SUPPORT OPENING COVER |
| 5. REMOVE BATTERY |
Loosen the bolt, nut and remove the battery clamp.
Remove the battery.
| 6. REMOVE BATTERY TRAY |
| 7. REMOVE FRONT WHEEL |
| 8. REMOVE NO. 1 ENGINE UNDER COVER |
| 9. REMOVE NO. 2 ENGINE UNDER COVER |
| 10. REMOVE FRONT FENDER APRON RH |
| 11. REMOVE NO. 1 ENGINE COVER |
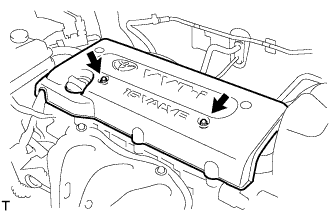 |
Remove the 2 nuts and cover.
| 12. DRAIN ENGINE COOLANT |
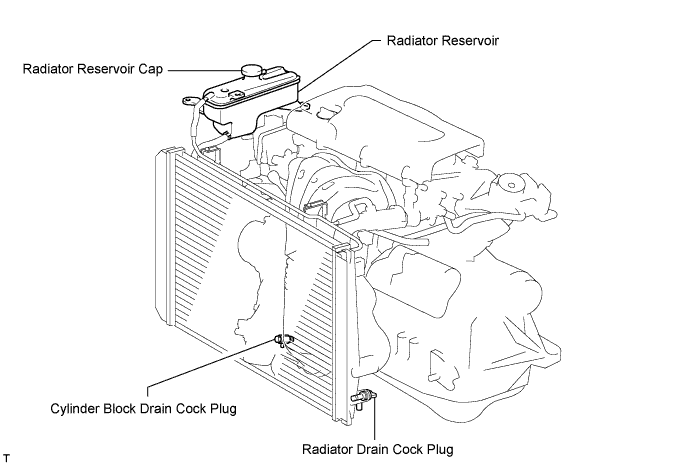
Loosen the radiator drain cock plug.
Remove the radiator reservoir cap.
Loosen the cylinder block drain cock plug.
| 13. DRAIN AUTOMATIC TRANSAXLE FLUID (for Automatic Transaxle) |
Drain automatic transaxle fluid for U241E (2WD) .
Drain automatic transaxle fluid for U140F (4WD) .
| 14. DRAIN TRANSAXLE OIL (for Manual Transaxle) |
Drain transaxle oil for E352 (2WD) .
Drain transaxle oil for E359F (4WD) .
| 15. REMOVE RADIATOR ASSEMBLY |
Remove the radiator (Click here).
| 16. REMOVE RADIATOR RESERVOIR |
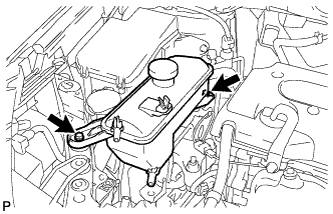 |
Remove the 2 bolts and reservoir.
| 17. REMOVE PURGE VSV |
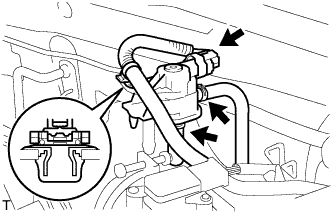 |
Disconnect the purge VSV connector.
Disconnect the wire harness clamp.
Disconnect the 2 purge line hoses from the purge VSV.
Remove the purge VSV from the air cleaner hose.
| 18. REMOVE AIR CLEANER CAP |
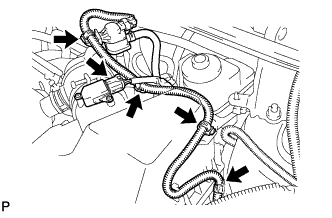 |
Disconnect the mass air flow meter connector.
Disconnect the purge VSV connector.
Disconnect the 4 wire harness clamps.
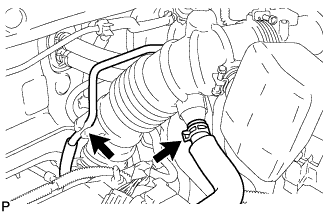 |
Disconnect the No. 2 ventilation hose from the air cleaner hose.
Disconnect the purge line hose from the clamp.
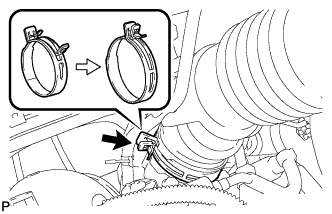 |
Lock the No. 1 air cleaner hose clamp, and then disconnect the No. 1 air cleaner hose from the throttle body.
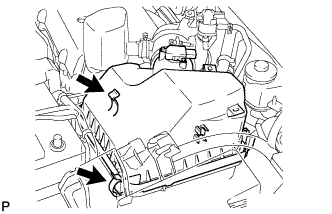 |
Unfasten the 2 hook clamps, and then remove the air cleaner cap.
Remove the air cleaner filter element from the air cleaner case.
| 19. REMOVE AIR CLEANER FILTER ELEMENT SUB-ASSEMBLY |
| 20. REMOVE AIR CLEANER CASE SUB-ASSEMBLY |
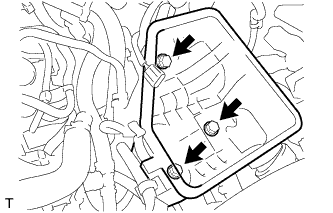 |
Remove the 3 bolts.
Disconnect the case from the No. 1 air cleaner inlet.
| 21. REMOVE FRONT BATTERY CARRIER |
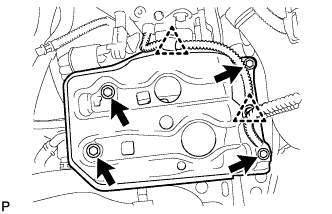 |
Disconnect the 2 clamps of the engine wire.
Remove the 4 bolts and front battery carrier.
| 22. REMOVE BATTERY BRACKET REINFORCEMENT |
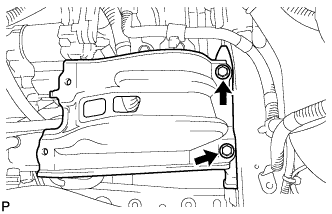 |
Remove the 2 bolts and battery bracket reinforcement.
| 23. REMOVE BATTERY CARRIER BRACKET |
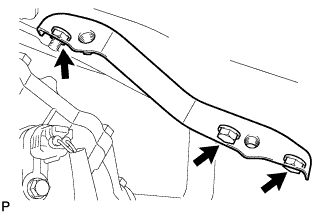 |
Remove the 2 bolts, nut and battery carrier bracket.
| 24. DISCONNECT UNION TO CONNECTOR TUBE HOSE (for LHD) |
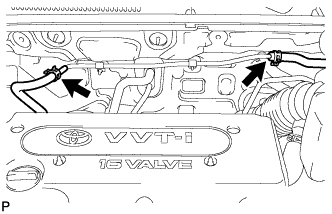 |
Disconnect the 2 union to connector tube hoses from the booster vacuum tube.
| 25. DISCONNECT UNION TO CONNECTOR TUBE HOSE (for RHD) |
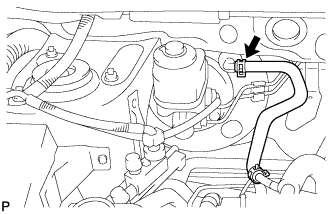 |
Disconnect the union to connector tube hose from the booster vacuum tube.
| 26. DISCONNECT HEATER WATER INLET HOSE |
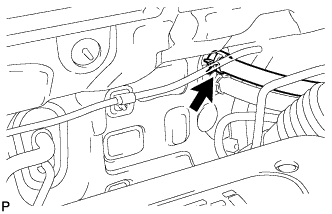 |
Disconnect the heater water inlet hose from the heater unit.
| 27. DISCONNECT HEATER WATER OUTLET HOSE |
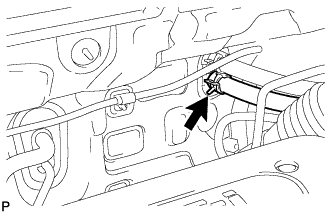 |
Disconnect the heater water outlet hose from the heater unit.
| 28. DISCONNECT FUEL TUBE |
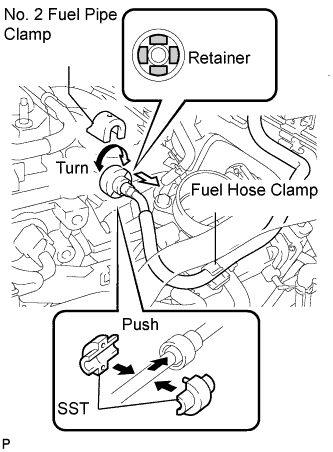 |
Remove the fuel tube from the fuel hose clamp.
Remove the fuel pipe clamp.
Wipe off any dirt on the fuel tube connector.
Hold the fuel tube connector, and then install the SST.
Turn the SST to align the retainer inside the fuel tube connector with the chamfered part of the SST.
Insert the SST into the fuel tube and hold it. Then push the fuel tube connector toward the SST side.
Mount the retainer of the fuel tube connector onto the chamfered part of the SST.
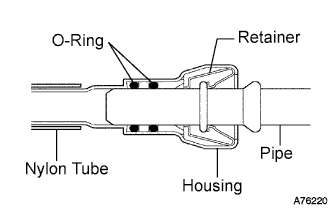 |
Slide the SST and fuel tube connector together towards the fuel tube until they make a "click" sound, and then disconnect the fuel tube.
Drain the fuel remaining inside the fuel tube.
Cover the fuel tube and fuel pipe with a plastic bag to protect the disconnected part.
| 29. DISCONNECT NO. 2 VENTILATION HOSE |
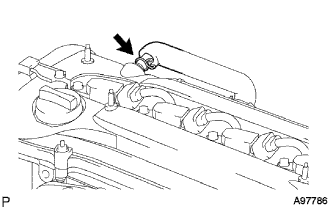 |
Disconnect the No. 2 ventilation hose from the ventilation valve.
| 30. REMOVE THROTTLE BODY |
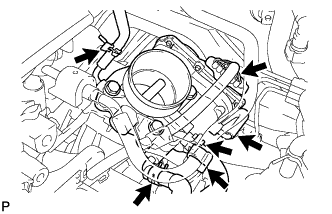 |
Disconnect the purge line hose from the throttle body.
Disconnect the water by-pass hose from the throttle body.
Disconnect the No. 2 water by-pass hose from the throttle body.
for Type A:
Disconnect the No. 1 throttle body hose from the throttle body.
Disconnect the throttle position sensor and control motor connector.
Disconnect the wire harness clamp.
Disconnect the fuel tube from the clamp.
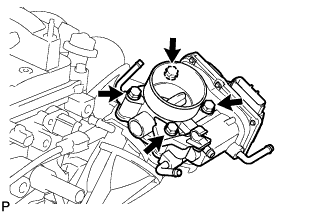 |
Remove the 4 bolts, and then remove the fuel pipe support and throttle body.
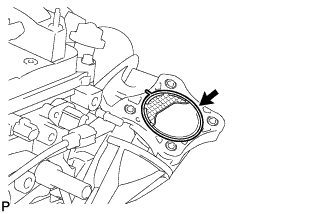 |
Remove the gasket from the intake manifold.
| 31. REMOVE FUEL DELIVERY PIPE SUB-ASSEMBLY |
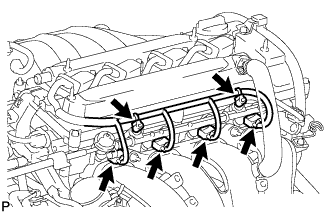 |
Remove the 2 wire harness clamps.
Disconnect the 4 fuel injector connectors.
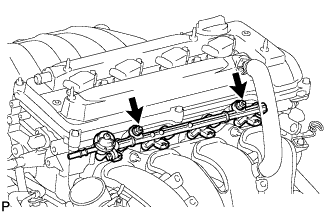 |
Remove the 2 bolts and then pull out the fuel delivery pipe together with the 4 fuel injectors.
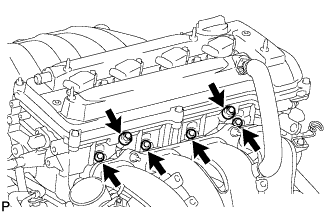 |
Remove the 2 delivery pipe spacers from the cylinder head.
Remove the 4 insulators from the cylinder head.
| 32. REMOVE INTAKE MANIFOLD |
Disconnect the union to check valve hose from the brake booster.
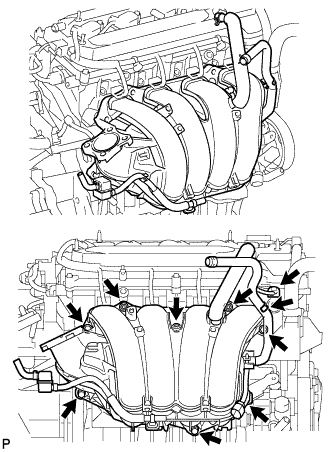 |
Disconnect the camshaft timing oil control valve connector.
Remove the wire harness clamp.
Remove the union to check valve hose from the vacuum hose clamp.
Remove the 5 bolts, 2 nuts and intake manifold.
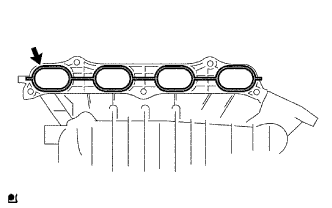 |
Remove the gasket from the intake manifold.
| 33. REMOVE INTAKE MANIFOLD INSULATOR |
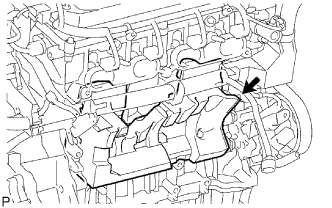 |
Remove the intake manifold insulator from the cylinder block.
| 34. REMOVE TRANSAXLE CONTROL CABLE ASSEMBLY (for Automatic Transaxle) |
Remove the transaxle control cable for U241E (2WD) .
Remove the transaxle control cable for U140F (4WD) .
| 35. REMOVE TRANSAXLE CONTROL CABLE ASSEMBLY (for Manual Transaxle) |
Remove the transaxle control cable for E352 (2WD) .
Remove the transaxle control cable for E359F (4WD) .
| 36. REMOVE CLUTCH RELEASE CYLINDER ASSEMBLY (for Manual Transaxle) |
Remove the clutch release cylinder for E352 (2WD) .
Remove the clutch release cylinder for E359F (4WD) .
| 37. REMOVE FRONT SUSPENSION MEMBER REINFORCEMENT RH |
Remove the 4 bolts and reinforcement RH.
| 38. REMOVE FAN & GENERATOR V BELT |
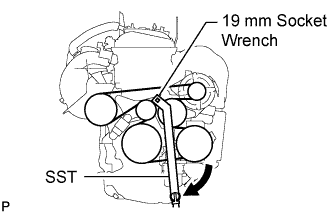 |
Using SST and 19 mm socket wrench, loosen the V-ribbed belt tensioner arm clockwise, then remove the fan and generator V belt.
| 39. REMOVE GENERATOR ASSEMBLY |
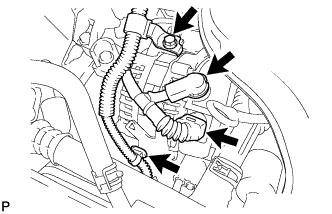 |
Disconnect the generator connector.
Remove the terminal cap.
Remove the nut and disconnect the generator wire.
Remove the bolt and wire harness clamp bracket.
Remove the wire harness clamps.
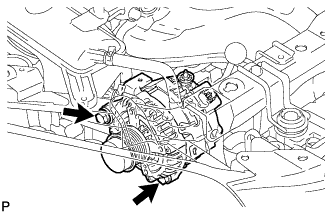 |
Remove the 2 bolts and generator.
| 40. REMOVE COOLER COMPRESSOR ASSEMBLY |
Remove the cooler compressor .
| 41. REMOVE ECM |
Remove the ECM .
| 42. DISCONNECT ENGINE WIRE |
Remove the engine room relay block cover.
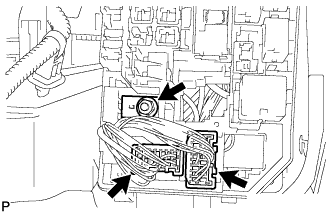 |
Remove the nut and disconnect the 2 engine wire connectors.
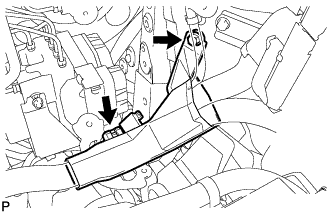 |
Remove the bolt and disconnect the engine wire cover clamp.
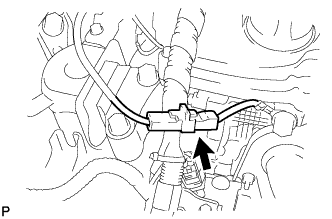 |
Disconnect the ground cable connector.
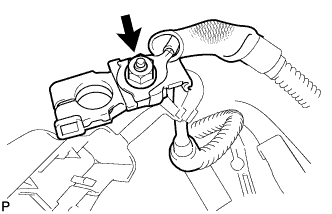 |
Remove the nut from the battery positive (+) terminal to disconnect the engine wire.
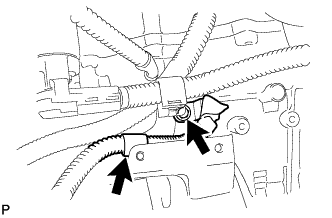 |
Disconnect the ground cable engine wire clamp located near the starter.
Remove the bolt and ground cable located near the starter.
| 43. REMOVE FRONT EXHAUST PIPE ASSEMBLY |
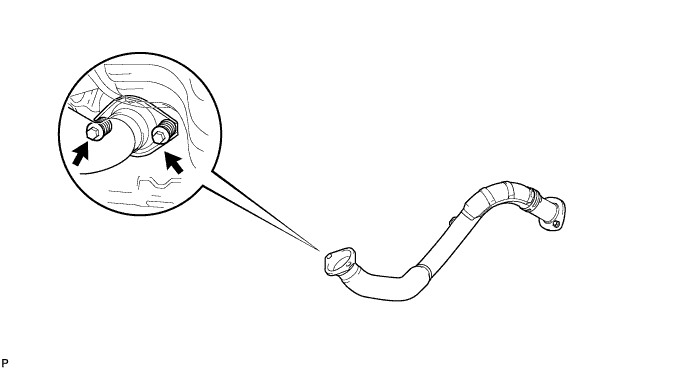
Remove the 2 bolts, 2 compression springs and front exhaust pipe.
Remove the gasket from the exhaust manifold.
| 44. REMOVE FRONT DRIVE SHAFT ASSEMBLY |
Remove the front drive shaft (for 2WD) (Click here).
Remove the front drive shaft (for 4WD) (Click here).
| 45. REMOVE PROPELLER SHAFT ASSEMBLY (for 4WD) |
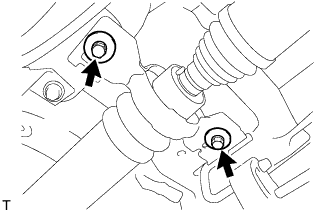 |
Remove the 2 bolts and 2 adjusting washers, and disconnect the propeller with center bearing shaft.
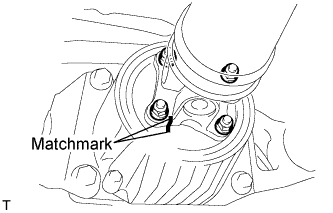 |
Place matchmarks on the differential carrier and propeller shaft.
Remove the 4 nuts and 4 washers, and disconnect the propeller shaft and differential carrier.
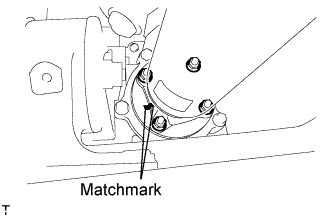 |
Place matchmarks on the transfer and propeller shaft.
Remove the 4 nuts and 4 washers, and disconnect the propeller shaft from the transfer.
| 46. REMOVE ENGINE MOUNTING INSULATOR FR |
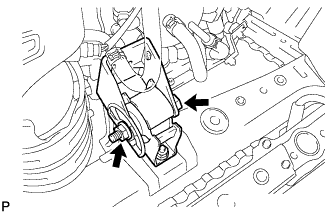 |
Remove the through bolt and nut.
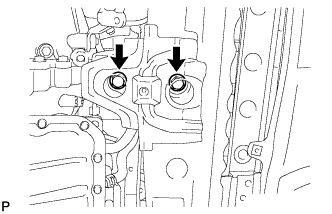 |
Remove the 2 bolts and front engine mounting insulator FR.
| 47. REMOVE ENGINE MOUNTING INSULATOR RR |
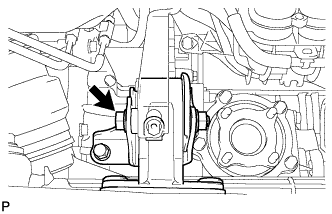 |
Remove the through bolt.
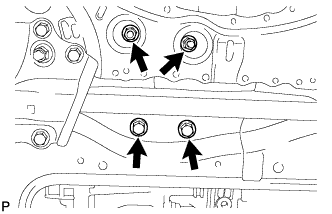 |
Remove the 2 nuts, 2 bolts and engine mounting insulator RR.
| 48. REMOVE ENGINE ASSEMBLY WITH TRANSAXLE |
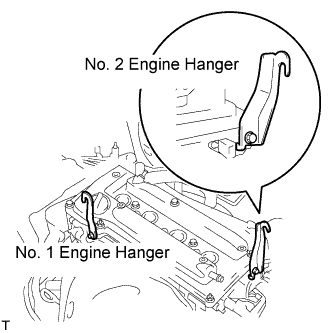 |
Install the No. 1 and No. 2 engine hangers with the bolts as shown in the illustration.
| Item | Part No. |
| No. 1 engine hanger | 12281-28010 |
| No. 2 engine hanger | 12282-28010 |
| Bolt | 91512-61020 |
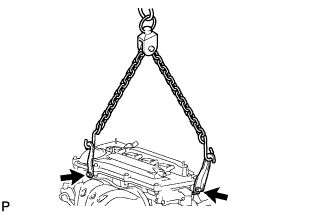 |
Attach the sling device and the engine with the chain block.
Carefully remove the engine with transaxle from the vehicle.
| 49. REMOVE ENGINE MOUNTING INSULATOR RH |
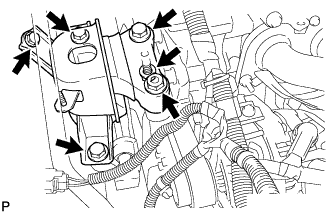 |
Remove the 2 nuts, 4 bolts and engine mounting insulator RH.
| 50. REMOVE ENGINE MOUNTING INSULATOR LH |
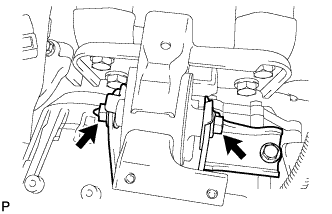 |
Remove the through bolt and nut.
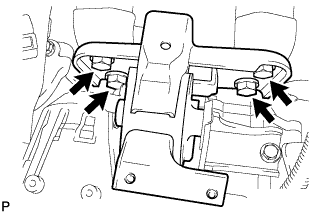 |
Remove the 4 bolts and engine mounting insulator LH.
| 51. REMOVE DRIVE SHAFT BEARING BRACKET (for 2WD) |
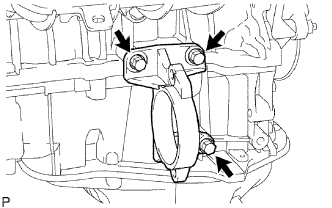 |
Remove the 3 bolts and bracket.
| 52. REMOVE DRIVE SHAFT BEARING BRACKET (for 4WD) |
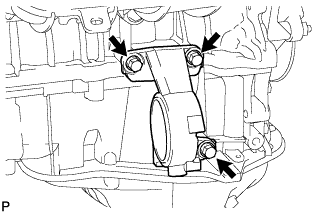 |
Remove the 3 bolts and bracket.
| 53. REMOVE TRANSFER ASSEMBLY (for 4WD) |
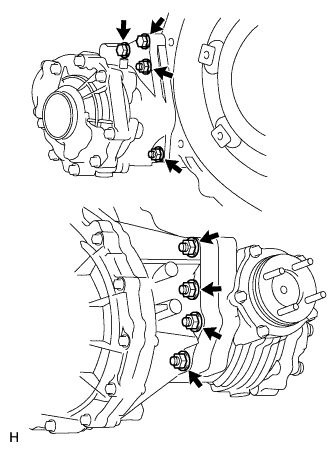 |
except K111F:
Remove the 6 nuts, 2 bolts and transfer from the transaxle.
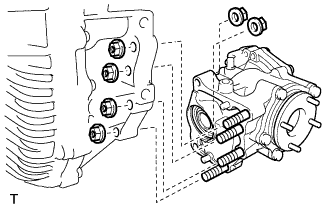 |
for K111F:
Remove the 6 nuts and transfer from the transaxle.
| 54. REMOVE STARTER ASSEMBLY |
Remove the starter for 1.6 kW Type .
Remove the starter for 1.7 kW Type .
| 55. REMOVE AUTOMATIC TRANSAXLE ASSEMBLY (for Automatic Transaxle) |
Remove the automatic transaxle for U241E (2WD) .
Remove the automatic transaxle for U140F (4WD) .
| 56. REMOVE TORQUE CONVERTER CLUTCH ASSEMBLY (for Automatic Transaxle) |
| 57. REMOVE DRIVE PLATE SUB-ASSEMBLY (for Automatic Transaxle) |
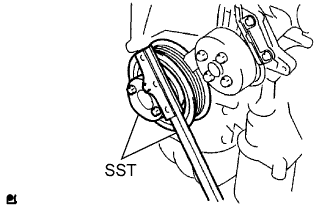 |
Using SST, hold the crankshaft.
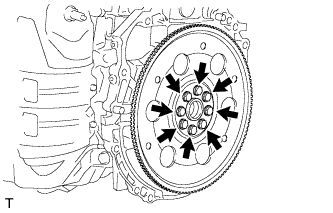 |
Remove the 8 bolts, rear spacer, drive plate and front spacer.
| 58. REMOVE FLYWHEEL HOUSING UNDER COVER (for Manual Transaxle) |
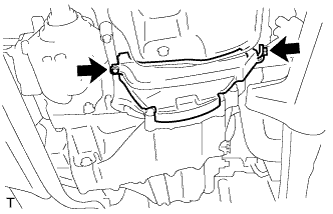 |
Remove the 2 bolts and insulator from the stiffener plate.
| 59. REMOVE STIFFENER PLATE LH (for Manual Transaxle) |
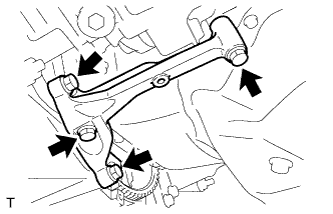 |
Remove the 4 bolts and stiffener plate.
| 60. REMOVE STIFFENER PLATE RH (for Manual Transaxle) |
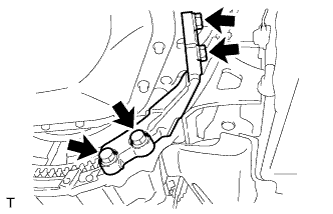 |
Remove the 4 bolts and stiffener plate.
| 61. REMOVE MANUAL TRANSAXLE ASSEMBLY (for Manual Transaxle) |
Remove the manual transaxle for E352 (2WD) .
Remove the manual transaxle for E359F (4WD) .
| 62. REMOVE CLUTCH COVER ASSEMBLY (for Manual Transaxle) |
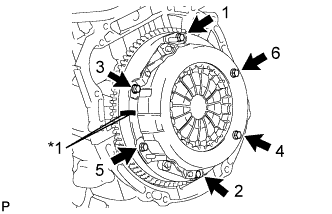 |
Put matchmarks on the clutch cover assembly and flywheel sub-assembly.
| *1 | Matchmark |
Loosen each set bolt one turn at a time in the order shown in the illustration until the spring tension is released.
Remove the set bolts and pull off the clutch cover assembly.
| 63. REMOVE CLUTCH DISC ASSEMBLY (for Manual Transaxle) |
| 64. REMOVE FLYWHEEL SUB-ASSEMBLY (for Manual Transaxle) |
|
Using SST, hold the crankshaft.
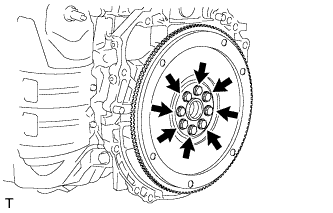 |
Remove the 8 bolts and flywheel.