REAR DRIVE SHAFT ASSEMBLY > INSTALLATION |
| 1. INSTALL REAR DRIVE SHAFT ASSEMBLY LH |
Align the splines of the rear drive shaft outboard joints and, install the left and right rear drive shafts to the axle hub.
| 2. INSTALL DIFFERENTIAL CARRIER ASSEMBLY |
Apply hypoid gear oil to the splines of the left and right rear drive shaft inboard joints.
![]() |
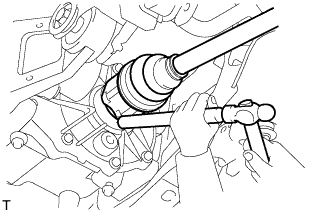
Align the splines of the rear drive shaft inboard joints and, using a brass bar and hammer, tap in the left and right rear drive shafts.
![]() |
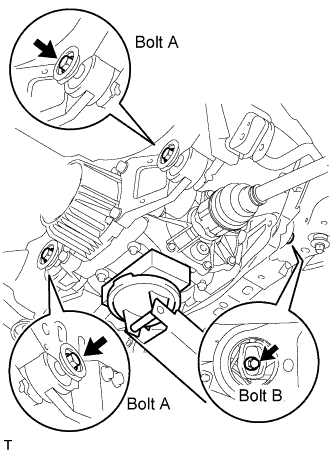
Slowly raise the transmission jack, fix the nuts in place and install the 3 bolts.
| 3. INSTALL REAR SPEED SENSOR LH |
| 4. INSTALL REAR AXLE SHAFT NUT |
Clean the threaded parts on the drive shaft and a new axle shaft nut using a non-residue solvent.
Install a new hub nut.
![]() |
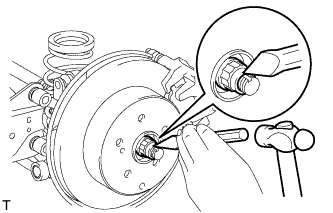
Using a chisel and hammer, stake the hub nut.
| 5. TEMPORARILY INSTALL PROPELLER WITH CENTER BEARING SHAFT ASSEMBLY |
![]() |
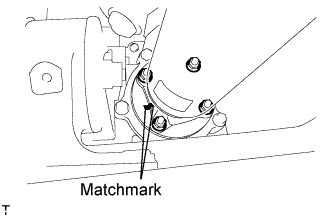
Align the matchmarks of the transfer and propeller shaft.
Temporarily install the propeller shaft with center bearing with the 4 nuts and 4 washers.
![]() |
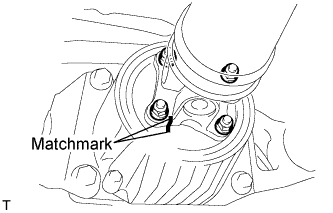
Align the matchmarks of the differential carrier and propeller shaft.
Temporarily install the propeller shaft with center bearing with the 4 nuts and 4 washers.
![]() |
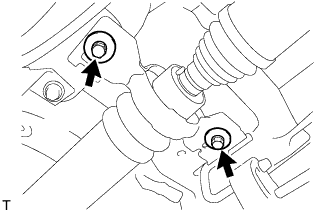
Temporarily install the center support bearing and center support bearing washer with the 2 bolts.
| 6. TIGHTEN PROPELLER WITH CENTER BEARING SHAFT ASSEMBLY |
Tighten the 4 nuts of the propeller shaft and transfer to the torque specification.
Tighten the 4 nuts of the propeller shaft and differential carrier to the torque specification.
Check that the center line of the center support bearing housing is perpendicular to the axis of the propeller shaft.
Tighten the 2 bolts of the center support bearing to the torque specification.
| 7. INSPECT JOINT ANGLE |
Before the angle measurement, stabilize each part by performing procedures like those described below.
Rotate the propeller shaft several times by hand.
Set the jack to the differential, and raise and lower the differential.
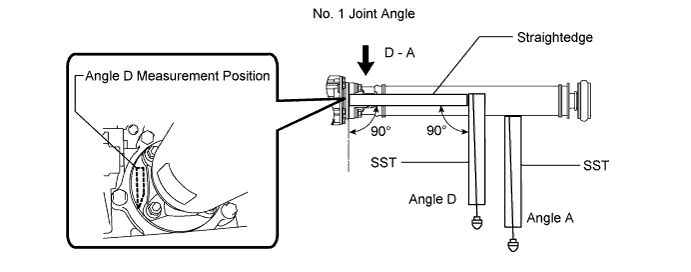
Using SST and a straightedge, measure the angle of the transfer flange (angle D) and the angle of the intermediate shaft (angle A).

Subtract the measured angle of the intermediate shaft (angle A) from the measured angle of the transfer flange (angle D) to obtain the No. 1 joint angle.
| Measurement Position | No. 1 Joint Angle |
| D - A | 2°27' +/-60' |
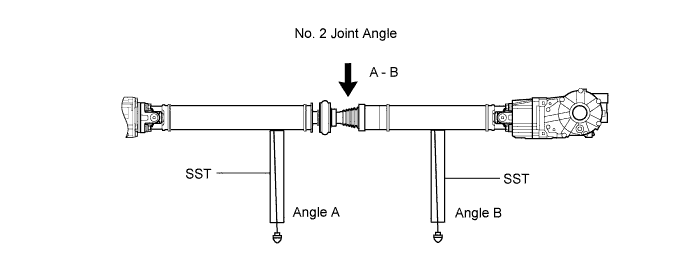
Using SST, measure the angle of the intermediate shaft (angle A) and the angle of the propeller shaft (angle B).

Subtract the measured angle of the propeller shaft (angle B) from the measured angle of the intermediate shaft (angle A) to obtain the No. 2 joint angle.
| Measurement Position | Engine | Transmission | No. 2 Joint Angle |
| A - B | 1AZ-FE | A/T | 1°29' +/-1°30' |
| M/T | 1°28' +/-1°30' | ||
| 2AZ-FE | A/T | 1°35' +/-1°30' | |
| M/T | 1°34' +/-1°30' | ||
| 2GR-FE | A/T | 1°35' +/-1°30' | |
| 3ZR-FAE | M/T | 1°28' +/-1°30' | |
| CVT | 1°29' +/-1°30' | ||
| 2AD-FTV 2AD-FHV | M/T | 1°29' +/-1°30' |
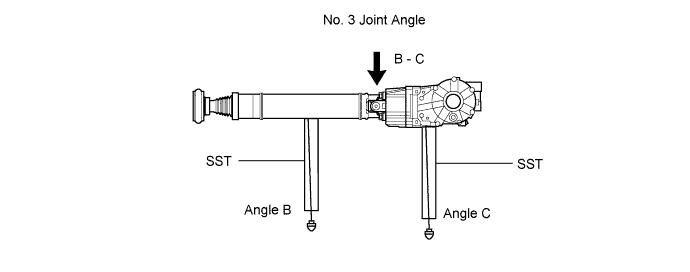
Using SST, measure the angle of the propeller shaft (angle B) and the angle of the rear differential (angle C).

Subtract the measured angle of the propeller shaft (angle B) from the measured angle of the rear differential (angle C) to obtain the No. 3 joint angle.
| Measurement Position | Engine | Transmission | No. 3 Joint Angle |
| B - C | 1AZ-FE | A/T | 2°10' +/-60' |
| M/T | 2°11' +/-60' | ||
| 2AZ-FE | A/T | 2°04' +/-60' | |
| M/T | |||
| 2GR-FE | A/T | 2°04' +/-60' | |
| 3ZR-FAE | M/T | 2°11' +/-60' | |
| CVT | 2°11' +/-60' | ||
| 2AD-FTV 2AD-FHV | M/T | 2°10' +/-60' |
| 8. INSTALL FRONT EXHAUST PIPE ASSEMBLY |
for 1AZ-FE:
for 2AZ-FE:
for 3ZR-FAE:
for 2GR-FE:
| 9. INSTALL EXHAUST CENTER PIPE ASSEMBLY |
for 1AZ-FE:
for 2AZ-FE:
for 3ZR-FAE:
for 2GR-FE:
| 10. INSTALL NO. 2 EXHAUST PIPE SUB-ASSEMBLY |
for 2GR-FE:
| 11. INSTALL TAILPIPE ASSEMBLY |
for 1AZ-FE:
for 2AZ-FE:
for 3ZR-FAE:
for 2GR-FE:
| 12. INSTALL REAR WHEEL |
| 13. ADD DIFFERENTIAL OIL |
| 14. CONNECT CABLE TO NEGATIVE BATTERY TERMINAL |
| 15. CHECK FOR DIFFERENTIAL OIL LEAKAGE |
| 16. CHECK FOR EXHAUST GAS LEAKAGE |
| 17. INSPECT AND ADJUST REAR WHEEL ALIGNMENT |