Home › TRANSMISSION · K111F CVT › CONTINUOUSLY VARIABLE TRANSAXLE SYSTEM

DTC    P0840    Transmission Fluid Pressure Sensor/Switch "A" Circuit

DTC    P0842    Transmission Fluid Pressure Sensor/Switch "A" Circuit Low

DTC    P0843    Transmission Fluid Pressure Sensor/Switch "A" Circuit High


DESCRIPTION

The ECM performs learning control for the belt clamping pressure based on the belt clamping pressure signal, which is detected by the oil pressure sensor.

DTC Code
DTC Detection Condition
  1. Diagnosis Condition
  2. Malfunction Status
  3. Malfunction Time
  4. Other
Trouble Area
P0840
  1. 2 seconds or more have elapsed after the engine is started.
  2. There is an open or short circuit in the oil pressure sensor circuit.
  3. 0.5 seconds
  4. 1 trip detection logic
  1. Open or short in oil pressure sensor circuit
  2. Oil pressure sensor
  3. ECM
P0842
  1. 2 seconds or more have elapsed after the engine is started.
  2. There is a short circuit in the oil pressure sensor circuit.
  3. 0.5 seconds
  4. 1 trip detection logic
  1. Short in oil pressure sensor circuit
  2. Oil pressure sensor
  3. ECM
P0843
  1. 2 seconds or more have elapsed after the engine is started.
  2. There is an open circuit in the oil pressure sensor circuit.
  3. 0.5 seconds
  4. 1 trip detection logic
  1. Open in oil pressure sensor circuit
  2. Oil pressure sensor
  3. ECM

MONITOR DESCRIPTION

These DTCs indicate an open or short circuit in the oil pressure sensor circuit. When there is an open or short circuit in the oil pressure sensor circuit, the ECM detects the problem, illuminates the MIL and stores the DTC.

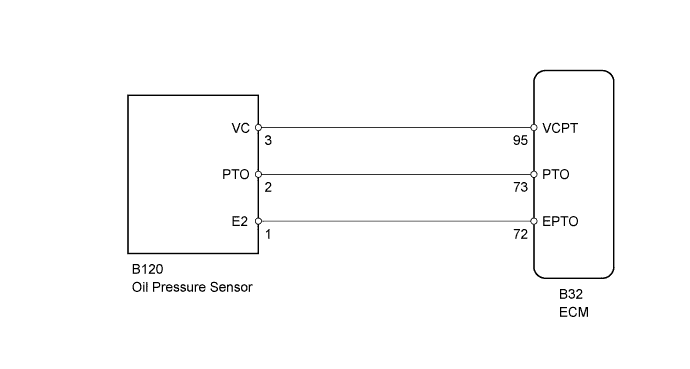
WIRING DIAGRAM


C200617E02


INSPECTION PROCEDURE

1.READ VALUE USING INTELLIGENT TESTER (A/T OIL PRESSURE)
  1. Connect the intelligent tester to the DLC3.

  1. Turn the ignition switch to ON.

  1. Turn the intelligent tester on.

  1. Enter the following menus: Powertrain / Engine and ECT / Data List.

  1. In accordance with the display on the tester, read the Data List.

    Engine and ECT 
    Tester Display
    Measurement Item/Range
    Normal Condition
    Diagnostic Note
    A/T Oil Pressure
    Secondary oil pressure value/
    min.: -0.625 MPa
    max.: 9.575 MPa
    Secondary oil pressure inspection
    1. D position stall speed test: 3.39 to 4.60 MPa
    2. R position stall speed test: 2.76 to 3.80 MPa
    -
    Result 
    Result
    Proceed to
    Data displayed is not as specified under Normal Condition
    A
    Data displayed is as specified under Normal Condition
    B


B
Go to step 6
A


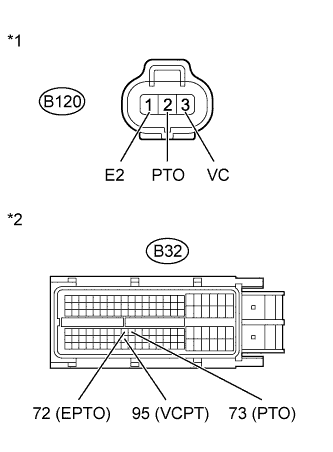
2.CHECK HARNESS AND CONNECTOR (OIL PRESSURE SENSOR - ECM)


    C200613E02
  1. Disconnect the oil pressure sensor connector.

  1. Disconnect the ECM connector.

  1. Measure the resistance according to the value(s) in the table below.

    Standard Resistance:
    Tester Connection
    Condition
    Specified Condition
    B120-1 (E2) - B32-72 (EPTO)
    Always
    Below 1 Ω
    B120-2 (PTO) - B32-73 (PTO)
    Always
    Below 1 Ω
    B120-3 (VC) - B32-95 (VCPT)
    Always
    Below 1 Ω
    B120-1 (E2) or B32-72 (EPTO) - Body ground
    Always
    10 kΩ or higher
    B120-2 (PTO) or B32-73 (PTO) - Body ground
    Always
    10 kΩ or higher
    B120-3 (VC) or B32-95 (VCPT) - Body ground
    Always
    10 kΩ or higher

    Text in Illustration 
    *1
    Front view of wire harness connector
    (to Oil Pressure Sensor)
    *2
    Front view of wire harness connector
    (to ECM)


NG
REPAIR OR REPLACE HARNESS OR CONNECTOR
OK


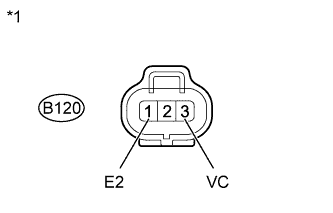
3.INSPECT ECM (VCPT TERMINAL VOLTAGE)


    C199166E02
  1. Disconnect the oil pressure sensor connector.

  1. Turn the ignition switch to ON.

  1. Measure the voltage according to the value(s) in the table below.

    Standard Voltage:
    Tester Connection
    Switch Condition
    Specified Condition
    B120-1 (E2) - B120-3 (VC)
    Ignition switch ON
    4.75 to 5.25 V

    Text in Illustration 
    *1
    Front view of wire harness connector
    (to Oil Pressure Sensor)


NG
Go to step 8
OK


4.REPLACE OIL PRESSURE SENSOR
  1. Replace the oil pressure sensor (Click here).


NEXT


5.PERFORM INITIALIZATION

NOTICE:
  1. Performing reset memory will clear the learned values of both the yaw rate sensor assembly*1 or deceleration sensor*2 (deceleration sensor 0 point calibration) and CVT oil pressure (CVT oil pressure calibration). Make sure to perform reset memory, yaw rate sensor assembly*1 or deceleration sensor*2 0 point calibration and CVT oil pressure calibration when replacing any of the parts shown in the following table:
    Replaced Part
    1. Continuously variable transaxle assembly
    2. ECM
    3. Oil pressure sensor
    4. Yaw rate sensor assembly (w/ VSC)
    5. Deceleration sensor (w/o VSC)
    6. Brake actuator assembly (skid control ECU)
  2. After performing reset memory, always perform yaw rate sensor assembly*1 or deceleration sensor*2 (deceleration sensor 0 point) calibration first, and then CVT oil pressure calibration.
  3. Always perform 0 point calibration with the vehicle on level ground.
  4. Do not shake or vibrate the vehicle during 0 point calibration.

  1. Using the intelligent tester, perform reset memory, deceleration sensor 0 point calibration and CVT oil pressure calibration (Click here).

  1. Check that no DTC is stored.


NEXT

END 

6.REPLACE ECM
  1. Replace the ECM (Click here).


NEXT


7.PERFORM INITIALIZATION

NOTICE:
  1. Performing reset memory will clear the learned values of both the yaw rate sensor assembly*1 or deceleration sensor*2 (deceleration sensor 0 point calibration) and CVT oil pressure (CVT oil pressure calibration). Make sure to perform reset memory, yaw rate sensor assembly*1 or deceleration sensor*2 0 point calibration and CVT oil pressure calibration when replacing any of the parts shown in the following table:
    Replaced Part
    1. Continuously variable transaxle assembly
    2. ECM
    3. Oil pressure sensor
    4. Yaw rate sensor assembly (w/ VSC)
    5. Deceleration sensor (w/o VSC)
    6. Brake actuator assembly (skid control ECU)
  2. After performing reset memory, always perform yaw rate sensor assembly*1 or deceleration sensor*2 (deceleration sensor 0 point) calibration first, and then CVT oil pressure calibration.
  3. Always perform 0 point calibration with the vehicle on level ground.
  4. Do not shake or vibrate the vehicle during 0 point calibration.

  1. Using the intelligent tester, perform reset memory, deceleration sensor 0 point calibration and CVT oil pressure calibration (Click here).

  1. Check that no DTC is stored.


NEXT

END 

8.REPLACE ECM
  1. Replace the ECM (Click here).


NEXT


9.PERFORM INITIALIZATION

NOTICE:
  1. Performing reset memory will clear the learned values of both the yaw rate sensor assembly*1 or deceleration sensor*2 (deceleration sensor 0 point calibration) and CVT oil pressure (CVT oil pressure calibration). Make sure to perform reset memory, yaw rate sensor assembly*1 or deceleration sensor*2 0 point calibration and CVT oil pressure calibration when replacing any of the parts shown in the following table:
    Replaced Part
    1. Continuously variable transaxle assembly
    2. ECM
    3. Oil pressure sensor
    4. Yaw rate sensor assembly (w/ VSC)
    5. Deceleration sensor (w/o VSC)
    6. Brake actuator assembly (skid control ECU)
  2. After performing reset memory, always perform yaw rate sensor assembly*1 or deceleration sensor*2 (deceleration sensor 0 point) calibration first, and then CVT oil pressure calibration.
  3. Always perform 0 point calibration with the vehicle on level ground.
  4. Do not shake or vibrate the vehicle during 0 point calibration.

  1. Using the intelligent tester, perform reset memory, deceleration sensor 0 point calibration and CVT oil pressure calibration (Click here).

  1. Check that no DTC is stored.


NEXT

END