Home › TRANSMISSION · K111F CVT › CONTINUOUSLY VARIABLE TRANSAXLE SYSTEM

DTC    P282B    Pressure Control Solenoid "K" Electrical (Shift Solenoid Valve SLS)


DESCRIPTION

The ECM uses shift solenoid valve SLS to control the secondary pulley pressure and belt clamping pressure according to the input shaft torque. Additionally, shift solenoid valve SLS is used to control the forward and reverse clutch hydraulic pressure when the forward and reverse clutch is engaged.

DTC Code
DTC Detection Condition
  1. Diagnosis Condition
  2. Malfunction Status
  3. Malfunction Time
  4. Other
Trouble Area
P282B
  1. The vehicle is being driven.
  2. There is an open or short circuit in the shift solenoid valve SLS circuit.
  3. 1 second
  4. 1 trip detection logic
  1. Open or short in shift solenoid valve SLS circuit
  2. Continuously variable transaxle assembly
  3. ECM

MONITOR DESCRIPTION

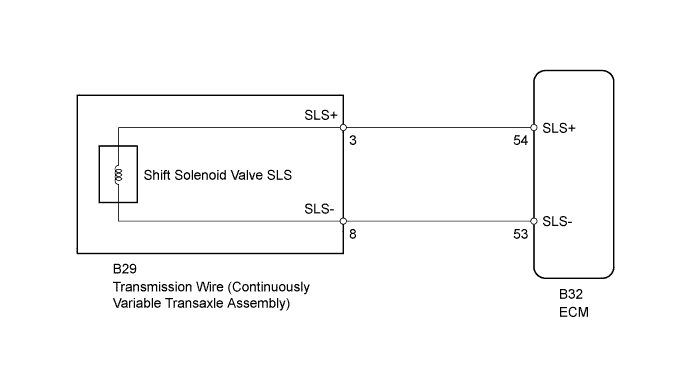
This DTC indicates an open or short circuit in the shift solenoid valve SLS circuit. When there is an open or short circuit in the shift solenoid valve SLS circuit, the ECM detects the problem, illuminates the MIL and stores the DTC.

WIRING DIAGRAM


C200871E05


INSPECTION PROCEDURE

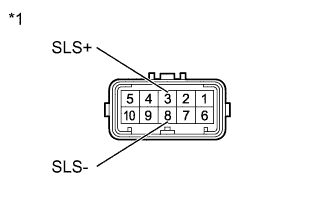
1.INSPECT TRANSMISSION WIRE (SHIFT SOLENOID VALVE SLS)


    C199169E05
  1. Disconnect the transmission wire connector.

  1. Measure the resistance according to the value(s) in the table below.

    Standard Resistance:
    Tester Connection
    Condition
    Specified Condition
    3 (SLS+) - 8 (SLS-)
    20°C (68°F)
    5.0 to 5.6 Ω
    3 (SLS+) - Body ground
    Always
    10 kΩ or higher
    8 (SLS-) - Body ground
    Always
    10 kΩ or higher

    Text in Illustration 
    *1
    Component without harness connected
    (Transmission Wire)


NG
Go to step 5
OK


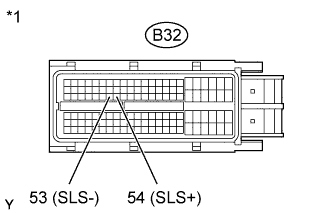
2.CHECK HARNESS AND CONNECTOR (TRANSMISSION WIRE - ECM)


    C197707E32
  1. Disconnect the ECM connector.

  1. Measure the resistance according to the value(s) in the table below.

    Standard Resistance:
    Tester Connection
    Condition
    Specified Condition
    B32-53 (SLS-) - B32-54 (SLS+)
    20°C (68°F)
    5.0 to 5.6 Ω
    B32-53 (SLS-) - Body ground
    Always
    10 kΩ or higher
    B32-54 (SLS+) - Body ground
    Always
    10 kΩ or higher

    Text in Illustration 
    *1
    Front view of wire harness connector
    (to ECM)


NG
REPAIR OR REPLACE HARNESS OR CONNECTOR
OK


3.REPLACE ECM
  1. Replace the ECM (Click here).


NEXT


4.PERFORM INITIALIZATION

NOTICE:
  1. Performing reset memory will clear the learned values of both the yaw rate sensor assembly*1 or deceleration sensor*2 (deceleration sensor 0 point calibration) and CVT oil pressure (CVT oil pressure calibration). Make sure to perform reset memory, yaw rate sensor assembly*1 or deceleration sensor*2 0 point calibration and CVT oil pressure calibration when replacing any of the parts shown in the following table:
    Replaced Part
    1. Continuously variable transaxle assembly
    2. ECM
    3. Oil pressure sensor
    4. Yaw rate sensor assembly (w/ VSC)
    5. Deceleration sensor (w/o VSC)
    6. Brake actuator assembly (skid control ECU)
  2. After performing reset memory, always perform yaw rate sensor assembly*1 or deceleration sensor*2 (deceleration sensor 0 point) calibration first, and then CVT oil pressure calibration.
  3. Always perform 0 point calibration with the vehicle on level ground.
  4. Do not shake or vibrate the vehicle during 0 point calibration.

  1. Using the intelligent tester, perform reset memory, deceleration sensor 0 point calibration and CVT oil pressure calibration (Click here).

  1. Check that no DTC is stored.


NEXT

END 

5.REPLACE CONTINUOUSLY VARIABLE TRANSAXLE ASSEMBLY
  1. Replace the continuously variable transaxle assembly (Click here).


NEXT


6.PERFORM INITIALIZATION

NOTICE:
  1. Performing reset memory will clear the learned values of both the yaw rate sensor assembly*1 or deceleration sensor*2 (deceleration sensor 0 point calibration) and CVT oil pressure (CVT oil pressure calibration). Make sure to perform reset memory, yaw rate sensor assembly*1 or deceleration sensor*2 0 point calibration and CVT oil pressure calibration when replacing any of the parts shown in the following table:
    Replaced Part
    1. Continuously variable transaxle assembly
    2. ECM
    3. Oil pressure sensor
    4. Yaw rate sensor assembly (w/ VSC)
    5. Deceleration sensor (w/o VSC)
    6. Brake actuator assembly (skid control ECU)
  2. After performing reset memory, always perform yaw rate sensor assembly*1 or deceleration sensor*2 (deceleration sensor 0 point) calibration first, and then CVT oil pressure calibration.
  3. Always perform 0 point calibration with the vehicle on level ground.
  4. Do not shake or vibrate the vehicle during 0 point calibration.

  1. Using the intelligent tester, perform reset memory, deceleration sensor 0 point calibration and CVT oil pressure calibration (Click here).

  1. Check that no DTC is stored.


NEXT

END