2AR-FE FUEL FUEL TANK INSTALLATION
PROCEDURE

 1.INSTALL NO. 3 FUEL TANK PROTECTOR
Install a new No. 3 fuel tank protector to the fuel tank assembly.
2.INSTALL BREATHER TUBE SUB-ASSEMBLY
Install the breather tube sub-assembly to the fuel tank assembly and connect the quick connector.
Click hereEngine / Hybrid System>2AR-FE FUEL>FUEL SYSTEM>PRECAUTION
3.INSTALL FUEL TUBE GROMMET
Install the 3 fuel tube grommets to the fuel tank assembly.
4.INSTALL NO. 5 FUEL TUBE CLAMP
Install the No. 5 fuel tube clamp to the fuel tank assembly.
5.INSTALL NO. 3 FUEL TUBE CLAMP
Install the No. 3 fuel tube clamp to the fuel tank assembly.
6.INSTALL FUEL TANK MAIN TUBE SUB-ASSEMBLY
Install the fuel tank main tube sub-assembly and attach the 5 clamps.
7.INSTALL FUEL SENDER GAUGE ASSEMBLY
8.INSTALL FUEL SUCTION TUBE ASSEMBLY WITH PUMP
9.INSTALL FUEL TANK VENT TUBE SET PLATE
10.CONNECT FUEL TANK MAIN TUBE SUB-ASSEMBLY
11.INSTALL FUEL TANK ASSEMBLY
Set the fuel tank assembly on an engine lifter with attachments.
Lift up the engine lifter.
Attach the wire harness to the 3 clamps.
Connect the fuel pump connector and sender gauge connector.
- NOTICE:
-
Be careful not to cut the wiring.
Install the No. 1 fuel tank band sub-assembly with the 2 bolts.
- Torque:
- 45 N*m (459 kgf*cm, 33 ft.*lbf)
Install the No. 1 fuel tank band sub-assembly LH with the 2 bolts.
- Torque:
- 45 N*m (459 kgf*cm, 33 ft.*lbf)
Install the No. 2 fuel tank band sub-assembly with the 2 bolts.
- Torque:
- 45 N*m (459 kgf*cm, 33 ft.*lbf)
Attach the 3 wire harness clamps and connect the connector.
12.CONNECT BREATHER TUBE SUB-ASSEMBLY
Connect the breather tube sub-assembly to the fuel tank filler pipe.
Click hereEngine / Hybrid System>2AR-FE FUEL>FUEL SYSTEM>PRECAUTION
13.CONNECT FUEL TANK VENT HOSE SUB-ASSEMBLY
Attach the hose clamp and fuel tank vent hose sub-assembly.
14.CONNECT FUEL TANK TO FILLER PIPE HOSE
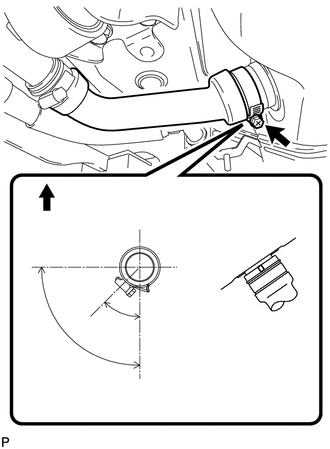
| *1 | Range |
| *2 | Stopper |
| *3 | Protrusion |
| *a | Top of Vehicle |
| *b | Bottom of Fuel Tank |
Connect the fuel tank to filler pipe hose to the fuel tank assembly and tighten the hose clamp.
- HINT:
-
Make sure the hose clamp is oriented as shown in the illustration.
15.INSTALL FUEL HOSE PROTECTOR
Install the fuel hose protector to the fuel tank to filler pipe hose and attach the claw.
16.CONNECT FUEL TANK TO CANISTER TUBE SUB-ASSEMBLY
Connect the fuel tank to canister tube sub-assembly.
Click hereEngine / Hybrid System>2AR-FE FUEL>FUEL SYSTEM>PRECAUTION
17.CONNECT FUEL TANK MAIN TUBE SUB-ASSEMBLY
Connect the fuel tank main tube sub-assembly.
Click hereEngine / Hybrid System>2AR-FE FUEL>FUEL SYSTEM>PRECAUTION
18.INSTALL NO. 1 FLOOR UNDER COVER
Install the No. 1 floor under cover with the 2 nuts and attach the clip.
19.INSTALL NO. 1 FUEL TANK PROTECTOR
Install the No. 1 fuel tank protector with the nut and attach the 3 clips.
- Torque:
- 20 N*m (204 kgf*cm, 15 ft.*lbf)
20.INSTALL FRONT FLOOR COVER
Install the front floor cover and attach the 4 clips.
Install the bolt and nut.
- Torque:
- for bolt : 12 N*m (122 kgf*cm, 9 ft.*lbf)
- for nut : 6.0 N*m (61 kgf*cm, 53 in.*lbf)
21.CONNECT PARKING BRAKE CABLE
Connect the parking brake cable with the 2 bolts.
- Torque:
- 6.0 N*m (61 kgf*cm, 53 in.*lbf)
22.ADD FUEL
23.CONNECT CABLE TO NEGATIVE BATTERY TERMINAL
- NOTICE:
-
When disconnecting the cable, some systems need to be initialized after the cable is reconnected.
-
Click hereGeneral>INTRODUCTION>REPAIR INSTRUCTION>INITIALIZATION
24.INSPECT FOR FUEL LEAK