Home › Audio / Visual / Telematics › PARK ASSIST / MONITORING › BLIND SPOT MONITOR SYSTEM
RM30B0U _56 Audio / Visual / Telematics _009404 PARK ASSIST / MONITORING _0051188 BLIND SPOT MONITOR SYSTEM D

PARK ASSIST / MONITORING  BLIND SPOT MONITOR SYSTEM  OPERATION CHECK  


BLIND SPOT MONITOR BEAM AXIS INSPECTION


a.

Procedure to enter Test Mode

i.

Connect the Techstream to the DLC3.


ii.

Turn the ignition switch to ON.


iii.

Turn the blind spot monitor main switch (warning cancel switch assembly) on.


iv.

Turn the Techstream on.


v.

Switch the blind spot monitor sensor to Test Mode using the Techstream. Enter the following menus: Body Electrical / Blind spot monitor Master or Blind spot monitor Slave / Utility / BSM Master beam axis inspection or BSM Slave beam axis inspection.


vi.

Finish Test Mode.


BLIND SPOT MONITOR BEAM AXIS CONFIRMATION


a.

When performing the blind spot monitor beam axis confirmation, move the vehicle to a place where the space shown in the illustration can be secured.
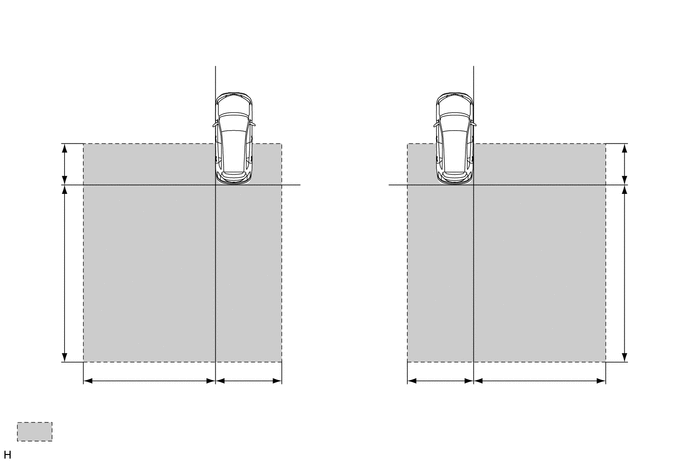
E270286
0.104,0.094 0.792,0.365 0.688,0.271 12 false LH Side: 3.813,0.083 4.5,0.354 0.688,0.271 12 false RH Side: 3.167,1.844 4.021,2.094 0.854,0.25 10 false Rear Bumper 0.583,4.406 2.115,4.656 1.531,0.25 10 false : Inspection Area 4.208,4.094 5.042,4.281 0.833,0.188 10 false 3 m (9.85 ft.) 5.313,4.094 6.24,4.281 0.927,0.188 10 false 6 m (19.69 ft.) 6.531,2.688 7.146,3.042 0.615,0.354 10 false 8 m (26.25 ft.) 6.594,1.531 7.125,1.896 0.531,0.365 10 false 2 m (6.57 ft.) 0.104,1.531 0.656,1.896 0.552,0.365 10 false 2 m (6.57 ft.) 0.063,2.646 0.698,2.969 0.635,0.323 10 false 8 m (26.25 ft.) 2.188,4.073 3.031,4.26 0.844,0.188 10 false 3 m (9.85 ft.) 1.135,4.083 2.073,4.281 0.938,0.198 10 false 6 m (19.69 ft.) 1.656,0.365 2.833,0.583 1.177,0.219 10 false Left side of vehicle 4.208,0.375 5.563,0.604 1.354,0.229 10 false Right side of vehicle

NOTICE:
·

Perform this inspection on level ground.

·

Make sure that there are no metal objects around the vehicle or on the ground.

·

Unload the vehicle before beginning the inspection.

·

Confirm that the tire pressure is correct before beginning the inspection.

·

Do not place an object other than the reflector (such as a large metallic object) in or allow people to enter the inspection area (W 9 m [29.53 ft.] x L 10 m [32.81 ft.] x H 4 m [13.13 ft.]) shown in the illustration.

·

Check that DTC C1ABB and DTC C1ABC are not output.


b.

Place the reflector.

i.

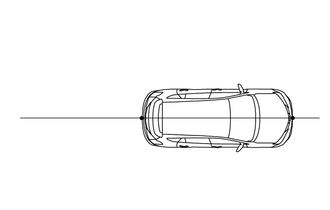
Hang a string (with weight) from the center of the vehicle's rear emblem. Mark the vehicle's rear center point on the ground. Repeat for the front of the vehicle. (mark [A] and [B])

ii.
E270287
1.083,1.635 1.5,1.219 false 3.219,1.604 3.042,1.229 false 0.823,1.229 1.146,0.458 1.146,0.458 1.406,0.458 false 1.51,0.365 2.76,0.552 1.25,0.188 10 Vehicle center line 0.896,1.583 1.052,1.781 0.156,0.198 10 A 3.208,1.646 3.365,1.844 0.156,0.198 10 B

Draw a vehicle center line so that it passes through mark (A) and (B) (front and rear center points).

iii.
E270288
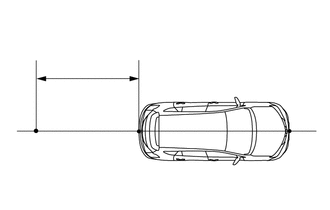
1.146,1.604 1.448,1.365 false 3.229,1.708 3.01,1.375 false 0.604,1.635 0.375,1.354 false 1,1.552 1.156,1.75 0.156,0.198 10 A 3.219,1.75 3.375,1.948 0.156,0.198 10 B 0.677,1.573 0.833,1.771 0.156,0.198 10 C 0.104,0.281 2.094,0.469 1.99,0.188 10 501 to 521 mm (1.64 to 1.71 ft.)

Mark the position on the center line 501 to 521 mm (1.64 to 1.71 ft.) behind the rear bumper. (Mark [C])
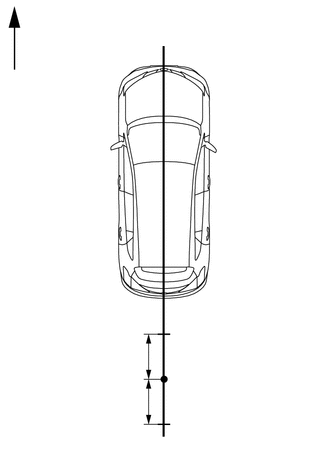

iv.
E270289
1.719,3.948 2.219,3.5 2.219,3.5 2.448,3.5 false 0.375,0.219 1.208,0.427 0.833,0.208 10 Vehicle front 0.333,3.583 1.469,3.813 1.135,0.229 10 300 mm (11.8 in.) 0.323,4.083 1.458,4.313 1.135,0.229 10 300 mm (11.8 in.) 2.521,3.427 2.677,3.625 0.156,0.198 10 C

Prepare 2 pieces of string of 600 mm (1.97 ft.) in length and secure the end of each string at a point 300 mm (11.8 in.) from mark (C) as shown in the illustration.


v.

Pull the end of each string and mark the position where each string meets on both the left and right side (marks [D] and [E]).
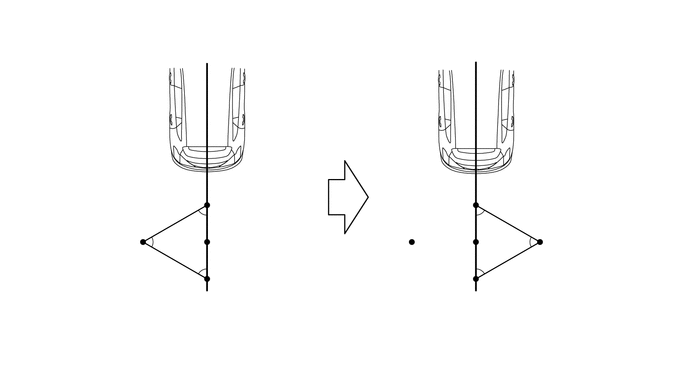
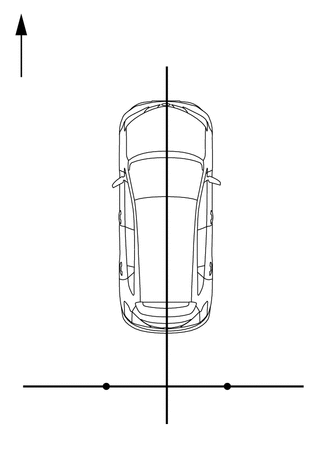
E270404
2.156,0.74 2.542,0.25 2.542,0.25 2.698,0.25 false 4.958,0.74 5.344,0.25 5.344,0.25 5.5,0.25 false 4.542,2.125 4.708,2.125 4.708,2.125 4.948,2.51 false 1.365,3.156 1.521,3.156 1.521,3.156 1.854,2.74 false 2.167,2.51 2.458,2.167 2.458,2.167 2.646,2.167 false 1.052,2.219 1.219,2.219 1.219,2.219 1.479,2.51 false 4,2.917 4.156,2.917 4.156,2.917 4.292,2.521 false 5.292,2.313 5.677,1.823 5.677,1.823 5.833,1.823 false 5.75,3.198 5.573,3.198 5.573,3.198 5.313,2.698 false 1.292,1.708 1.458,1.708 1.458,1.708 1.833,2.302 false 5.635,2.51 5.823,2.229 5.823,2.229 5.969,2.229 false 0.115,0.073 1.135,0.323 1.021,0.25 12 Vehicle rear: 2.781,0.177 4.01,0.396 1.229,0.219 10 Vehicle center line 5.594,0.167 6.823,0.385 1.229,0.219 10 Vehicle center line 0.865,1.625 1.281,1.844 0.417,0.219 10 String 5.927,1.74 6.844,1.938 0.917,0.198 10 String 5.833,3.125 6.75,3.323 0.917,0.198 10 String 0.927,3.063 1.333,3.292 0.406,0.229 10 String 2.729,2.094 2.885,2.292 0.156,0.198 10 C 0.906,2.146 1.063,2.344 0.156,0.198 10 D 3.885,2.844 4.042,3.042 0.156,0.198 10 D 4.406,2.063 4.563,2.26 0.156,0.198 10 C 6.063,2.156 6.219,2.354 0.156,0.198 10 E


vi.
E270405
2.365,4.01 2.698,3.521 2.698,3.521 2.854,3.521 false 0.635,4.469 0.844,4.469 0.844,4.469 1.104,4.021 false 1.74,0.844 2.073,0.354 2.073,0.354 2.229,0.354 false 2.448,4.427 2.281,4.427 2.281,4.427 2.01,4.021 false 0.417,0.333 1.25,0.552 0.833,0.219 10 Vehicle front 2.323,0.271 3.24,0.594 0.917,0.323 10 Vehicle center line 2.917,3.448 3.073,3.646 0.156,0.198 10 E 0.49,4.396 0.646,4.594 0.156,0.198 10 D 2.531,4.333 3.042,4.51 0.51,0.177 10 Line P

Draw a line (P) so that it passes through mark (D) and (E) and is perpendicular to the vehicle center line.


vii.

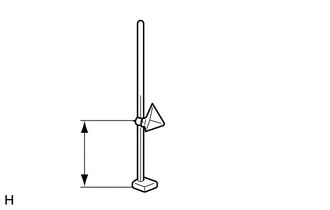
Set the reflector at the position (Z) shown in the illustration below.

SST
09870-60000 (09870-60010), 09870-60040  
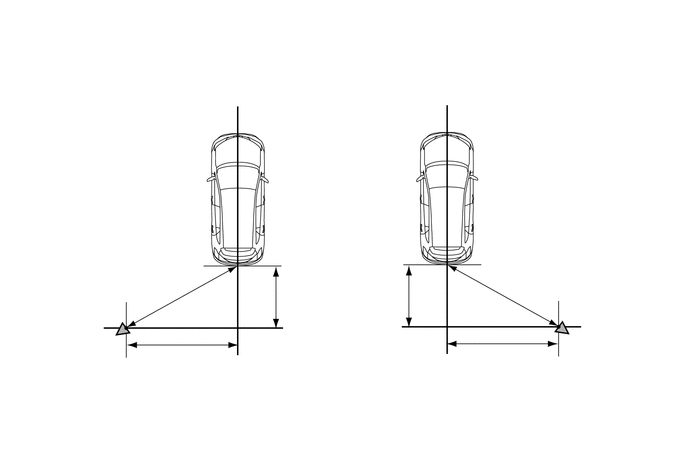
E270406
5.188,3.052 5.458,2.521 5.458,2.521 5.646,2.521 false 2.719,2.76 3,2.448 3,2.448 3.135,2.448 false 1.875,3.094 1.646,2.573 1.646,2.573 1.406,2.573 false 1.313,3.396 1.094,2.969 1.094,2.969 0.896,2.969 false 5.813,3.385 5.948,2.969 5.948,2.969 6.135,2.969 false 0.906,3.917 1.052,3.917 1.052,3.917 1.219,3.479 false 6.271,3.896 6.063,3.896 6.063,3.896 5.906,3.469 false 4.365,2.75 4.198,2.448 4.198,2.448 4.042,2.448 false 2.99,3.792 2.823,3.792 2.823,3.792 2.688,3.417 false 4.125,3.792 4.333,3.792 4.333,3.792 4.469,3.417 false 1.115,0.177 1.823,0.417 0.708,0.24 12 false LH Side: 3.688,0.177 4.396,0.417 0.708,0.24 12 false RH Side: 1.875,0.698 3.042,0.958 1.167,0.26 10 false Vehicle center line 4.052,0.708 5.219,0.969 1.167,0.26 10 false Vehicle center line 3.198,2.365 4.042,2.615 0.844,0.25 10 false Rear bumper 3.063,3.719 3.531,3.979 0.469,0.26 10 false Line P 0.302,3.844 0.865,4.083 0.563,0.24 10 false Reflector 0.156,2.469 1.427,2.677 1.271,0.208 10 false 3209 mm (10.53 ft.) 5.729,2.427 7,2.635 1.271,0.208 10 false 3209 mm (10.53 ft.) 1.333,3.833 2.573,4.01 1.24,0.177 10 false 3159 to 3179 mm 3.094,3.177 4.094,3.406 1,0.229 10 false (1.64 to 1.71 ft.) 4.719,3.823 5.833,4.01 1.115,0.188 10 false 3159 to 3179 mm 4.74,4.177 5.885,4.406 1.146,0.229 10 false (10.36 to 10.43 ft.) 3.094,2.875 4.083,3.104 0.99,0.229 10 false 501 to 521 mm 0.74,2.906 0.896,3.104 0.156,0.198 10 false Z 6.219,2.906 6.375,3.104 0.156,0.198 10 false Z 6.344,3.813 6.906,4.052 0.563,0.24 10 false Reflector 3.698,3.719 4.167,3.979 0.469,0.26 10 false Line P 1.302,4.208 2.448,4.438 1.146,0.229 10 false (10.36 to 10.43 ft.)

NOTICE:
E238830
0.208,1.385 0.729,1.552 0.521,0.167 10 false 540 mm 0.208,1.573 0.75,1.74 0.542,0.167 10 false (1.77 ft.)

·

Set the reflector so that its center is 540 mm (1.77 ft) above the ground.

·
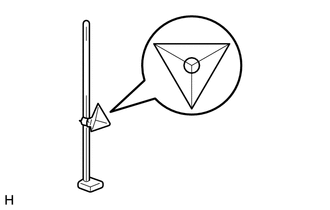
E238829
1.866,1.28 3.095,1.622 1.23,0.342 10 Center of triangular pyramid 2.008,0.634 2.495,1.265 false

The center of the triangular pyramid is the reference point for the setting position and angle.

·

Set the reflector as shown in the illustration so that the center of the triangular pyramid faces the blind spot monitor sensor.

·

Perform the operation as precisely as possible.


c.

Perform the blind spot monitor beam axis display.

i.

Connect the Techstream to the DLC3.


ii.

Turn the ignition switch to ON.


iii.

Turn the blind spot monitor main switch (warning canceling switch assembly) on.


iv.

Turn the Techstream on.


v.

Enter the following menus: Body Electrical / Blind spot monitor Master or Blind spot monitor Slave / Utility / BSM Master beam axis display or BSM Slave beam axis display.


vi.

Check the results displayed for the BSM beam axis display.

Allowable Range
Item Blind Spot Monitor Sensor LH (Master) Blind Spot Monitor Sensor RH (Slave)
Angle -3.6 to +3.6° -3.6 to +3.6°
Distance 2.0 to 3.0 m (6.57 to 9.85 ft.) 2.0 to 3.0 m (6.57 to 9.85 ft.)

HINT:

If the results are outside the allowable range, try again as the reflector setting position may be incorrect or a metal object may exist near the detection area.


vii.

Perform the blind spot monitor beam axis adjustment using the Techstream. Enter the following menus: Body Electrical / Blind spot monitor Master or Blind spot monitor Slave / Utility / BSM Master beam axis adjustment or BSM Slave beam axis adjustment.

HINT:

When values on the axis display are in the allowable range, performing this adjustment compensates the values to the normal value.


BLIND SPOT MONITOR INSTALLATION CONDITION INSPECTION


NOTICE:
·

Perform this inspection on level ground.

·

Unload the vehicle before beginning the inspection.

·

Confirm that the tire pressure is correct before beginning the inspection.


b.

Attach a jig similar to the one shown in the illustration to the outward facing surface of the blind spot monitor sensor and check that the blind spot monitor sensor is perpendicular to the floor surface or within the allowable range.
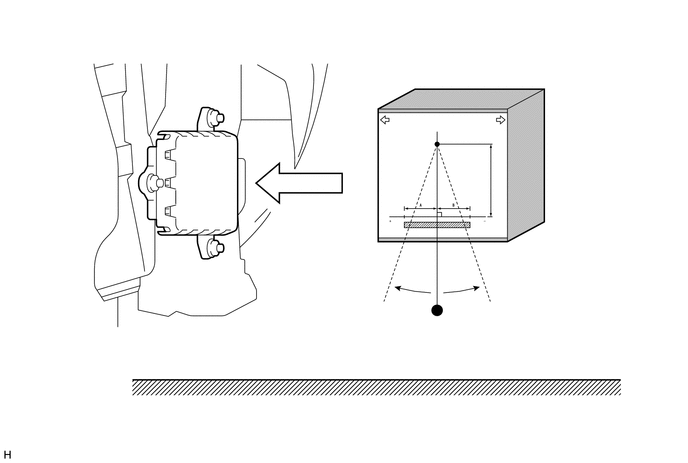
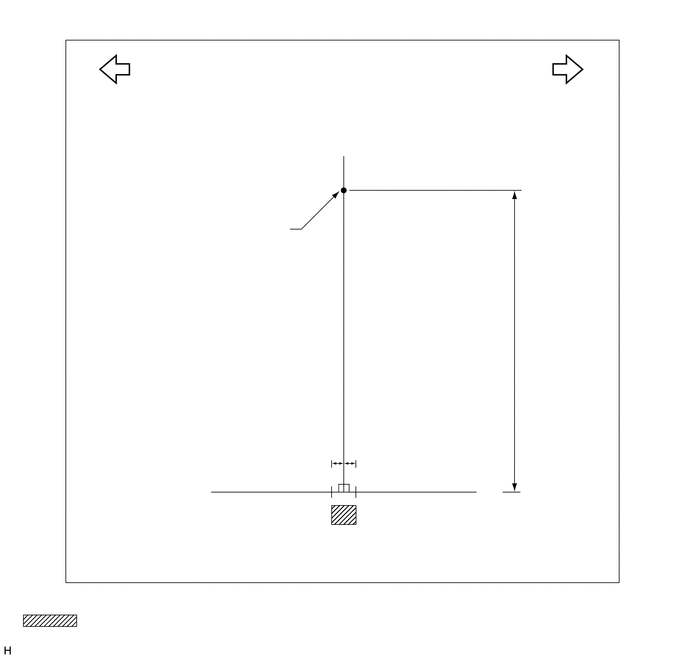
E233717
5.917,3.958 5.917,3.417 false 5.917,3.417 6.063,3.417 false 1.948,3.583 1.948,2.448 false 2.302,2.115 2.979,3.5 false 5.052,1.208 5.583,0.615 false 5.583,0.615 5.729,0.615 false 4.615,3.25 4.875,3.25 false 2.979,3.5 3.094,3.5 false 6.083,3.344 6.917,3.531 0.833,0.188 10 Floor surface 1.188,3.583 2.906,3.75 1.719,0.167 10 Blind Spot Monitor Sensor 3.125,3.438 4.813,3.646 1.688,0.208 10 Outward facing surface 0.156,0.063 2.281,0.448 2.125,0.385 12 Rear view of vehicle (RH): 5.76,0.552 6.208,0.792 0.448,0.24 10 Jig 4.906,3.188 5.479,3.427 0.573,0.24 10 Weight

E274263
3.031,4.271 3.198,4.271 3.198,4.271 3.531,4.802 false 4.104,4.271 3.938,4.271 3.938,4.271 3.635,4.802 false 0.865,6.375 3.469,6.573 2.604,0.198 10 false : Allowable range 2.167,5.219 2.323,5.417 0.156,0.198 10 false + 4.917,5.188 5.073,5.385 0.156,0.198 10 false - 2.844,4.208 3,4.406 0.156,0.198 10 false A 4.177,4.208 4.333,4.406 0.156,0.198 10 false B 1.521,2.302 2.969,2.656 1.448,0.354 10 false Position where string is to be secured 1.448,0.563 3.344,0.917 1.896,0.354 10 false Hold this side against the blind spot monitor sensor RH. 3.792,0.563 5.688,0.917 1.896,0.354 10 false Hold this side against the blind spot monitor sensor LH. 3.458,1.219 3.917,1.417 0.458,0.198 10 false Top 5.469,3.115 6.063,3.5 0.594,0.385 10 false 100 mm (3.34 in.)

Standard:
A B
Blind spot monitor sensor RH 8 mm (0.315 in.) -8 mm (-0.315 in.)
Blind spot monitor sensor LH 8 mm (0.315 in.) -8 mm (-0.315 in.)
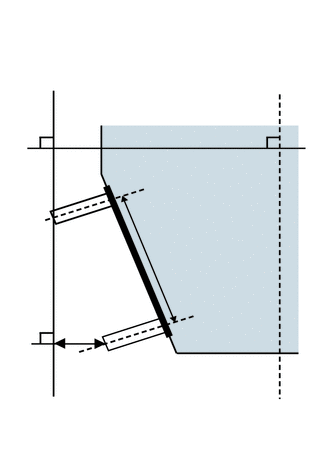


c.
E224437
0.093,0.004 1.444,0.209 1.350,0.205 12 Vehicle rear (LH): 1.094,0.494 2.261,0.806 1.166,0.312 10 Vehicle center line 1.227,3.6 1.469,4.012 false 1.594,3.929 2.215,4.092 0.621,0.163 10 Stud bolt 1.451,0.898 2.246,1.061 0.795,0.163 10 Vehicle front 0.69,3.82 0.812,3.983 0.121,0.163 10 y 1.941,3.657 2.703,3.820 0.762,0.163 10 Vehicle rear 2.517,0.632 2.919,1.171 false 0.052,4.258 2.431,4.421 2.379,0.163 10 Line parallel to the vehicle center line 0.782,3.568 0.731,3.851 false 0.549,3.834 0.274,3.903 false 0.274,3.903 0.274,4.278 false 1.808,2.389 2.338,2.573 0.530,0.184 10 104 mm 1.431,1.954 1.593,1.62 false 1.597,1.62 1.663,1.62 false 1.666,1.534 2.687,1.854 1.021,0.320 10 Stud bolt center line 1.825,2.595 2.508,2.779 0.683,0.184 10 (4.09 in.) 1.469,4.012 1.563,4.012 false

Using the sensor installation stud bolt center lines as a reference, check that the stud bolts are as shown in the illustration.

Standard:
Dimension Specified Value
y 29 to 42 mm (1.15 to 1.65 in.)