HEATING / AIR CONDITIONING CONDENSER INSTALLATION
PROCEDURE

 1.INSTALL COOLER CONDENSER ASSEMBLY
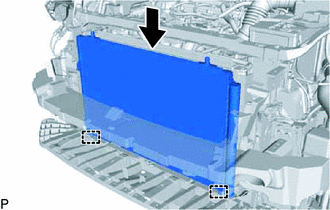
Attach the 2 guides to install the cooler condenser assembly as shown in the illustration.
- NOTICE:
-
Do not damage the cooler condenser or radiator when installing the cooler condenser assembly.
- HINT:
-
If a new cooler condenser assembly is installed, add compressor oil to the condenser as follows.
- Capacity:
Add 40 cc (1.35 fl. oz.)
- Compressor Oil:
ND-OIL 8 or equivalent
2.INSTALL NO. 2 FAN SHROUD
Install the No. 2 fan shroud with the 2 bolts.
- Torque:
- 11 N*m (112 kgf*cm, 8 ft.*lbf)
Attach the 3 clamps to connect the water by-pass pipe to the No. 2 fan shroud.
3.INSTALL NO. 1 RADIATOR SUPPORT
4.CONNECT LIQUID PIPE SUB-ASSEMBLY
Remove the vinyl tape from the liquid pipe sub-assembly and the connecting part of the cooler condenser with receiver assembly.
Sufficiently apply compressor oil to a new O-ring and the fitting surface of the tube joint.
- Compressor Oil:
ND-OIL 8 or equivalent
Install the O-ring to the liquid pipe sub-assembly.
Connect the liquid pipe sub-assembly to the cooler condenser assembly with the bolt.
- Torque:
- 5.4 N*m (55 kgf*cm, 48 in.*lbf)
5.CONNECT DISCHARGE HOSE SUB-ASSEMBLY
Remove the vinyl tape from the discharge hose sub-assembly and the connecting part of the cooler condenser with receiver assembly.
Sufficiently apply compressor oil to a new O-ring and the fitting surface of the tube joint.
- Compressor Oil:
ND-OIL 8 or equivalent
Install the O-ring to the discharge hose sub-assembly.
Connect the discharge hose sub-assembly to the cooler condenser assembly with the bolt.
- Torque:
- 5.4 N*m (55 kgf*cm, 48 in.*lbf)
6.INSTALL RADIATOR UPPER AIR GUIDE PLATE
7.INSTALL FRONT BUMPER UPPER REINFORCEMENT SUB-ASSEMBLY
8.INSTALL HEADLIGHT
9.ADJUST HOOD SUB-ASSEMBLY
10.CHARGE AIR CONDITIONING SYSTEM WITH REFRIGERANT
11.WARM UP ENGINE
12.INSPECT FOR REFRIGERANT LEAK