SLIDING ROOF / CONVERTIBLE SLIDING ROOF HOUSING INSTALLATION
PROCEDURE

 1.INSTALL SLIDING ROOF HOUSING SUB-ASSEMBLY
Temporarily install the sliding roof housing sub-assembly with the 8 nuts.
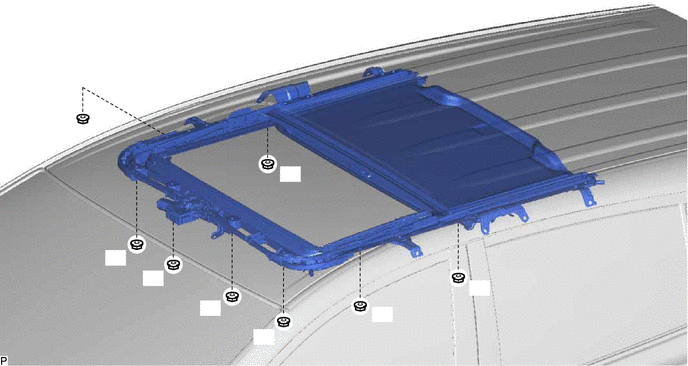
Tighten the nuts in the order indicated in the illustration.
- Torque:
- 5.5 N*m (56 kgf*cm, 49 in.*lbf)
Temporarily install the 8 bolts on the vehicle interior side.
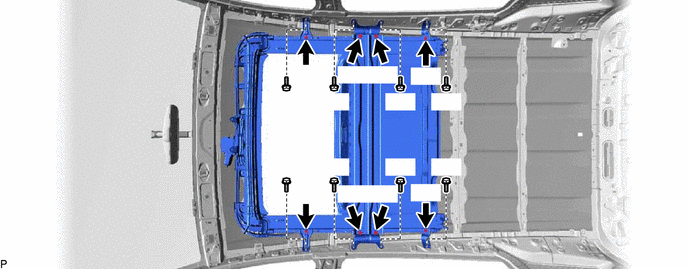
Tighten the bolts in the order indicated in the illustration.
- Torque:
- 8.0 N*m (82 kgf*cm, 71 in.*lbf)
Insert the sliding roof drain hose.
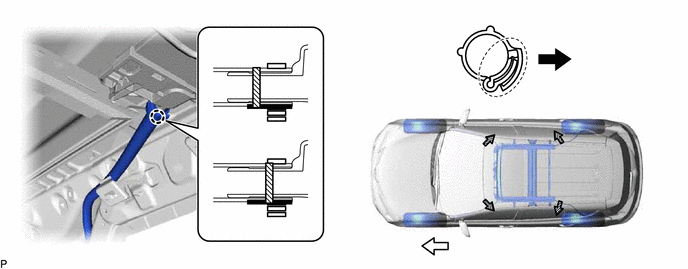
| *A | except TMMC Made | *B | for TMMC Made |
| *1 | Marking A | *2 | Marking B |
| *3 | Clamp | - | - |
| *a | Lock Area | *b | Front Side |
| *c | Out Side | - | - |
- HINT:
- ·
The hose should be inserted to the base of the drain pipe.
·Make sure that marking A on the drain hose is facing toward the bottom of the vehicle.
Attach the claw to connect the sliding roof drain hose.
- NOTICE:
- ·
Make sure that the lock area of the clamp is facing toward the outside of the vehicle when installing the clamp.
·except TMMC Made:
Install the clamp on the side of marking B that is closest to the sliding roof housing.
·for TMMC Made:
Install the clamp so that it overlaps with marking B
- HINT:
-
Use the same procedure for the other 3 sliding roof drain hoses.
2.INSTALL REAR SIDE RAIL SPACER LH
3.INSTALL REAR SIDE RAIL SPACER RH
- HINT:
-
Use the same procedure as for the LH side.
4.INSTALL CURTAIN SHIELD AIRBAG ASSEMBLY LH
5.INSTALL CURTAIN SHIELD AIRBAG ASSEMBLY RH
- HINT:
-
Use the same procedure as for the LH side.
6.INSTALL SLIDING ROOF WEATHERSTRIP
Install the sliding roof weatherstrip as follows:
Align the alignment mark on the weatherstrip with the middle marks at the corners of the sliding roof panel sub-assembly as shown in the illustration.
Position the centers of the 2 joints of the sliding roof weatherstrip as shown in the illustration and install the weatherstrip.
Install the lip of the weatherstrip firmly.
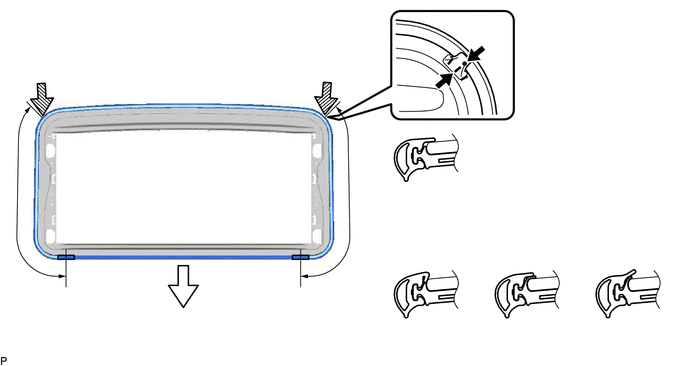
| *A | Normal | *B | Abnormal |
| *1 | Center of Joint | *2 | Rear |
| *3 | Alignment Mark | *4 | Middle Mark |
| *a | Pinched | *b | Exposed |
| *c | Gap (raised, wavy, etc.) | *d | 46.6 cm (1.53 ft.) |
7.INSTALL SLIDING ROOF GLASS SUB-ASSEMBLY
Using a T25 "TORX" socket wrench, temporarily install the sliding roof glass sub-assembly with the 4 screws.
Perform a level check.
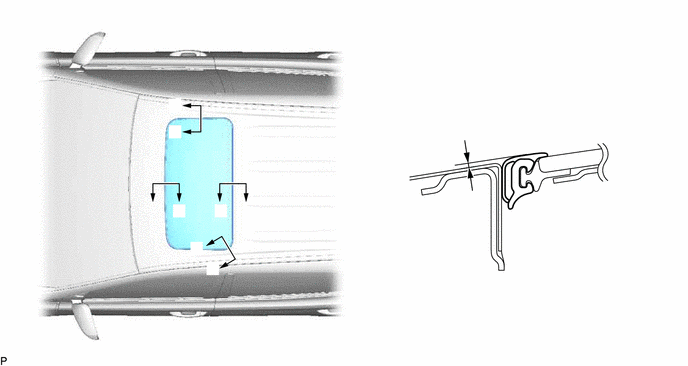
Check the difference in level for "a" between the roof panel and the upper surface of the weatherstrip when the sliding roof glass is fully closed.
- Standard:
Area Measurement A - A 0 + 1.0 mm (0 + 0.0394 in.)
0 - 2.0 mm (0 - 0.0787 in.)B - B 0 + 2.0 mm (0 + 0.0787 in.)
0 - 1.0 mm (0 - 0.0394 in.)C - C 0 + 1.5 mm (0 + 0.0591 in.)
0 - 1.5 mm (0 - 0.0591 in.)D - D 0 + 1.5 mm (0 + 0.0591 in.)
0 - 1.0 mm (0 - 0.0394 in.)
- HINT:
-
"+" represents the condition that the glass is above the panel level. "-" represents the condition that the glass is below the panel level.
| *a | Even |
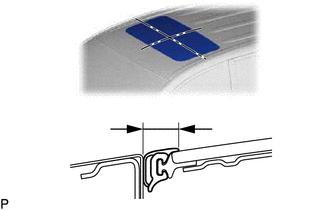
Perform a gap check.
Check the gap between the roof panel and roof glass.
- NOTICE:
-
The gap must be even all around.
After adjusting the sliding roof glass, using a T25 "TORX" socket wrench, install the sliding roof glass sub-assembly with the 4 screws.
- Torque:
- 4.0 N*m (41 kgf*cm, 35 in.*lbf)
8.CHECK FOR WATER LEAK
After adjusting the sliding roof glass sub-assembly, check for water leaks.
If there are any leaks, readjust the sliding roof glass sub-assembly.
9.INSTALL SLIDING ROOF SIDE GARNISH LH
Attach the 2 claws and install the sliding roof side garnish LH.
10.INSTALL SLIDING ROOF SIDE GARNISH RH
- HINT:
-
Use the same procedure as for the LH side.
11.INSTALL ROOF HEADLINING ASSEMBLY
12.RESET SLIDING ROOF DRIVE GEAR SUB-ASSEMBLY
13.CHECK SLIDING ROOF SYSTEM
14.INSPECT FOR WATER LEAK
After adjusting the sliding roof glass sub-assembly, inspect for water leaks.
If there are any leaks, readjust the sliding roof glass sub-assembly.