SEAT REAR SEAT ASSEMBLY(for RH Side) REASSEMBLY
CAUTION / NOTICE / HINT
- CAUTION:
-
Wear protective gloves. Sharp areas on the seatback frame, seat cushion frame and reclining adjuster may injure your hands.
- HINT:
-
A bolt without a torque specification is shown in the standard bolt chart.
-
Click hereGeneral>SPECIFICATIONS>STANDARD BOLT>SPECIFIED TORQUE FOR STANDARD BOLTS
PROCEDURE

 1.INSTALL SEPARATE TYPE REAR SEATBACK COVER
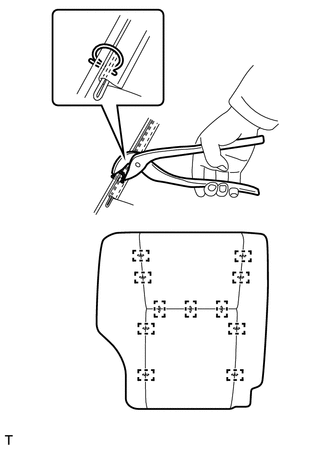
| *1 | Hog Ring Pliers |
Set the separate type rear seatback cover in place.
Using hog ring pliers, install the separate type rear seatback cover to the rear seat cushion pad RH with 11 new hog rings.
- NOTICE:
- ·
Be careful not to damage the separate type rear seatback cover.
·Be sure to securely install the hog rings as shown in the illustration while preventing wrinkles from forming on the separate type rear seatback cover.
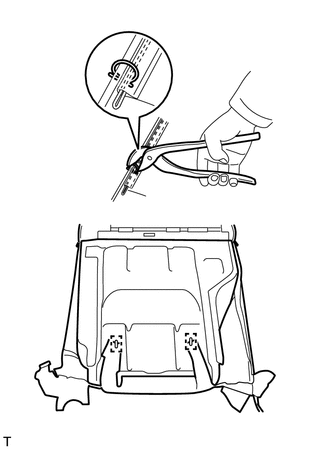
| *1 | Hog Ring Pliers |
Using hog ring pliers, install 2 new hog rings.
- NOTICE:
- ·
Be careful not to damage the separate type rear seatback cover.
·Be sure to securely install the hog rings as shown in the illustration while preventing wrinkles from forming on the separate type rear seatback cover.
Install the separate type rear seatback cover (with pad) to the rear seat cushion frame sub-assembly RH.
Attach the 2 clamps.
2.INSTALL REAR SEAT HEADREST SUPPORT
Attach the 4 claws to install the 2 rear seat headrest supports.
3.INSTALL REAR SEATBACK BOARD RH
Attach the clamp and 5 claws to install the rear seatback board RH.
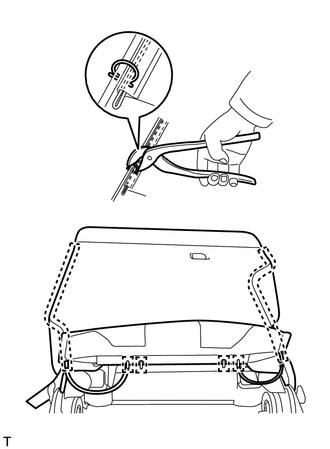
| *1 | Hog Ring Pliers |
Using hog ring pliers, install 4 new hog rings and attach the 2 pieces of fastening tape.
- NOTICE:
- ·
Be careful not to damage the separate type rear seatback cover.
·Be sure to securely install the hog rings as shown in the illustration while preventing wrinkles from forming on the separate type rear seatback cover.
4.INSTALL NO. 1 SEATBACK ASSEMBLY RH
Install the No. 1 seatback assembly RH to the rear seat reclining adjuster assembly RH with the 2 bolts.
- Torque:
- 42 N*m (428 kgf*cm, 31 ft.*lbf)
5.INSTALL REAR SEAT INNER BELT ASSEMBLY RH
6.INSTALL REAR SEAT CENTER LAP TYPE BELT ASSEMBLY RH
7.INSTALL NO. 2 SEAT ADJUSTER CONTROL CABLE ASSEMBLY
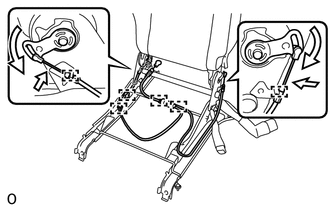
Connect the 2 cables in the order shown in the illustration.
Attach the 2 clamps of the cable ends.
Attach the 4 clamps and install the No. 2 seat adjuster control cable assembly.
8.INSTALL REAR SEAT REAR CUSHION MOULDING RH
Attach the clamp and claw to install the rear seat rear cushion moulding RH.
w/ Seat Belt Warning System:
Attach the 2 clamps.
9.INSTALL REAR SEAT CUSHION MOULDING RH
Attach the 2 clamps and claw to install the rear seat cushion moulding RH.
10.INSTALL REAR SEAT COVER
Attach the claw to install the rear seat cover.
Install the clip and screw.
11.INSTALL REAR SEATBACK COVER RH
Attach the claw to install the rear seatback cover RH.
Install the clip and screw.
12.INSTALL SEPARATE TYPE REAR SEAT CUSHION COVER
Set the separate type rear seat cushion cover in place.
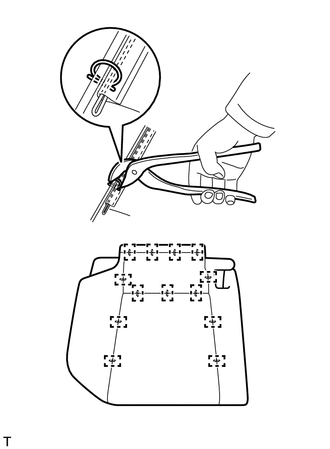
| *1 | Hog Ring Pliers |
Using hog ring pliers, install the separate type rear seat cushion cover to the rear seat cushion pad RH with 13 new hog rings.
- NOTICE:
- ·
Be careful not to damage the separate type rear seat cushion cover.
·Be sure to securely install the hog rings as shown in the illustration while preventing wrinkles from forming on the separate type rear seat cushion cover.
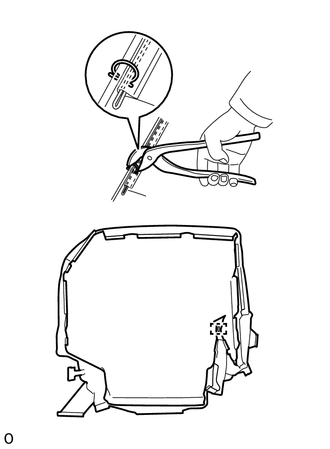
| *1 | Hog Ring Pliers |
Using hog ring pliers, install a new hog ring.
- NOTICE:
- ·
Be careful not to damage the separate type rear seat cushion cover.
·Be sure to securely install the hog rings as shown in the illustration while preventing wrinkles from forming on the separate type rear seat cushion cover.
Install the separate type rear seat cushion cover (with pad) to the rear seat cushion frame sub-assembly.
Attach the 18 hooks.
13.INSTALL NO. 1 SEAT CUSHION ASSEMBLY RH
Install the No. 1 seat cushion assembly RH with the 2 bushes and 2 bolts.
- Torque:
- 21 N*m (214 kgf*cm, 15 ft.*lbf)
Attach the 2 claws to install the rear seatback cover.
Install the 3 clamps.
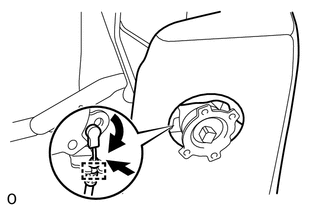
Connect the cable in the order shown in the illustration.
Attach the clamp of the cable end.
Install the 2 bushes and 2 bolts.
- Torque:
- 21 N*m (214 kgf*cm, 15 ft.*lbf)
14.INSTALL REAR SEAT NO. 2 CUSHION HINGE COVER
Attach the clamp and 4 claws to install the rear seat No. 2 cushion hinge cover.
Attach the clamp.
15.INSTALL REAR SEAT NO. 1 CUSHION HINGE COVER
Attach the clamp and 4 claws to install the rear seat No. 1 cushion hinge cover.
16.INSTALL RECLINING ADJUSTER RELEASE HANDLE RH
Install the reclining adjuster release handle RH with the 3 screws.
17.INSTALL REAR SEAT COVER CAP RH
Attach the 3 claws to install the rear seat cover cap RH.
18.INSTALL REAR SEAT HEADREST ASSEMBLY