3ZR-FE ENGINE MECHANICAL CAMSHAFT REMOVAL
PROCEDURE

 13506
1.REMOVE CHAIN SUB-ASSEMBLY
13050
2.INSPECT CAMSHAFT TIMING GEAR ASSEMBLY
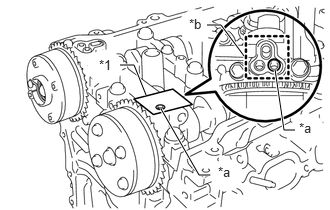
| *1 | Adhesive Tape |
| *a | Prick a Hole |
| *b | Adhesive Tape Sealing Area |
Inspect the lock of the camshaft timing gear assembly.
After cleaning and degreasing the VVT oil hole on the intake side of the No. 1 camshaft bearing cap, completely seal the oil hole with adhesive tape or equivalent as shown in the illustration to prevent air from leaking.
- NOTICE:
-
Be sure to cover the oil hole completely because air leaks due to insufficient sealing will prevent the lock pin from being released.
Prick a hole in the tape covering the oil hole as shown in the illustration. (Procedure A)
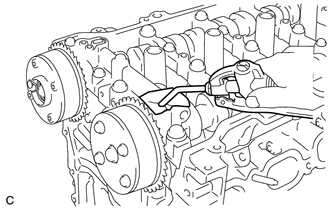
Apply approximately 150 kPa (1.5 kgf/cm2, 22 psi) of air pressure to the hole pricked in procedure A to release the lock pin.
- NOTICE:
- ·
If air leaks out, reattach the adhesive tape.
·Cover the oil hole with a piece of cloth when applying air pressure to prevent oil from spraying.
Forcibly turn the camshaft timing gear assembly in the advance direction (counterclockwise).
- HINT:
-
Depending on the air pressure applied, the camshaft timing gear assembly may turn in the advance direction without assistance.
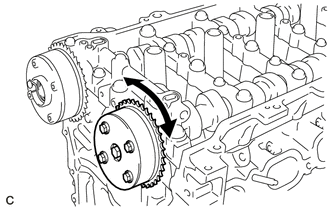
Turn the camshaft timing gear assembly within its movable range (26.5 to 28.5°) 2 or 3 times without turning it to the most retarded position. Make sure that the camshaft timing gear assembly turns smoothly.
Remove the adhesive tape from the No. 1 camshaft bearing cap.
13070A
3.INSPECT CAMSHAFT TIMING EXHAUST GEAR ASSEMBLY
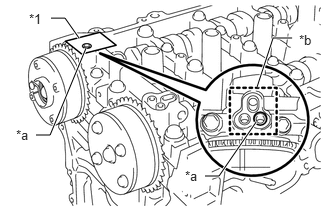
| *1 | Adhesive Tape |
| *a | Prick a Hole |
| *b | Adhesive Tape Sealing Area |
Check the lock of the camshaft timing exhaust gear assembly.
After cleaning and degreasing the VVT oil hole on the exhaust side of the No. 1 camshaft bearing cap, completely seal the oil hole with adhesive tape or equivalent as shown in the illustration to prevent air from leaking.
- NOTICE:
-
Be sure to cover the oil hole completely because air leaks due to insufficient sealing will prevent the lock pin from being released.
Prick a hole in the tape covering the oil hole as shown in the illustration. (Procedure A)
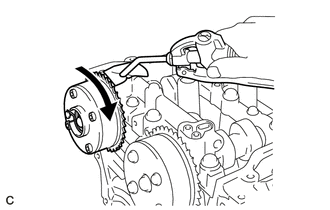
Apply approximately 200 kPa (2.0 kgf/cm2, 28 psi) of air pressure to the hole pricked in procedure A to release the lock pin.
- NOTICE:
- ·
If air leaks out, reattach the adhesive tape.
·Cover the oil hole with a piece of cloth when applying air pressure to prevent oil from spraying.
Using a screwdriver with its tip wrapped with tape, forcibly turn the camshaft timing exhaust gear assembly in the retard direction (clockwise).
- NOTICE:
- ·
Be sure to keep the camshaft timing exhaust gear assembly in the retard direction using a screwdriver. If the gear is released, it will return to the most advanced position automatically due to the force from the spring.
·Do not damage the camshaft timing exhaust gear assembly.
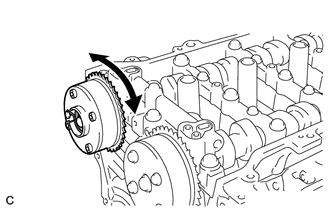
Using a screwdriver with its tip wrapped with tape, turn the camshaft timing exhaust gear assembly within its movable range (19 to 21°) 2 or 3 times without turning it to the most advanced position. Make sure that the camshaft timing exhaust gear assembly turns smoothly.
Remove the adhesive tape from the No. 1 camshaft bearing cap.
13050
4.REMOVE CAMSHAFT TIMING GEAR ASSEMBLY
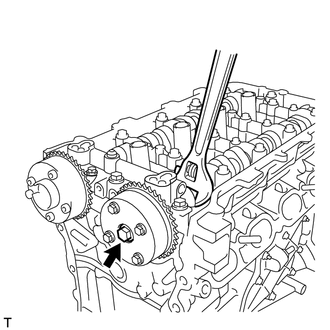
Remove the flange bolt while holding the hexagonal portion of the camshaft, and then remove the camshaft timing gear assembly.
- NOTICE:
-
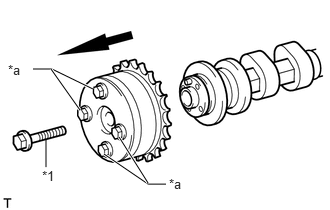 1.083,1.604 1.542,1.917 1.542,1.917 1.729,1.917 true 0.479,1.458 0.479,1.74 false 1.24,1.427 1.542,1.906 true 0.344,0.719 0.542,0.719 0.542,0.719 0.969,0.927 true 0.531,0.719 0.833,1.146 true 0.438,1.75 0.75,1.906 0.313,0.156 10 *1 1.76,1.833 2.073,1.99 0.313,0.156 10 *a 0.083,0.646 0.396,0.802 0.313,0.156 10 *a
*1 Flange Bolt *a Do Not Remove
- ·
Before removing the camshaft timing gear assembly, make sure that the lock pin has been released.
·Be sure not to remove the other 4 bolts.
·Keep the camshaft timing gear horizontal while removing it from the camshaft.
13070A
5.REMOVE CAMSHAFT TIMING EXHAUST GEAR ASSEMBLY
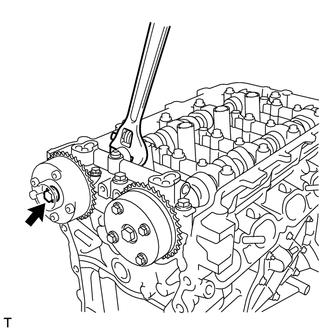
Remove the flange bolt while holding the hexagonal portion of the No. 2 camshaft, and then remove the camshaft timing exhaust gear assembly.
- NOTICE:
-
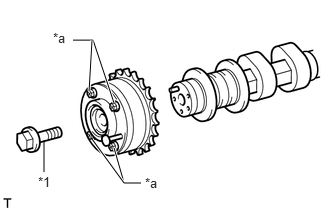 0.458,1.458 0.458,1.792 false 1.188,1.542 1.292,1.906 true 0.958,1.448 1.292,1.906 1.292,1.906 1.469,1.906 true 0.76,0.417 0.969,0.417 0.969,0.417 1.188,1.073 true 0.958,0.417 0.927,0.948 true 0.396,1.813 0.708,1.969 0.313,0.156 10 *1 0.552,0.313 0.865,0.469 0.313,0.156 10 *a 1.51,1.823 1.823,1.979 0.313,0.156 10 *a
*1 Flange Bolt *a Do Not Remove
- ·
Be sure not to remove the other 4 bolts.
·Keep the camshaft timing exhaust gear horizontal while removing it from the No. 2 camshaft.
6.REMOVE CAMSHAFT BEARING CAP
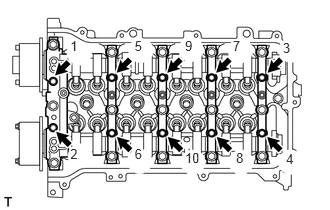
Uniformly loosen and remove the 10 bearing cap bolts in the sequence shown in the illustration.
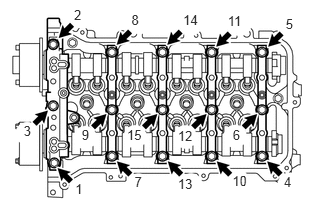
Uniformly loosen and remove the 15 bearing cap bolts in the sequence shown in the illustration.
- NOTICE:
-
Uniformly loosen the bolts while keeping the camshaft level.
Remove the 5 camshaft bearing caps.
- HINT:
-
Arrange the removed parts in the correct order.
13511
7.REMOVE CAMSHAFT
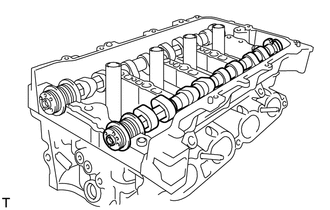
13512
8.REMOVE NO. 2 CAMSHAFT
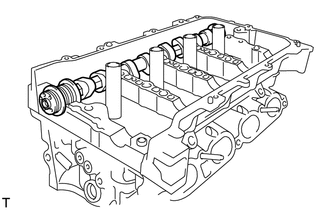
11811
9.REMOVE NO. 1 CAMSHAFT BEARING
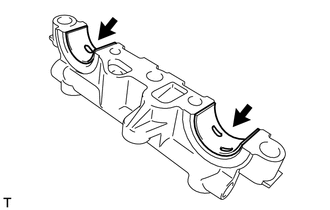
Remove the 2 No. 1 camshaft bearings.
11821
10.REMOVE NO. 2 CAMSHAFT BEARING
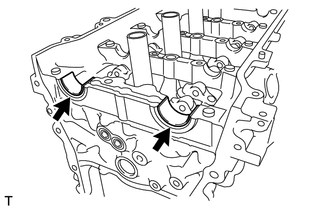
Remove the 2 No. 2 camshaft bearings.
13801
11.REMOVE NO. 1 VALVE ROCKER ARM SUB-ASSEMBLY
13750
12.REMOVE VALVE LASH ADJUSTER ASSEMBLY
11103
13.REMOVE CAMSHAFT HOUSING SUB-ASSEMBLY
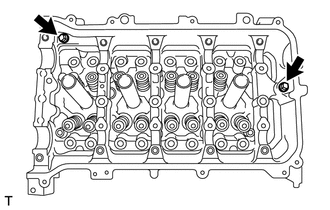
Remove the 2 bolts.
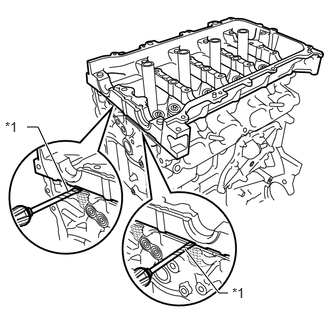
| *1 | Protective Tape |
Remove the camshaft housing sub-assembly by prying between the cylinder head sub-assembly and camshaft housing sub-assembly with a screwdriver.
- NOTICE:
-
Be careful not to damage the contact surfaces of the cylinder head sub-assembly and camshaft housing sub-assembly.
- HINT:
-
Tape the screwdriver tip before use.
13801
14.INSPECT NO. 1 VALVE ROCKER ARM SUB-ASSEMBLY
13750
15.INSPECT VALVE LASH ADJUSTER ASSEMBLY