2AD-FTV EMISSION CONTROL EXHAUST GAS TEMPERATURE SENSOR(for DPF) INSTALLATION
PROCEDURE

 89425A
1.INSTALL EXHAUST GAS TEMPERATURE SENSOR
- NOTICE:
-
If the exhaust gas temperature sensor is dropped, replace it with a new one.
Using a 14 mm union nut wrench, install the exhaust gas temperature sensor.
- Torque:
- 30 N*m (306 kgf*cm, 22 ft.*lbf)
- NOTICE:
-
Use the formula to calculate special torque values for situations where a union nut wrench is click here combined with a torque wrench.
-
Click hereGeneral>INTRODUCTION>REPAIR INSTRUCTION>PRECAUTION
Attach the exhaust gas temperature sensor connector clamp.
89425B
2.INSTALL NO. 2 EXHAUST GAS TEMPERATURE SENSOR
- NOTICE:
-
If the No. 2 exhaust gas temperature sensor is dropped, replace it with a new one.
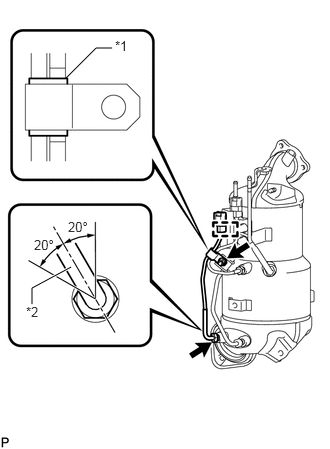
| *1 | White Tube |
| *2 | Protective Tube |
Temporarily install the No. 2 exhaust gas temperature sensor with the union nut.
Attach the No. 2 exhaust gas temperature sensor connector clamp.
Temporarily install the clamp with the nut.
- NOTICE:
-
Make sure the clamp is aligned with the white tube of the wire harness as shown in the illustration.
Tighten the nut.
- Torque:
- 6.4 N*m (65 kgf*cm, 57 in.*lbf)
Using a 14 mm union nut wrench, tighten the union nut of the No. 2 exhaust gas temperature sensor.
- Torque:
- 30 N*m (306 kgf*cm, 22 ft.*lbf)
- NOTICE:
- ·
When tightening the union nut, make sure that the protective tube of the sensor is within the range shown in the illustration.
·Use the formula to calculate special torque values for situations where a union nut wrench is click here combined with a torque wrench.
Click hereGeneral>INTRODUCTION>REPAIR INSTRUCTION>PRECAUTION
25051
3.INSTALL EXHAUST MANIFOLD CONVERTER SUB-ASSEMBLY
25586
4.INSTALL NO. 1 MANIFOLD CONVERTER INSULATOR
5.INSTALL ENGINE ASSEMBLY