AXLE AND DIFFERENTIAL REAR AXLE CARRIER REMOVAL
CAUTION / NOTICE / HINT
- HINT:
- ·
Use the same procedure for the RH and LH sides.
·The procedure listed below is for the LH side.
PROCEDURE

 1.REMOVE REAR WHEEL
42312B
2.REMOVE REAR AXLE SHAFT NUT LH (for 4WD/AWD)
89516D
3.DISCONNECT SKID CONTROL SENSOR WIRE LH (for 2WD)
4.DISCONNECT REAR SPEED SENSOR LH (for 4WD/AWD)
5.DISCONNECT REAR DISC BRAKE CALIPER ASSEMBLY LH
42431
6.REMOVE REAR DISC
42450B
7.REMOVE REAR AXLE HUB AND BEARING ASSEMBLY LH (for 2WD)
42440
8.REMOVE REAR AXLE HUB AND BEARING ASSEMBLY LH (for 4WD/AWD)
48840A
9.REMOVE REAR STABILIZER LINK ASSEMBLY LH
46430
10.DISCONNECT NO. 3 PARKING BRAKE CABLE ASSEMBLY
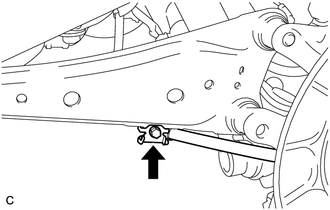
Remove the bolt and disconnect the No. 3 parking brake cable from the rear trailing arm assembly.
11.DISCONNECT PARKING BRAKE ASSEMBLY
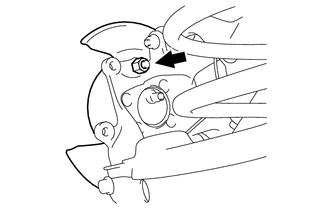
Remove the nut and disconnect the parking brake assembly from the rear axle carrier.
89408C
12.REMOVE REAR HEIGHT CONTROL SENSOR SUB-ASSEMBLY LH (w/ Automatic Headlight Beam Level Control System)
48517A
13.DISCONNECT REAR SHOCK ABSORBER BRACKET LH
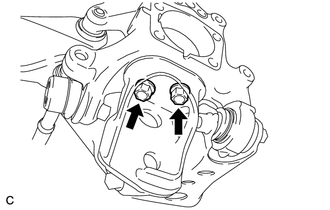
Remove the 2 bolts and disconnect the rear shock absorber bracket from the rear axle carrier.
48720A
14.DISCONNECT REAR NO. 1 SUSPENSION ARM ASSEMBLY LH
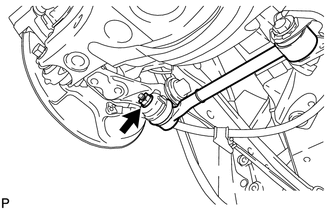
Remove the nut from the axle carrier.
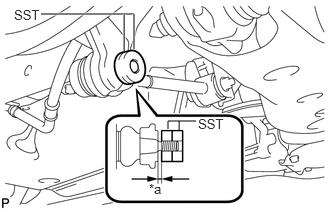
| *a | 1 mm (0.0394 in.) |
Install SST to the rear No. 1 suspension arm as shown in the illustration.
- SST
- 09960-20010 (09961-02060)
- NOTICE:
-
Make sure that the clearance measurement between SST and the rear axle assembly is 1 mm (0.0394 in.).
- HINT:
-
Use 2 SST of the same type.
Using SST, disconnect the rear No. 1 suspension arm from the rear axle carrier as shown in the illustration.
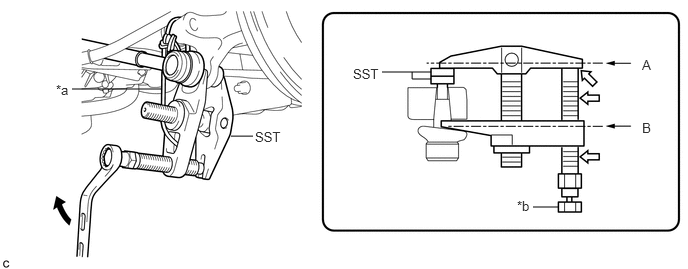
| *a | Tie the string without any slack. | *b | Place a wrench here. |

|
Turn | 
|
Molybdenum Grease Application Area |
- SST
- 09960-20010 (09961-02010)
- CAUTION:
-
Apply molybdenum grease to the threads and end of SST bolt.
- NOTICE:
- ·
Be sure to tighten the string firmly to secure SST to the rear axle assembly to prevent SST from falling off.
·Install SST so that A and B are parallel.
·Be sure to place a wrench on the part indicated in the illustration.
·Do not damage the ball joint dust cover.
48710B
15.DISCONNECT REAR TRAILING ARM ASSEMBLY
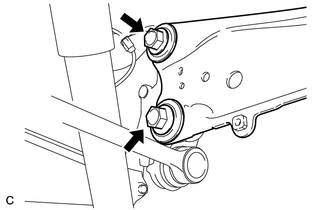
Remove the 2 bolts and disconnect the rear trailing arm from the rear axle carrier.
48740F
16.DISCONNECT REAR NO. 2 SUSPENSION ARM ASSEMBLY LH
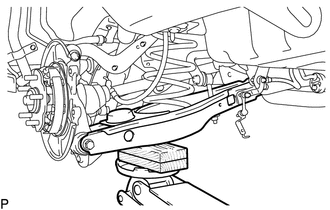
Support the rear No. 2 suspension arm with a jack using a wooden block to avoid damage.
- NOTICE:
-
Do not excessively jack up the rear No. 2 suspension arm assembly LH.
- HINT:
-
Support the rear shock absorber at a position where it compresses by approximately 20 to 30 mm (0.788 to 1.181 in.).
Loosen the bolt and nut of the rear No. 2 suspension arm on the rear suspension member side.
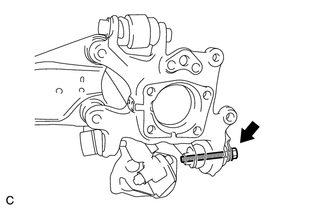
Remove the bolt and disconnect the No. 2 rear suspension arm from the rear axle carrier.
Lower the jack gradually to remove the rear coil spring together with the rear upper coil spring insulator.
Remove the rear lower coil spring insulator from the rear No. 2 suspension arm.
42305
17.REMOVE REAR AXLE CARRIER SUB-ASSEMBLY LH
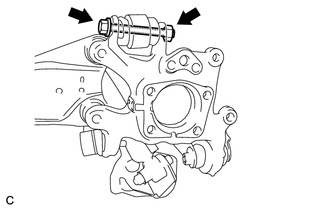
Remove the bolt and disconnect the rear upper control arm from the rear axle carrier.