DRIVE SHAFT / PROPELLER SHAFT FRONT DRIVE SHAFT ASSEMBLY(for 2WD) REASSEMBLY
CAUTION / NOTICE / HINT
- NOTICE:
- ·
When using a vise, place aluminum plates between the part and vise.
·When using a vise, do not overtighten it.
PROCEDURE

 43410C
1.INSTALL FRONT DRIVE SHAFT BEARING
w/o Drive Shaft Bearing Case:
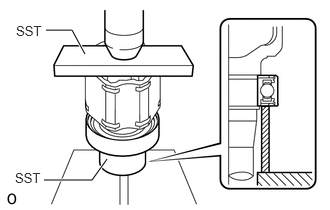
Using SST and a press, install a new front drive shaft bearing to the front drive inboard joint assembly RH.
- SST
- 09527-10011
09710-30012 (09710-04081)
- NOTICE:
-
Make sure the bearing is completely installed.
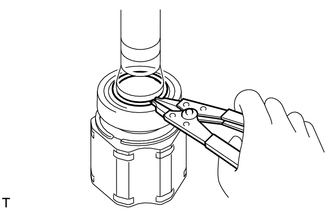
Using a snap ring expander, install a new snap ring.
43045
2.INSTALL DRIVE SHAFT BEARING CASE SUB-ASSEMBLY
w/ Drive Shaft Bearing Case:
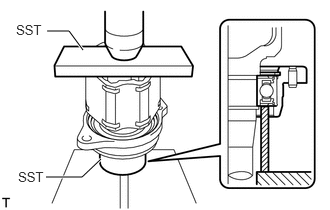
Using SST and a press, install a new drive shaft bearing case sub-assembly to the front drive inboard joint assembly RH.
- SST
- 09527-10011
09710-30012 (09710-04081)
- NOTICE:
-
Make sure the bearing is completely installed.
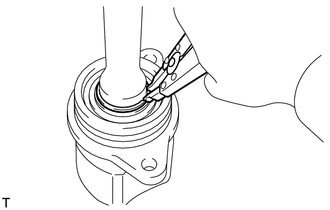
Using a snap ring expander, install a new snap ring.
43458
3.INSTALL FRONT DRIVE SHAFT DUST COVER
w/o Drive Shaft Bearing Case:
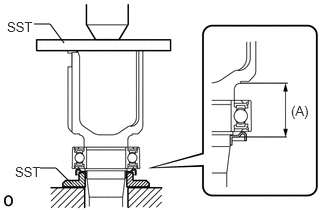
Using SST and a press, install a new drive shaft dust cover.
- SST
- 09527-10011
09726-40010
- Standard distance (A):
41.6 to 42.6 mm (1.638 to 1.677 in.)
- NOTICE:
-
Be careful not to damage the front drive shaft dust cover.
w/ Drive Shaft Bearing Case:
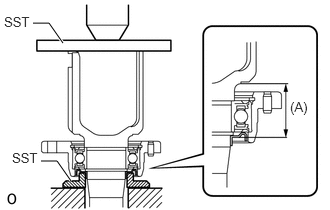
Using SST and a press, install a new drive shaft dust cover.
- SST
- 09527-10011
09726-40010
- Standard distance (A):
41.6 to 42.6 mm (1.638 to 1.677 in.)
- NOTICE:
-
Be careful not to damage the front drive shaft dust cover.
41336E
4.INSTALL FRONT DRIVE SHAFT DUST COVER LH
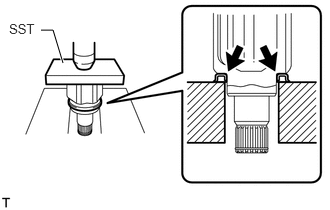
Using SST and a press, install a new front drive shaft dust cover LH.
- SST
- 09527-10011
- NOTICE:
- ·
The front drive shaft dust cover LH should be installed completely.
·Be careful not to damage the front drive shaft dust cover LH.
41336D
5.INSTALL FRONT DRIVE SHAFT DUST COVER RH
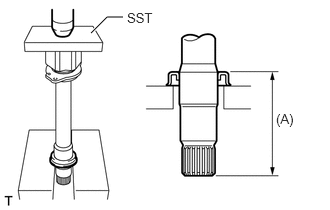
Using SST and a press, install a new front drive shaft dust cover RH to the front drive inboard joint assembly RH until the distance from the tip of the front drive inboard joint assembly RH to the front drive shaft dust cover RH onto reaches the specification as shown in the illustration.
- SST
- 09527-10011
- Standard Distance (A):
Item Length for 1AD-FTV (Manual Transaxle) 110.0 to 111.0 mm (4.331 to 4.370 in.) for 2AR-FE (Automatic Transaxle) for 2AR-FE (Manual Transaxle) 91.0 to 92.0 mm (3.583 to 3.622 in.) for 3ZR-FE (Manual Transaxle) for 3ZR-FE (CVT)
- NOTICE:
-
Be careful not to damage the front drive shaft dust cover RH.
6.INSTALL FRONT AXLE OUTBOARD JOINT BOOT
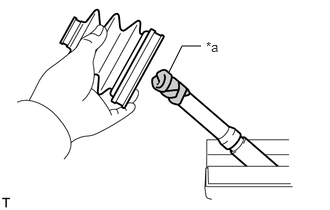
| *a | Protective Tape |
Before installing the front axle outboard joint boot, wrap the splines of the front drive outboard joint shaft assembly with protective tape to prevent the front axle outboard joint boot from being damaged.
Install new parts to the front drive outboard joint shaft assembly in the following order.
Front No. 2 axle outboard joint boot clamp
Front axle outboard joint boot
Front axle outboard joint boot clamp
Install the front axle outboard joint boot so that it is between the front No. 2 axle outboard joint boot clamp and front drive outboard joint shaft assembly.
Temporarily install the front axle outboard joint boot clamp to the front axle outboard joint boot.
Pack the front drive outboard joint shaft assembly and front axle outboard joint boot with grease from the boot kit.
- Standard Grease Capacity:
Item Grease Capacity for 1AD-FTV (Manual Transaxle) 205 to 215 g (7.3 to 7.5 oz) for 2AR-FE (Automatic Transaxle) for 2AR-FE (Manual Transaxle) for 3ZR-FE (Manual Transaxle) for 3ZR-FE (CVT) 171 to 181 g (6.1 to 6.3 oz)
43447F
7.INSTALL FRONT NO. 2 AXLE OUTBOARD JOINT BOOT CLAMP LH
- CAUTION:
-
Wear protective gloves to avoid injuries to your hands.
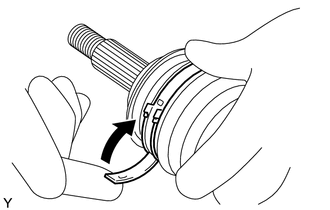
Install the front No. 2 axle outboard joint boot clamp LH onto the front axle outboard joint boot and temporarily fold back the lever.
- NOTICE:
- ·
Set the lever into the guide groove correctly and install the front No. 2 axle outboard joint boot clamp LH as close to the inside of the vehicle as possible.
·Check the band and lever for any deformation before folding back the lever.
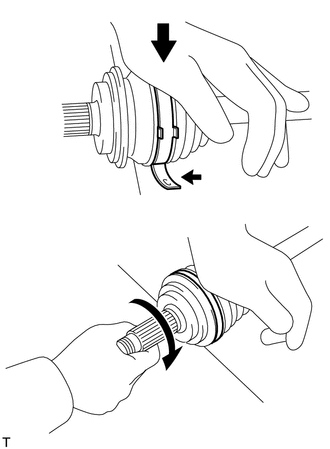
Lean your weight on your hand and roll the front drive outboard joint shaft assembly LH forward while pressing the front drive outboard joint shaft assembly LH against a surface until a click sound is heard.
- NOTICE:
- ·
Do not damage the deflector.
·Make sure that the front drive outboard joint shaft assembly LH is in direct contact with the surface.
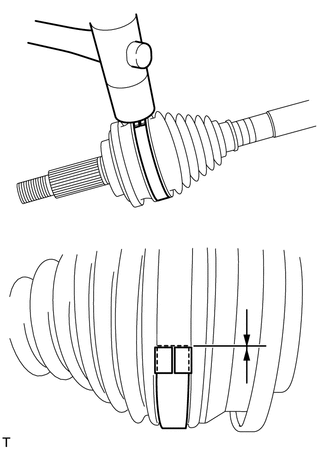
Using a plastic-faced hammer, tap the buckle to fix the lever in place while making sure that the end of the lever is even with the edge of the buckle.
- NOTICE:
-
Do not damage the front axle outboard joint boot.
43447D
8.INSTALL FRONT NO. 2 AXLE OUTBOARD JOINT BOOT CLAMP RH
- HINT:
-
Use the same procedure described for the LH side.
43447E
9.INSTALL FRONT AXLE OUTBOARD JOINT BOOT CLAMP LH
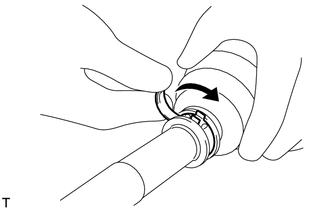
- CAUTION:
-
Wear protective gloves to avoid injuries to your hands.
Install the front axle outboard joint boot clamp LH to the front axle outboard joint boot and temporarily fold back the lever.
- NOTICE:
- ·
Set the lever into the guide groove correctly.
·Check the band and lever for any deformation before folding back the lever.
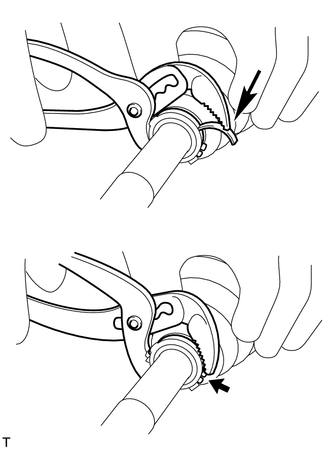
Using water pump pliers, pinch the front axle outboard joint boot clamp LH to temporarily fix it in place.
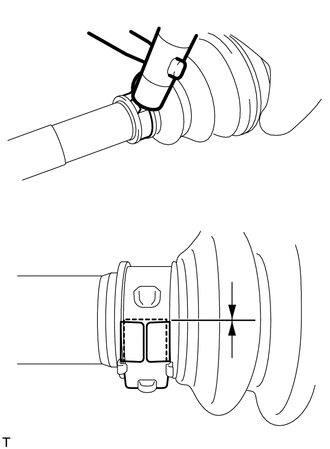
Using a plastic-faced hammer, tap the buckle to fix the lever in place while making sure that the end of the lever is even with the edge of the buckle.
- NOTICE:
-
Do not damage the front axle outboard joint boot.
43447C
10.INSTALL FRONT AXLE OUTBOARD JOINT BOOT CLAMP RH
- HINT:
-
Use the same procedure described for the LH side.
43474E
11.INSTALL FRONT DRIVE SHAFT DAMPER LH (w/ Drive Shaft Damper)
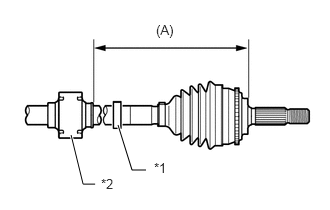
| *1 | Front Drive Shaft Damper Clamp LH |
| *2 | Front Drive Shaft Damper LH |
Install a new front drive shaft damper clamp LH and front drive shaft damper LH onto the front drive outboard joint shaft assembly LH.
- HINT:
-
Make sure the front drive shaft damper clamp LH is on the outboard joint side.
Adjust the position of the drive shaft damper LH so that the distance shown in the illustration is within the specified range.
- Standard Distance (A):
Item Length for 1AD-FTV (Manual Transaxle) 158.0 to 162.0 mm (6.221 to 6.377 in.) for 2AR-FE (Automatic Transaxle) for 2AR-FE (Manual Transaxle) - for 3ZR-FE (Manual Transaxle) - for 3ZR-FE (CVT) 161.0 to 165.0 mm (6.339 to 6.496 in.)
43474D
12.INSTALL FRONT DRIVE SHAFT DAMPER RH (w/ Drive Shaft Damper)
| *1 | Front Drive Shaft Damper Clamp RH |
| *2 | Front Drive Shaft Damper RH |
Install a new front drive shaft damper clamp RH and front drive shaft damper RH onto the front drive outboard joint shaft assembly RH.
- HINT:
-
Make sure the front drive shaft damper clamp RH is on the outboard joint side.
Adjust the position of the drive shaft damper RH so that the distance shown in the illustration is within the specified range.
- Standard Distance (A):
Item Length for 1AD-FTV (Manual Transaxle) - for 2AR-FE (Automatic Transaxle) 161.0 to 165.0 mm (6.339 to 6.496 in.) for 2AR-FE (Manual Transaxle) - for 3ZR-FE (Manual Transaxle) - for 3ZR-FE (CVT) -
43474G
13.INSTALL FRONT DRIVE SHAFT DAMPER CLAMP LH (w/ Drive Shaft Damper)
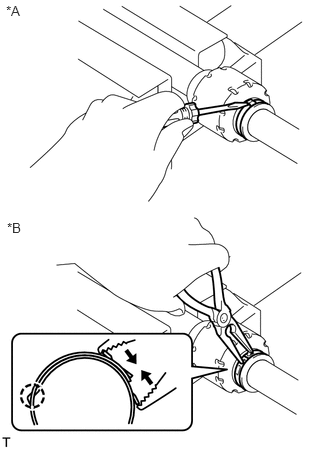
| *A | for One Touch Type |
| *B | for Claw Engagement Type |
Install the front drive shaft damper clamp LH.
- NOTICE:
-
Be sure to install the front drive shaft damper clamp LH in the correct position.
for One Touch Type:
Using a screwdriver, install the front drive shaft damper clamp LH as shown in the illustration.
for Claw Engagement Type:
Using needle-nose pliers, install the front drive shaft damper clamp LH as shown in the illustration.
43474F
14.INSTALL FRONT DRIVE SHAFT DAMPER CLAMP RH (w/ Drive Shaft Damper)
- HINT:
-
Use the same procedure described for the LH side.
43040
15.INSTALL FRONT DRIVE INBOARD JOINT ASSEMBLY LH
Install new parts to the front drive outboard joint shaft assembly LH in the following order.
Front axle inboard joint boot clamp LH
Front axle inboard joint boot
Front No. 2 axle inboard joint boot clamp LH
Remove the protective tape from the front drive outboard joint shaft assembly LH.
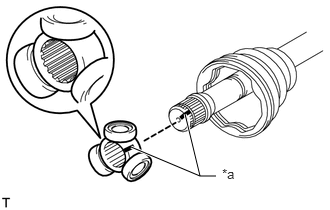
| *a | Matchmark |
Align the matchmarks and place the beveled side of the tripod joint axial spline toward the front drive outboard joint shaft assembly LH.
Using a brass bar and hammer, tap the tripod joint onto the front drive outboard joint shaft assembly LH.
- NOTICE:
- ·
Do not tap the rollers.
·Be sure to install the tripod in the correct direction.
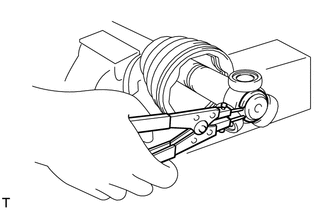
Using a snap ring expander, install a new snap ring.
Pack the front drive inboard joint assembly LH and front axle inboard joint boot with grease from the boot kit.
- Standard grease capacity:
175 to 185 g (6.2 to 6.5 oz)
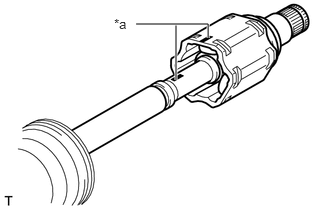
| *a | Matchmark |
Align the matchmarks and install the front drive inboard joint assembly LH to the front drive outboard joint shaft assembly LH.
43030
16.INSTALL FRONT DRIVE INBOARD JOINT ASSEMBLY RH
- HINT:
-
Use the same procedure described for the LH side.
17.INSTALL FRONT AXLE INBOARD JOINT BOOT
Install the front axle inboard joint boot to the front drive inboard joint assembly.
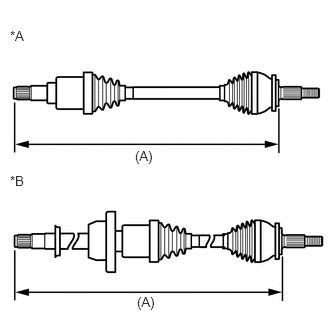
| *A | for LH Side |
| *B | for RH Side |
Check that the 2 joint boots are not stretched or contracted when the front drive shaft is at the standard length.
- Length (A):
Item Length for 1AD-FTV (Manual Transaxle) LH Side 553.6 mm (1.82 ft.) RH Side 932.4 mm (3.06 ft.) for 2AR-FE (Automatic Transaxle) LH Side 577.6 mm (1.89 ft.) RH Side 914.4 mm (3.00 ft.) for 2AR-FE (Manual Transaxle) LH Side 583.6 mm (1.91 ft.) RH Side 906.4 mm (2.97 ft.) for 3ZR-FE (Manual Transaxle) LH Side 594.6 mm (1.95 ft.) RH Side 893.4 mm (2.93 ft.) for 3ZR-FE (CVT) LH Side 591.2 mm (1.94 ft.) RH Side 890.0 mm (2.92 ft.)
- NOTICE:
-
Keep the drive shaft assembly level during inspection.
If the boots are stretched or contracted, correct them.
43448F
18.INSTALL FRONT AXLE INBOARD JOINT BOOT CLAMP LH
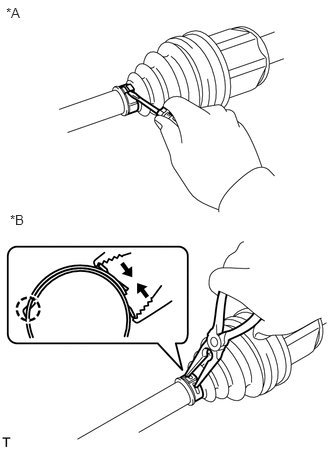
| *A | for One Touch Type |
| *B | for Claw Engagement Type |
for One Touch Type:
Using a screwdriver, install the front axle inboard joint boot clamp LH as shown in the illustration.
- NOTICE:
-
Be careful not to damage the boot.
for Claw Engagement Type:
Using needle-nose pliers, install the front axle inboard joint boot clamp LH as shown in the illustration.
- NOTICE:
-
Be careful not to damage the boot.
43448C
19.INSTALL FRONT AXLE INBOARD JOINT BOOT CLAMP RH
- HINT:
-
Use the same procedure described for the LH side.
43448G
20.INSTALL FRONT NO. 2 AXLE INBOARD JOINT BOOT CLAMP LH
- HINT:
-
Use the same procedure described for the front axle inboard joint boot clamp LH.
43448E
21.INSTALL FRONT NO. 2 AXLE INBOARD JOINT BOOT CLAMP RH
- HINT:
-
Use the same procedure described for the LH side.
22.INSPECT FRONT DRIVE SHAFT