SUPPLEMENTAL RESTRAINT SYSTEMS AIRBAG SYSTEM(w/ Occupant Classification System) B1860/64 Short in Driver Side Knee Airbag Squib Circuit B1861/64 Open in Driver Side Knee Airbag Squib Circuit B1862/64 Short to GND in Driver Side Knee Airbag Squib Circuit B1863/64 Short to B+ in Driver Side Knee Airbag Squib Circuit
DESCRIPTION
The driver side knee squib circuit consists of the airbag sensor assembly and lower No. 1 instrument panel airbag assembly.
This circuit instructs the SRS to deploy when deployment conditions are met.
These DTCs are stored when a malfunction is detected in the driver side knee squib circuit.
| DTC No. | Detection Item | DTC Detection Condition | Trouble Area |
|---|---|---|---|
| B1860/64 | Short in Driver Side Knee Airbag Squib Circuit | One of the following conditions is met:
·
The airbag sensor assembly detects a line short circuit signal 5 times in the driver side knee squib circuit during the primary check. ·
A driver side knee squib malfunction. ·
An airbag sensor assembly malfunction. |
·
Instrument panel wire ·
Lower No. 1 instrument panel airbag assembly (Driver side knee squib) ·
Airbag sensor assembly |
| B1861/64 | Open in Driver Side Knee Airbag Squib Circuit | One of the following conditions is met:
·
The airbag sensor assembly detects an open circuit signal in the driver side knee squib circuit for 2 seconds. ·
A driver side knee squib malfunction. ·
An airbag sensor assembly malfunction. |
·
Instrument panel wire ·
Lower No. 1 instrument panel airbag assembly (Driver side knee squib) ·
Airbag sensor assembly |
| B1862/64 | Short to GND in Driver Side Knee Airbag Squib Circuit | One of the following conditions is met:
·
The airbag sensor assembly detects a short circuit to ground signal in the driver side knee squib circuit for 0.5 seconds. ·
A driver side knee squib malfunction. ·
An airbag sensor assembly malfunction. |
·
Instrument panel wire ·
Lower No. 1 instrument panel airbag assembly (Driver side knee squib) ·
Airbag sensor assembly |
| B1863/64 | Short to B+ in Driver Side Knee Airbag Squib Circuit | One of the following conditions is met:
·
The airbag sensor assembly detects a short circuit to B+ signal in the driver side knee squib circuit for 0.5 seconds. ·
A driver side knee squib malfunction. ·
An airbag sensor assembly malfunction. |
·
Instrument panel wire ·
Lower No. 1 instrument panel airbag assembly (Driver side knee squib) ·
Airbag sensor assembly |
WIRING DIAGRAM
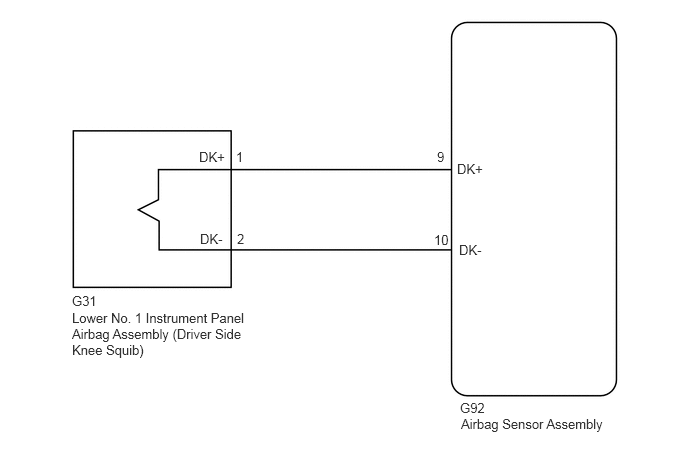
CAUTION / NOTICE / HINT
- NOTICE:
- ·
After turning the ignition switch off, waiting time may be required before disconnecting the cable from the negative (-) battery terminal. Therefore, make sure to read the disconnecting the cable from the negative (-) battery terminal notices before proceeding with work.
Click hereGeneral>INTRODUCTION>REPAIR INSTRUCTION>PRECAUTION
·When disconnecting the cable from the negative (-) battery terminal while performing repairs, some systems need to be initialized after the cable is reconnected.
Click hereGeneral>INTRODUCTION>REPAIR INSTRUCTION>INITIALIZATION
·After replacing the airbag sensor assembly, refer to initialization.
Click hereGeneral>INTRODUCTION>REPAIR INSTRUCTION>INITIALIZATION
- HINT:
-
To perform the simulation method, enter check mode (signal check) with the GTS (Click here Vehicle Interior>SUPPLEMENTAL RESTRAINT SYSTEMS>AIRBAG SYSTEM(w/ Occupant Classification System)>CHECK MODE PROCEDURE), and then wiggle each connector of the airbag system or drive the vehicle on various types of road (Click here Vehicle Interior>SUPPLEMENTAL RESTRAINT SYSTEMS>AIRBAG SYSTEM(w/ Occupant Classification System)>DIAGNOSIS SYSTEM).
PROCEDURE
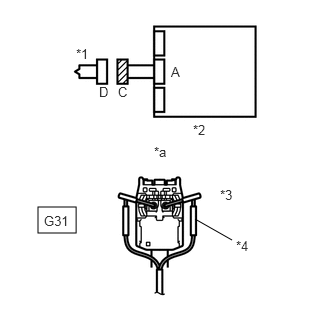
| *1 | Driver Side Knee Squib |
| *2 | Airbag Sensor Assembly |
| *3 | Connector C |
| *4 | SST |
| *a | Front view of wire harness connector
(to Driver Side Knee Squib) |
Turn the ignition switch off.
Disconnect the cable from the negative (-) battery terminal, and wait for at least 90 seconds.
Disconnect the connector from the lower No. 1 instrument panel airbag assembly.
Connect the white wire side of SST (resistance: 2.1 Ω) to connector C.
- CAUTION:
-
Never connect the tester to the lower No. 1 instrument panel airbag assembly (driver side knee squib) for measurement, as this may lead to a serious injury due to airbag deployment.
- NOTICE:
- ·
Do not forcibly insert SST into the terminals of the connector when connecting SST.
·Insert SST straight into the terminals of the connector.
- SST
- 09843-18061
Connect the cable to the negative (-) battery terminal, and wait for at least 2 seconds.
Turn the ignition switch to ON, and wait for at least 60 seconds.
Clear the DTCs.
- Body Electrical > SRS Airbag > Clear DTCs
- 50002 188
Turn the ignition switch off.
Turn the ignition switch to ON, and wait for at least 60 seconds.
Check for DTCs.
- Body Electrical > SRS Airbag > Trouble Codes
- 50001 188
- Result:
Proceed to DTC B1860/64, B1861/64, B1862/64 or B1863/64 is not output DTC B1860/64, B1861/64, B1862/64 or B1863/64 is output
- HINT:
-
Codes other than DTC B1860/64, B1861/64, B1862/64 and B1863/64 may be output at this time, but they are not related to this check.
Turn the ignition switch off.
Disconnect the cable from the negative (-) battery terminal, and wait for at least 90 seconds.
Disconnect SST from connector C.
DTC B1860/64, B1861/64, B1862/64 or B1863/64 is not output
DTC B1860/64, B1861/64, B1862/64 or B1863/64 is output
Disconnect the connectors from the airbag sensor assembly.
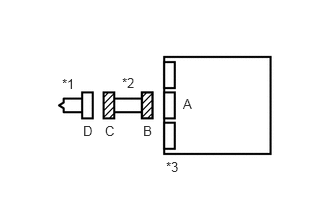
| *1 | Driver Side Knee Squib |
| *2 | Instrument Panel Wire |
| *3 | Airbag Sensor Assembly |
Check that the connectors (on the airbag sensor assembly side and lower No. 1 instrument panel airbag assembly side) are not damaged.
- OK:
The lock button is not disengaged, and the claw of the lock is not deformed or damaged.
- Result:
Proceed to OK NG
OK
NG
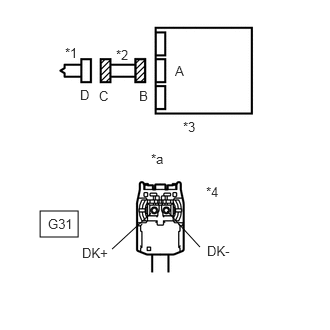
| *1 | Driver Side Knee Squib |
| *2 | Instrument Panel Wire |
| *3 | Airbag Sensor Assembly |
| *4 | Connector C |
| *a | Front view of wire harness connector
(to Driver Side Knee Squib) |
Connect the cable to the negative (-) battery terminal, and wait for at least 2 seconds.
Turn the ignition switch to ON.
Measure the voltage according to the value(s) in the table below.
- Standard Voltage:
Tester Connection Switch Condition Specified Condition G31-1 (DK+) - Body ground Ignition switch ON Below 1 V G31-2 (DK-) - Body ground Ignition switch ON Below 1 V
Turn the ignition switch off.
Disconnect the cable from the negative (-) battery terminal, and wait for at least 90 seconds.
Measure the resistance according to the value(s) in the table below.
- Standard Resistance:
Tester Connection Condition Specified Condition G31-1 (DK+) - G31-2 (DK-) Always Below 1 Ω
Release the activation prevention mechanism built into connector B.
Measure the resistance according to the value(s) in the table below.
- Standard Resistance:
Tester Connection Condition Specified Condition G31-1 (DK+) - G31-2 (DK-) Always 1 MΩ or higher
Restore the released activation prevention mechanism of connector B to its original condition.
Measure the resistance according to the value(s) in the table below.
- Standard Resistance:
Tester Connection Condition Specified Condition G31-1 (DK+) - Body ground Always 1 MΩ or higher G31-2 (DK-) - Body ground Always 1 MΩ or higher
- Result:
Proceed to OK NG
OK
NG
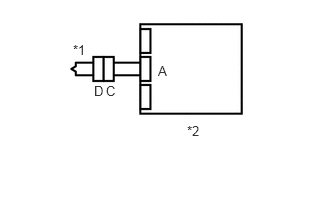
| *1 | Driver Side Knee Squib |
| *2 | Airbag Sensor Assembly |
Connect the connectors to the lower No. 1 instrument panel airbag assembly and airbag sensor assembly.
Connect the cable to the negative (-) battery terminal, and wait for at least 2 seconds.
Turn the ignition switch to ON, and wait for at least 60 seconds.
Clear the DTCs.
- Body Electrical > SRS Airbag > Clear DTCs
- 50002 188
Turn the ignition switch off.
Turn the ignition switch to ON, and wait for at least 60 seconds.
Check for DTCs.
- Body Electrical > SRS Airbag > Trouble Codes
- 50001 188
- Result:
Proceed to DTC B1860/64, B1861/64, B1862/64 or B1863/64 is not output DTC B1860/64, B1861/64, B1862/64 or B1863/64 is output
- HINT:
-
Codes other than DTC B1860/64, B1861/64, B1862/64 and B1863/64 may be output at this time, but they are not related to this check.
DTC B1860/64, B1861/64, B1862/64 or B1863/64 is not output
DTC B1860/64, B1861/64, B1862/64 or B1863/64 is output