NAVIGATION / MULTI INFO DISPLAY NAVIGATION SYSTEM(for Radio and Display Type) B15C0 GPS Antenna Connection Malfunction(short) B15C1 GPS Antenna Connection Malfunction(break)
DESCRIPTION
These DTCs are stored when a malfunction occurs in the navigation antenna assembly.
| DTC No. | Detection Item | DTC Detection Condition | Trouble Area |
|---|---|---|---|
| B15C0 | GPS Antenna Connection Malfunction(short) | Navigation antenna error | ·
Navigation antenna assembly (Except models with the vehicle identification number on the certification label ending with the character X.) ·
Satellite radio antenna assembly (Only for models with the vehicle identification number on the certification label ending with the character X.) ·
No. 3 antenna cord sub-assembly (Only for models with the vehicle identification number on the certification label ending with the character X.) ·
No. 2 antenna cord sub-assembly (Only for models with the vehicle identification number on the certification label ending with the character X.) ·
Antenna cord sub-assembly ·
Navigation ECU |
| B15C1 | GPS Antenna Connection Malfunction(break) | Error of the power source to the navigation antenna | ·
Navigation antenna assembly (Except models with the vehicle identification number on the certification label ending with the character X.) ·
Satellite radio antenna assembly (Only for models with the vehicle identification number on the certification label ending with the character X.) ·
No. 3 antenna cord sub-assembly (Only for models with the vehicle identification number on the certification label ending with the character X.) ·
No. 2 antenna cord sub-assembly (Only for models with the vehicle identification number on the certification label ending with the character X.) ·
Antenna cord sub-assembly ·
Navigation ECU |
WIRING DIAGRAM
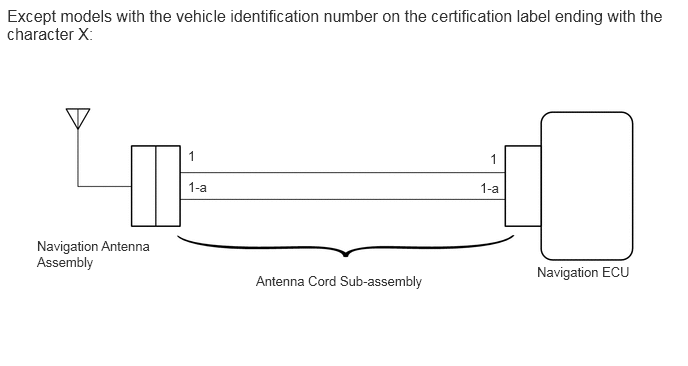
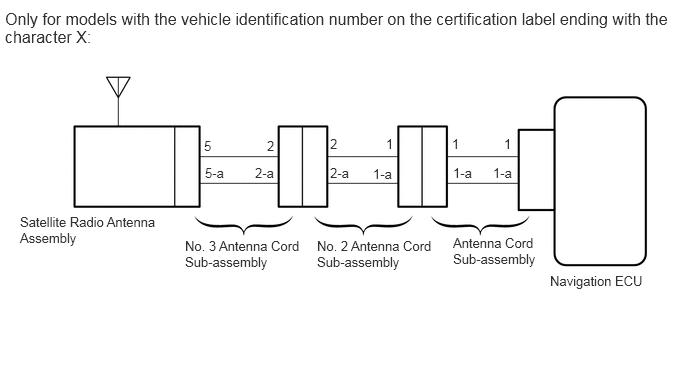
CAUTION / NOTICE / HINT
- NOTICE:
-
Check that the wire harness is properly installed and does not have any sharp bends, pinching or loose connections.
-
Click hereGeneral>INTRODUCTION>HOW TO TROUBLESHOOT ECU CONTROLLED SYSTEMS>HOW TO PROCEED WITH TROUBLESHOOTING
PROCEDURE
Check the vehicle condition.
- Result:
Result Proceed to Except models with the vehicle identification number on the certification label ending with the character X A Only for models with the vehicle identification number on the certification label ending with the character X B
A
B
Check if the navigation antenna assembly is securely connected to the antenna cord sub-assembly.
- OK:
Navigation antenna assembly is securely connected.
- Result:
Proceed to OK NG
OK
NG
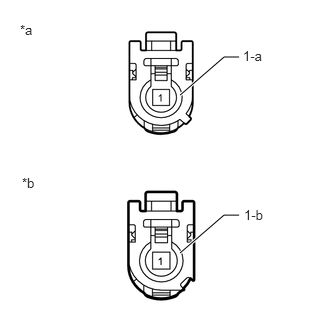
| *a | Front view of wire harness connector
(to Navigation Antenna Assembly) |
| *b | Front view of wire harness connector
(to Navigation ECU) |
Disconnect the antenna connector from the navigation ECU.
Disconnect the antenna connector from the navigation antenna assembly.
Measure the resistance according to the value(s) in the table below.
- Standard Resistance:
Tester Connection Condition Specified Condition 1 - 1 Always Below 1 Ω 1-a - 1-a Always Below 1 Ω 1 - Body ground Always 10 kΩ or higher 1-a - Body ground Always 10 kΩ or higher
- Result:
Proceed to OK NG
OK
NG
Replace the navigation antenna assembly with a known good one.
Click hereAudio / Visual / Telematics>NAVIGATION / MULTI INFO DISPLAY>NAVIGATION ANTENNA>REMOVAL
Clear the DTCs.
- Body Electrical > Navigation System > Clear DTCs
- 50002 212
Check for DTCs.
- Body Electrical > Navigation System > Trouble Codes
- 50001 212
- OK:
No DTCs are output.
- Result:
Proceed to OK NG
OK
NG
Check if the antenna cord sub-assembly is securely connected to the navigation ECU.
- OK:
Antenna cord sub-assembly is securely connected.
- Result:
Proceed to OK NG
OK
NG
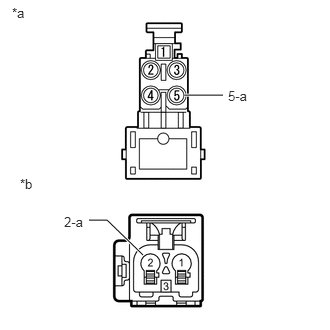
| *a | Front view of wire harness connector
(to Satellite Radio Antenna Assembly) |
| *b | Front view of wire harness connector
(to No. 2 Antenna Cord Sub-assembly) |
Disconnect the antenna connector from the satellite radio antenna assembly.
Disconnect the antenna connector from the No. 2 antenna cord sub-assembly.
Measure the resistance according to the value(s) in the table below.
- Standard Resistance:
Tester Connection Condition Specified Condition 5 - 2 Always Below 1 Ω 5-a - 2-a Always Below 1 Ω 5 - Body ground Always 10 kΩ or higher 5-a - Body ground Always 10 kΩ or higher
- Result:
Proceed to OK NG
OK
NG
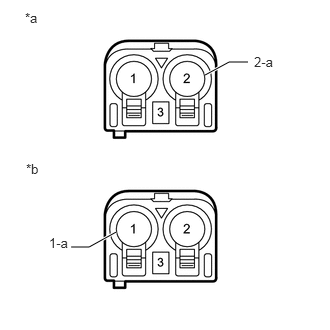
| *a | Front view of wire harness connector
(to No. 3 Antenna Cord Sub-assembly) |
| *b | Front view of wire harness connector
(to Antenna Cord Sub-assembly) |
Disconnect the antenna connector from the No. 3 antenna cord sub-assembly.
Disconnect the antenna connector from the antenna cord sub-assembly.
Measure the resistance according to the value(s) in the table below.
- Standard Resistance:
Tester Connection Condition Specified Condition 2 - 1 Always Below 1 Ω 2-a - 1-a Always Below 1 Ω 2 - Body ground Always 10 kΩ or higher 2-a - Body ground Always 10 kΩ or higher
- Result:
Proceed to OK NG
OK
NG
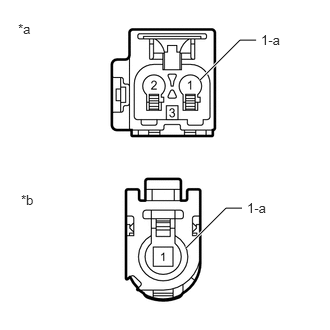
| *a | Front view of wire harness connector
(to No. 2 Antenna Cord Sub-assembly) |
| *b | Front view of wire harness connector
(to Navigation ECU) |
Disconnect the antenna connector from the No. 2 antenna cord sub-assembly.
Disconnect the antenna connector from the navigation ECU.
Measure the resistance according to the value(s) in the table below.
- Standard Resistance:
Tester Connection Condition Specified Condition 1 - 1 Always Below 1 Ω 1-a - 1-a Always Below 1 Ω 1 - Body ground Always 10 kΩ or higher 1-a - Body ground Always 10 kΩ or higher
- Result:
Proceed to OK NG
OK
NG
Click hereAudio / Visual / Telematics>AUDIO / VIDEO>RADIO ANTENNA CORD(for Instrument Panel Side)>REMOVAL
Replace the satellite radio antenna assembly with a known good one.
Click hereAudio / Visual / Telematics>AUDIO / VIDEO>AMPLIFIER ANTENNA>REMOVAL
Clear the DTCs.
- Body Electrical > Navigation System > Clear DTCs
- 50002 212
Check for DTCs.
- Body Electrical > Navigation System > Trouble Codes
- 50001 212
- OK:
No DTCs are output.
- Result:
Proceed to OK NG
OK
NG