2WW FUEL FUEL TANK INSTALLATION
PROCEDURE

 83320
1.INSTALL FUEL SENDER GAUGE ASSEMBLY
77295D
2.INSTALL FUEL TUBE GROMMET
Install the 3 fuel tube grommets to the fuel tank assembly.
77289B
3.INSTALL FUEL TUBE CLAMP NO.3
Install the No. 3 fuel tube clamp to the fuel tank assembly.
77299A
4.INSTALL NO. 5 FUEL TUBE CLAMP
Install the No. 5 fuel tube clamp to the fuel tank assembly.
77206C
5.INSTALL NO. 2 FUEL MAIN TUBE SUB-ASSEMBLY (w/ Combustion Type Power Heater)
Install the No. 2 fuel tank main tube sub-assembly to the No. 3 fuel tube clamp, No. 5 fuel tube clamp and 3 fuel tube grommets.
77204A
6.INSTALL FUEL TANK RETURN TUBE
Install the fuel return tube to the No. 3 fuel tube clamp, No. 5 fuel tube clamp and 3 fuel tube grommets.
77209D
7.INSTALL FUEL TANK MAIN TUBE SUB-ASSEMBLY
Install the fuel tank main tube sub-assembly to the No. 3 fuel tube clamp, No. 5 fuel tube clamp and 3 fuel tube grommets.
77020A
8.INSTALL FUEL SUCTION WITH PUMP AND GAUGE TUBE ASSEMBLY
Install a new gasket onto the fuel suction with pump and gauge tube assembly.
Install the fuel suction with pump and gauge tube assembly.
- NOTICE:
-
Do not damage the fuel suction with pump and gauge tube assembly.
77168A
9.INSTALL FUEL TANK VENT TUBE SET PLATE
Install the fuel tank vent tube set plate with the 8 bolts.
- Torque:
- 6.0 N*m (61 kgf*cm, 53 in.*lbf)
77209D
10.CONNECT FUEL TANK MAIN TUBE SUB-ASSEMBLY
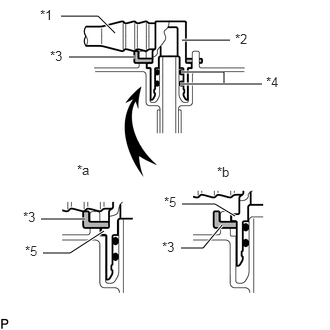
| *1 | Fuel Tube |
| *2 | Fuel Tube Joint |
| *3 | Tube Joint Clip |
| *4 | O-Ring |
| *5 | Collar |
| *a | CORRECT |
| *b | INCORRECT |
Push the fuel tube joint into the plug of the fuel suction with pump and gauge tube assembly, and then install the tube joint clip.
- NOTICE:
- ·
Check that there are no scratches or foreign objects on the connecting parts.
·Check that the fuel tube joint is inserted securely.
·Check that the fuel tube joint clip is on the collar of the fuel tube joint.
·After installing the tube joint clip, check that the fuel tube joint cannot be pulled off.
·Be careful not to damage any clip. If a clip is damaged, replace it.
77204A
11.CONNECT FUEL TANK RETURN TUBE
| *1 | Fuel Tube |
| *2 | Fuel Tube Joint |
| *3 | Tube Joint Clip |
| *4 | O-Ring |
| *5 | Collar |
| *a | CORRECT |
| *b | INCORRECT |
Push the fuel tube joint into the plug of the fuel suction with pump and gauge tube assembly, and then install the tube joint clip.
- NOTICE:
- ·
Check that there are no scratches or foreign objects on the connecting parts.
·Check that the fuel tube joint is inserted securely.
·Check that the fuel tube joint clip is on the collar of the fuel tube joint.
·After installing the tube joint clip, check that the fuel tube joint cannot be pulled off.
·Be careful not to damage any clip. If a clip is damaged, replace it.
77206C
12.CONNECT NO. 2 FUEL MAIN TUBE SUB-ASSEMBLY (w/ Combustion Type Power Heater)
| *1 | Fuel Tube |
| *2 | Fuel Tube Joint |
| *3 | Tube Joint Clip |
| *4 | O-Ring |
| *5 | Collar |
| *a | CORRECT |
| *b | INCORRECT |
Push the fuel tube joint into the plug of the fuel suction with pump and gauge tube assembly, and then install the tube joint clip.
- NOTICE:
- ·
Check that there are no scratches or foreign objects on the connecting parts.
·Check that the fuel tube joint is inserted securely.
·Check that the fuel tube joint clip is on the collar of the fuel tube joint.
·After installing the tube joint clip, check that the fuel tube joint cannot be pulled off.
·Be careful not to damage any clip. If a clip is damaged, replace it.
77249
13.INSTALL FUEL EMISSION HOSE
Attach the clamp and install the fuel emission hose.
Click hereEngine / Hybrid System>2WW FUEL>FUEL SYSTEM>PRECAUTION
77100
14.INSTALL FUEL TANK ASSEMBLY
Set the fuel tank assembly on an engine lifter.
Lift up the engine lifter.
Connect the fuel sender gauge connector.
- NOTICE:
-
Be careful not to cut the wire harness.
Connect the wire harness to the 2 fuel tube grommets.
Install the No. 1 fuel tank band sub-assembly with the 2 bolts.
- Torque:
- 45 N*m (459 kgf*cm, 33 ft.*lbf)
Install the No. 1 fuel tank band sub-assembly LH with the 2 bolts.
- Torque:
- 45 N*m (459 kgf*cm, 33 ft.*lbf)
Install the No. 2 fuel tank band sub-assembly with the 2 bolts.
- Torque:
- 45 N*m (459 kgf*cm, 33 ft.*lbf)
77269A
15.CONNECT FUEL TANK BREATHER HOSE
Connect the fuel tank breather hose to the fuel tank assembly.
Click hereEngine / Hybrid System>2WW FUEL>FUEL SYSTEM>PRECAUTION
77213E
16.CONNECT FUEL TANK TO FILLER PIPE HOSE
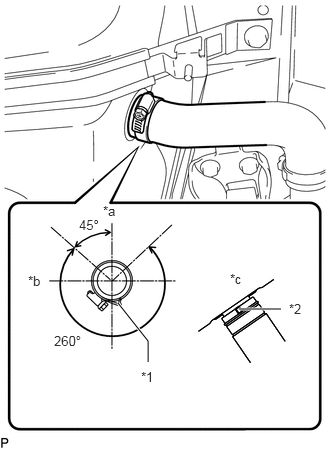
| *1 | Stopper |
| *2 | Protrusion |
| *a | Top |
| *b | Front |
| *c | Bottom of Fuel Tank |
Connect the fuel tank to filler pipe hose to the fuel tank assembly and tighten the hose clamp.
- HINT:
-
Make sure the hose clamp is oriented as shown in the illustration.
77209D
17.CONNECT FUEL TANK MAIN TUBE SUB-ASSEMBLY
Connect the fuel tank main tube sub-assembly to the fuel pipe.
Click hereEngine / Hybrid System>2WW FUEL>FUEL SYSTEM>PRECAUTION
77204A
18.CONNECT FUEL TANK RETURN TUBE
Connect the fuel tank return tube to the fuel pipe, and slide the clamp to secure the hose.
77206C
19.CONNECT NO. 2 FUEL MAIN TUBE SUB-ASSEMBLY (w/ Combustion Type Power Heater)
Connect the No. 2 fuel main tube sub-assembly to the fuel pipe, and slide the clamp to secure the hose.
46420
20.CONNECT NO. 2 PARKING BRAKE CABLE ASSEMBLY
Connect the No. 2 parking brake cable assembly with the 2 bolts.
- Torque:
- 6.0 N*m (61 kgf*cm, 53 in.*lbf)
58398F
21.INSTALL NO. 1 FLOOR UNDER COVER
Attach the 2 clips and install the No. 1 floor under cover with the 2 nuts.
77641A
22.INSTALL NO. 1 FUEL TANK PROTECTOR
Attach the 3 clips and install the No. 1 fuel tank protector with the nut.
- Torque:
- 20 N*m (204 kgf*cm, 15 ft.*lbf)
50819
23.INSTALL FRONT FLOOR COVER
Install the front floor cover with the bolt and nut.
- Torque:
- for bolt : 12 N*m (122 kgf*cm, 9 ft.*lbf)
- for nut : 6.0 N*m (61 kgf*cm, 53 in.*lbf)
Attach the 5 clips.
24.INSPECT FOR FUEL LEAK