AUDIO / VIDEO AUDIO AND VISUAL SYSTEM(for Radio and Display Type) B15C0 Short in GPS Antenna B15C1 Open in GPS Antenna
DESCRIPTION
These DTCs are stored when a malfunction occurs in the navigation antenna assembly.
| DTC No. | Detection Item | DTC Detection Condition | Trouble Area |
|---|---|---|---|
| B15C0 | GPS Antenna Connection Malfunction(short) | Navigation antenna error | ·
Navigation antenna assembly ·
Antenna cord sub-assembly ·
Radio and display receiver assembly |
| B15C1 | GPS Antenna Connection Malfunction(break) | Error of the power source to the navigation antenna | ·
Navigation antenna assembly ·
Antenna cord sub-assembly ·
Radio and display receiver assembly |
WIRING DIAGRAM
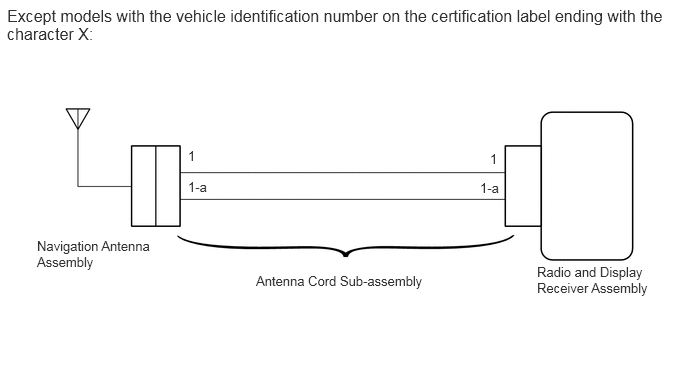
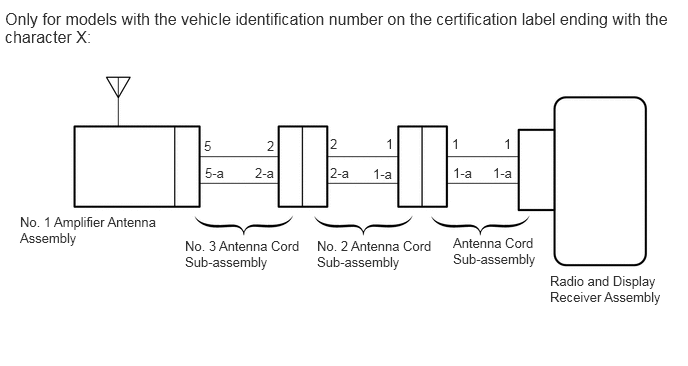
CAUTION / NOTICE / HINT
- NOTICE:
-
Check that the wire harness is properly installed and does not have any sharp bends, pinching or loose connections.
-
Click hereGeneral>INTRODUCTION>HOW TO TROUBLESHOOT ECU CONTROLLED SYSTEMS>HOW TO PROCEED WITH TROUBLESHOOTING
PROCEDURE
Check the vehicle condition.
- Result:
Result Proceed to Except models with the vehicle identification number on the certification label ending with the character X A Only for models with the vehicle identification number on the certification label ending with the character X B
A
B
Check if the navigation antenna assembly is securely connected to the antenna cord sub-assembly.
- OK:
Navigation antenna assembly is securely connected.
- Result:
Proceed to OK NG
OK
NG
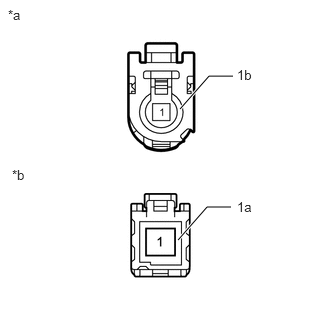
| *a | Front view of wire harness connector
(to Radio and Display Receiver Assembly) |
| *b | Front view of wire harness connector
(to Navigation Antenna Assembly) |
Disconnect the antenna connector from the radio and display receiver assembly.
Disconnect the antenna connector from the navigation antenna assembly.
Measure the resistance according to the value(s) in the table below.
- Standard Resistance:
Tester Connection Condition Specified Condition 1 - 1 Always Below 1 Ω 1-a - 1-a Always Below 1 Ω 1 - Body ground Always 10 kΩ or higher 1-a - Body ground Always 10 kΩ or higher
- Result:
Proceed to OK NG
OK
NG
Replace the navigation antenna assembly with a known good one.
Click hereAudio / Visual / Telematics>NAVIGATION / MULTI INFO DISPLAY>NAVIGATION ANTENNA>REMOVAL
Clear the DTCs.
- Body Electrical > Navigation System > Clear DTCs
- 50002 212
Check for DTCs.
- Body Electrical > Navigation System > Trouble Codes
- 50001 212
- OK:
No DTCs are output.
- Result:
Proceed to OK NG
OK
NG
Check if the antenna cord sub-assembly is securely connected to the radio and display receiver assembly.
- OK:
Antenna cord sub-assembly is securely connected.
- Result:
Proceed to OK NG
OK
NG
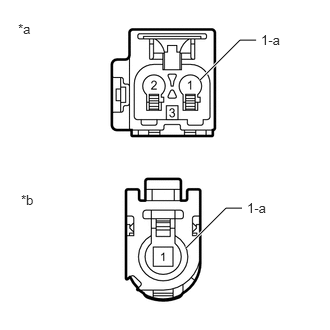
| *a | Front view of wire harness connector
(to No. 2 Antenna Cord Sub-assembly) |
| *b | Front view of wire harness connector
(to radio and display receiver assembly) |
Disconnect the antenna connector from the No. 2 antenna cord sub-assembly.
Disconnect the antenna connector from the radio and display receiver assembly.
Measure the resistance according to the value(s) in the table below.
- Standard Resistance:
Tester Connection Condition Specified Condition 1 - 1 Always Below 1 Ω 1-a - 1-a Always Below 1 Ω 1 - Body ground Always 10 kΩ or higher 1-a - Body ground Always 10 kΩ or higher
- Result:
Proceed to OK NG
OK
NG
Click hereAudio / Visual / Telematics>AUDIO / VIDEO>RADIO ANTENNA CORD(for Instrument Panel Side)>REMOVAL
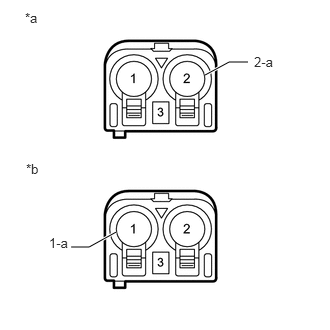
| *a | Front view of wire harness connector
(to No. 3 Antenna Cord Sub-assembly) |
| *b | Front view of wire harness connector
(to Antenna Cord Sub-assembly) |
Disconnect the antenna connector from the No. 3 antenna cord sub-assembly.
Disconnect the antenna connector from the antenna cord sub-assembly.
Measure the resistance according to the value(s) in the table below.
- Standard Resistance:
Tester Connection Condition Specified Condition 2 - 1 Always Below 1 Ω 2-a - 1-a Always Below 1 Ω 2 - Body ground Always 10 kΩ or higher 2-a - Body ground Always 10 kΩ or higher
- Result:
Proceed to OK NG
OK
NG
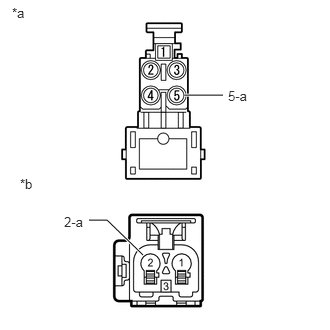
| *a | Front view of wire harness connector
(to No. 1 Amplifier Antenna Assembly) |
| *b | Front view of wire harness connector
(to No. 2 Antenna Cord Sub-assembly) |
Disconnect the antenna connector from the No. 1 amplifier antenna assembly.
Disconnect the antenna connector from the No. 2 antenna cord sub-assembly.
Measure the resistance according to the value(s) in the table below.
- Standard Resistance:
Tester Connection Condition Specified Condition 5 - 2 Always Below 1 Ω 5-a - 2-a Always Below 1 Ω 5 - Body ground Always 10 kΩ or higher 5-a - Body ground Always 10 kΩ or higher
- Result:
Proceed to OK NG
OK
NG
Replace the No. 1 amplifier antenna assembly with a known good one.
Click hereAudio / Visual / Telematics>AUDIO / VIDEO>AMPLIFIER ANTENNA>REMOVAL
Clear the DTCs.
- Body Electrical > Navigation System > Clear DTCs
- 50002 212
Check for DTCs.
- Body Electrical > Navigation System > Trouble Codes
- 50001 212
- OK:
No DTCs are output.
- Result:
Proceed to OK NG
OK
NG