3ZR-FE ENGINE MECHANICAL CAMSHAFT INSTALLATION
CAUTION / NOTICE / HINT
- HINT:
-
Perform "Inspection After Repairs after replacing the camshaft No. 2 camshaft, camshaft timing gear assembly or camshaft timing exhaust gear assembly.
- ·
for K111, K111F:
Click hereEngine / Hybrid System>3ZR-FE ENGINE CONTROL>SFI SYSTEM(for K111, K111F)>INITIALIZATION
·except K111, K111F:
Click hereEngine / Hybrid System>3ZR-FE ENGINE CONTROL>SFI SYSTEM(except K111, K111F)>INITIALIZATION
PROCEDURE

 13750
1.INSTALL VALVE LASH ADJUSTER ASSEMBLY
13801
2.INSTALL NO. 1 VALVE ROCKER ARM SUB-ASSEMBLY
11811
3.INSTALL NO. 1 CAMSHAFT BEARING
Clean the surfaces of bearings.
Install the 2 No. 1 camshaft bearings.
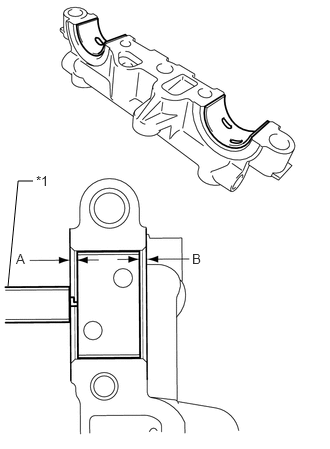
| *1 | Vernier Caliper |
Using a vernier caliper, measure the distance between the camshaft bearing cap edge and camshaft bearing edge.
- Dimension (A - B) or (B - A):
0 to 0.7 mm (0 to 0.0276 in.)
- NOTICE:
-
Position the bearings in the center of the camshaft bearing cap by measuring dimensions A and B.
11821
4.INSTALL NO. 2 CAMSHAFT BEARING
Clean both surfaces of the bearings.
Install the 2 No. 2 camshaft bearings.
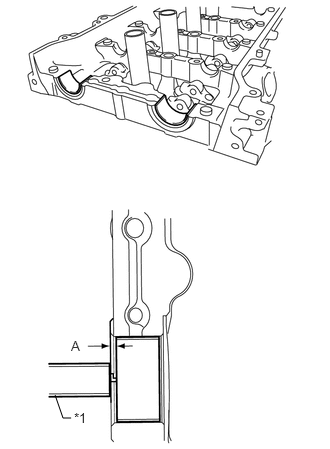
| *1 | Vernier Caliper |
Using a vernier caliper, measure the distance between the bearing cap edge and camshaft bearing edge.
- Dimension (A):
1.05 to 1.75 mm (0.0413 to 0.0689 in.)
- NOTICE:
-
Position the bearings in the center of the camshaft bearing cap by measuring dimension A.
13512
5.INSTALL NO. 2 CAMSHAFT
- HINT:
-
Perform "Inspection After Repairs" after replacing the No. 2 camshaft.
- ·
for K111, K111F:
Click hereEngine / Hybrid System>3ZR-FE ENGINE CONTROL>SFI SYSTEM(for K111, K111F)>INITIALIZATION
·except K111, K111F:
Click hereEngine / Hybrid System>3ZR-FE ENGINE CONTROL>SFI SYSTEM(except K111, K111F)>INITIALIZATION
Clean the camshaft journals.
Apply a light coat of engine oil to the camshaft journals and camshaft housing sub-assembly.
Install the No. 2 camshaft to the camshaft housing sub-assembly.
13511
6.INSTALL CAMSHAFT
- HINT:
-
Perform "Inspection After Repairs" after replacing the camshaft.
- ·
for K111, K111F:
Click hereEngine / Hybrid System>3ZR-FE ENGINE CONTROL>SFI SYSTEM(for K111, K111F)>INITIALIZATION
·except K111, K111F:
Click hereEngine / Hybrid System>3ZR-FE ENGINE CONTROL>SFI SYSTEM(except K111, K111F)>INITIALIZATION
Clean the camshaft journals.
Apply a light coat of engine oil to the camshaft journals and camshaft housing sub-assembly.
Install the camshaft to the camshaft housing sub-assembly.
7.INSTALL CAMSHAFT BEARING CAP
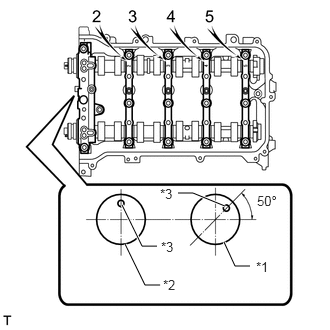
| *1 | Camshaft |
| *2 | No. 2 Camshaft |
| *3 | Straight Pin |
Apply a light coat of engine oil to the camshaft bearing caps.
Check the marks and numbers on the camshaft bearing caps and place the camshaft bearing caps in the proper position and direction.
- HINT:
-
Make sure that the knock pin of the camshaft is positioned as shown in the illustration.
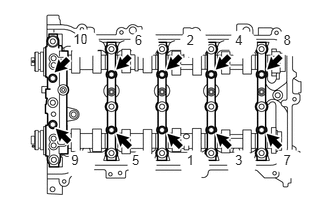
Install the 10 bolts in the order shown in the illustration.
- Torque:
- 16 N*m (163 kgf*cm, 12 ft.*lbf)
11103
8.INSTALL CAMSHAFT HOUSING SUB-ASSEMBLY
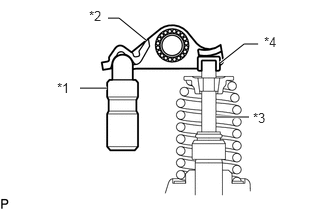
| *1 | Lash Adjuster |
| *2 | Valve Rocker Arm |
| *3 | Valve Stem |
| *4 | Valve Stem Cap |
Make sure that the valve rocker arm is installed as shown in the illustration.
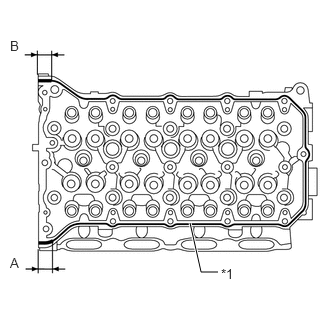
| *1 | Continuous Line |
Apply seal packing in a continuous line as shown in the illustration.
- Seal packing:
Toyota Genuine Seal Packing Black, Three Bond 1207B or equivalent
- Standard Seal Packing Diameter:
Area Specified Condition Continuous Line 3.5 to 4.5 mm (0.138 to 0.177 in.) A 8.0 mm (0.315 in.) B 7.0 mm (0.276 in.)
- Application Length A and B:
15 mm (0.591 in.)
- NOTICE:
- ·
Remove any oil from the contact surfaces.
·Install the camshaft housing sub-assembly within 3 minutes and tighten the bolts within 10 minutes after applying seal packing.
·Do not start the engine for at least 2 hours after installation.
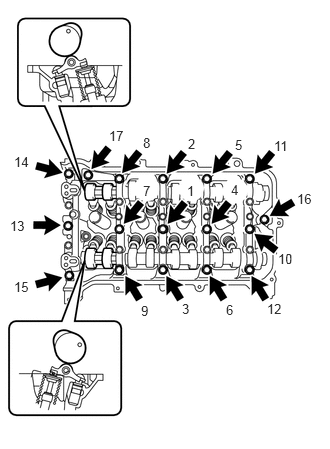
Set the camshaft and No. 2 camshaft as shown in the illustration.
Install the camshaft housing sub-assembly with the 17 bolts and tighten them in the order shown in the illustration.
- Torque:
- 27 N*m (275 kgf*cm, 20 ft.*lbf)
- NOTICE:
- ·
After installing the camshaft housing sub-assembly, make sure that the cam lobes are positioned as shown in the illustration.
·If any of the bolts are loosened during installation, remove the camshaft housing sub-assembly, clean the installation surfaces, and reapply seal packing.
·If the camshaft housing sub-assembly is removed because any of the bolts are loosened during installation, make sure that the previously applied seal packing does not enter any oil passages.
·After installing the camshaft housing sub-assembly, wipe off any seal packing that seeped out from between the camshaft housing sub-assembly and cylinder head.
13050
9.INSTALL CAMSHAFT TIMING GEAR ASSEMBLY
- HINT:
-
Perform "Inspection After Repairs" after replacing the camshaft timing gear assembly.
- ·
for K111, K111F:
Click hereEngine / Hybrid System>3ZR-FE ENGINE CONTROL>SFI SYSTEM(for K111, K111F)>INITIALIZATION
·except K111, K111F:
Click hereEngine / Hybrid System>3ZR-FE ENGINE CONTROL>SFI SYSTEM(except K111, K111F)>INITIALIZATION
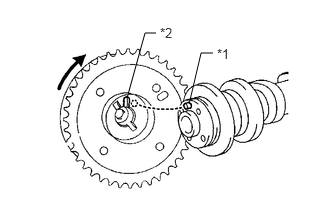
| *1 | Straight Pin |
| *2 | Key Groove |
Put the camshaft timing gear assembly and camshaft together with the straight pin and key groove misaligned as shown in the illustration.
- NOTICE:
-
Do not forcefully push in the camshaft timing gear assembly. This may cause the camshaft straight pin tip to damage the installation surface of the camshaft timing gear assembly.
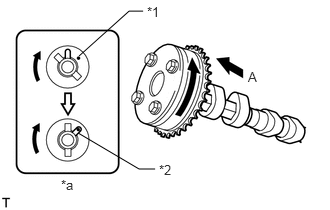
| *1 | Straight Pin |
| *2 | Key Groove |
| *a | View A |
Turn the camshaft timing gear assembly as shown in the illustration while pushing it gently against the camshaft. Push further at the position where the pin fits into the groove.
- NOTICE:
-
Do not turn the camshaft timing gear assembly in the retard direction (clockwise).
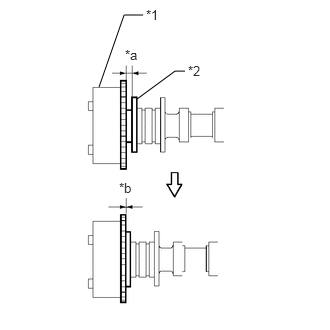
| *1 | Camshaft Timing Gear Assembly |
| *2 | Camshaft Flange |
| *a | Clearance |
| *b | No Clearance |
Check that there is no clearance between the camshaft timing gear assembly and camshaft flange.
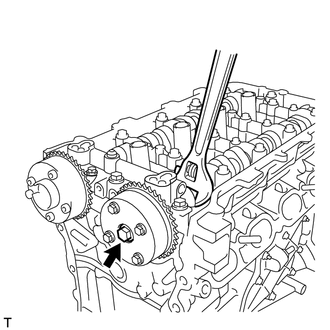
Tighten the flange bolt while holding the hexagonal portion of the camshaft.
- Torque:
- 54 N*m (551 kgf*cm, 40 ft.*lbf)
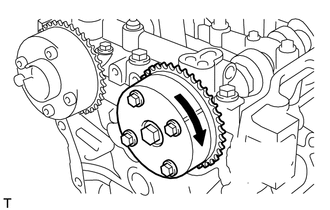

|
Locks when turned all the way in this direction |
Check that the camshaft timing gear assembly can move in the retard direction (clockwise) and is locked in the most retarded position.
13070A
10.INSTALL CAMSHAFT TIMING EXHAUST GEAR ASSEMBLY
- HINT:
-
Perform " Inspection After Repairs" after replacing the camshaft timing exhaust gear assembly.
- ·
for K111, K111F:
Click hereEngine / Hybrid System>3ZR-FE ENGINE CONTROL>SFI SYSTEM(for K111, K111F)>INITIALIZATION
·except K111, K111F:
Click hereEngine / Hybrid System>3ZR-FE ENGINE CONTROL>SFI SYSTEM(except K111, K111F)>INITIALIZATION
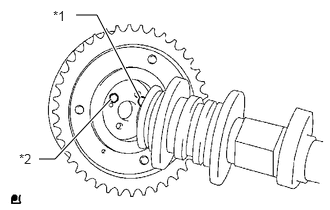
| *1 | Straight Pin |
| *2 | Pin Hole |
Put the camshaft timing exhaust gear assembly and No. 2 camshaft together by aligning the pin hole and straight pin.
- NOTICE:
-
Do not forcefully push in the camshaft timing exhaust gear assembly. This may cause the camshaft straight pin tip to damage the installation surface of the camshaft timing exhaust gear assembly.
Lightly press the camshaft timing exhaust gear assembly against the No. 2 camshaft and turn the camshaft timing exhaust gear assembly. Push further at the position where the straight pin enters the pin hole.
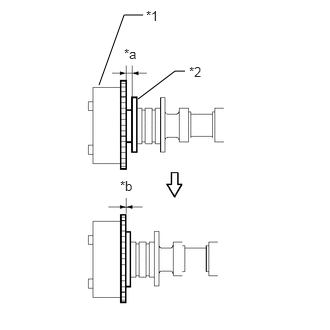
| *1 | Camshaft Timing Exhaust Gear Assembly |
| *2 | Camshaft Flange |
| *a | Clearance |
| *b | No Clearance |
Check that there is no clearance between the camshaft timing exhaust gear assembly and camshaft flange.
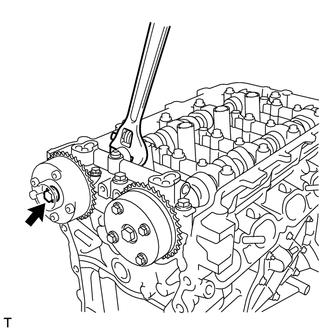
Tighten the flange bolt while holding the hexagonal portion of the No. 2 camshaft.
- Torque:
- 54 N*m (551 kgf*cm, 40 ft.*lbf)
Check the camshaft timing exhaust gear assembly lock.
Make sure that the camshaft timing exhaust gear assembly is locked.
13506
11.INSTALL CHAIN SUB-ASSEMBLY