DOOR LOCK POWER DOOR LOCK CONTROL SYSTEM Only Back Door cannot be Opened
DESCRIPTION
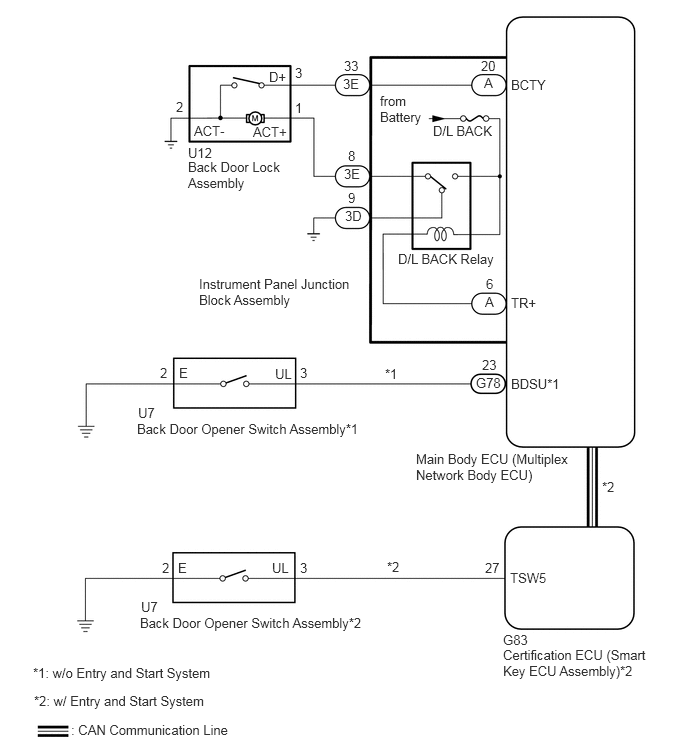
The main body ECU (multiplex network body ECU) receives signals from the back door opener switch assembly. Then, the main body ECU (multiplex network body ECU) activates the back door lock motor.
WIRING DIAGRAM
CAUTION / NOTICE / HINT
- NOTICE:
- ·
The power door lock control system uses the CAN communication system. Inspect the communication function by following How to Proceed with Troubleshooting. Troubleshoot the power door lock control system after confirming that the communication systems are functioning properly.
Click hereVehicle Interior>DOOR LOCK>POWER DOOR LOCK CONTROL SYSTEM>HOW TO PROCEED WITH TROUBLESHOOTING
·Before performing this troubleshooting, perform troubleshooting for "Back Door Entry Unlock Function does not Operate" for the Entry and start system (for Entry Function) first.*
*: w/ Entry and Start System
·Inspect the fuses for circuits related to this system before performing the following inspection procedure.
·When replacing the main body ECU (multiplex network body ECU), make sure to replace it with a new one.
·As the door control battery is installed between the vehicle battery and main body ECU (multiplex network body ECU), first perform the inspections in On-Vehicle Inspection to confirm that there are no malfunctions in the power source circuit for the main body ECU (multiplex network body ECU) before performing this troubleshooting procedure.*
*: w/ Door Control Battery
Click hereVehicle Interior>DOOR LOCK>POWER DOOR LOCK CONTROL SYSTEM>ON-VEHICLE INSPECTION
PROCEDURE
Check the vehicle specification.
- Result:
Proceed to w/o Entry and Start System w/ Entry and Start System
w/o Entry and Start System
w/ Entry and Start System
Check the power door lock basic functions.
Click hereVehicle Interior>DOOR LOCK>POWER DOOR LOCK CONTROL SYSTEM>OPERATION CHECK
- OK:
The power door lock basic functions operate properly.
- Result:
Proceed to OK NG
OK
NG
Connect the GTS to the DLC3.
Turn the ignition switch to ON.
Turn the GTS on.
Enter the following menus: Body Electrical / Main Body / Data List / All Data.
Read the Data List according to the display on the GTS.
- Body Electrical > Main Body > Data List
-
Tester Display Measurement Item Range Normal Condition Diagnostic Note Back Door Open Back door lock signal Permit or Prohibit Permit: Back door unlocked
Prohibit: Back door locked-
- Body Electrical > Main Body > Data List
-
Tester Display Back Door Open - 50003 123 27
- OK:
The GTS indicates Permit or Prohibit according to the door lock operation shown in the table.
- Result:
Proceed to OK NG
OK
NG
for LHD: Click herePower Source / Network>POWER DISTRIBUTION>MAIN BODY ECU(for LHD)>REMOVAL
for RHD: Click herePower Source / Network>POWER DISTRIBUTION>MAIN BODY ECU(for RHD)>REMOVAL
Connect the GTS to the DLC3.
Turn the ignition switch to ON.
Turn the GTS on.
Enter the following menus: Body Electrical / Main Body / Active Test.
Perform the Active Test according to the display on the GTS.
- Body Electrical > Main Body > Active Test
-
Tester Display Measurement Item Control Range Diagnostic Note Trunk and Back-Door Open Back door lock motor OFF/ON -
- Body Electrical > Main Body > Active Test
-
Tester Display Trunk and Back-Door Open - 50004 123 3
- OK:
The back door lock assembly unlatches when ON is selected.
- Result:
Proceed to OK NG
OK
NG
Connect the GTS to the DLC3.
Turn the ignition switch to ON.
Turn the GTS on.
Enter the following menus: Body Electrical / Main Body / Data List / All Data.
Read the Data List according to the display on the GTS.
- Body Electrical > Main Body > Data List
-
Tester Display Measurement Item Range Normal Condition Diagnostic Note Back Door Open Handle SW Back door opener switch signal ON or OFF ON: Back door opener switch pushed
OFF: Back door opener switch not pushed-
- Body Electrical > Main Body > Data List
-
Tester Display Back Door Open Handle SW - 50003 123 29
- OK:
The GTS indicates ON or OFF according to the switch operation shown in the table.
- Result:
Proceed to OK NG
OK
for LHD: Click herePower Source / Network>POWER DISTRIBUTION>MAIN BODY ECU(for LHD)>REMOVAL
for RHD: Click herePower Source / Network>POWER DISTRIBUTION>MAIN BODY ECU(for RHD)>REMOVAL
NG
Remove the back door opener switch assembly.
Click hereVehicle Exterior>DOOR / HATCH>BACK DOOR OPENER SWITCH>REMOVAL
Inspect the back door opener switch assembly.
Click hereVehicle Exterior>DOOR / HATCH>BACK DOOR OPENER SWITCH>INSPECTION
- Result:
Proceed to OK NG
OK
NG
Disconnect the G78 main body ECU (multiplex network body ECU) connector.
Measure the resistance according to the value(s) in the table below.
- Standard Resistance:
Tester Connection Condition Specified Condition U7-3 (UL) - G78-23 (BDSU) Always Below 1 Ω U7-2 (E) - Body ground U7-3 (UL) or G78-23 (BDSU) - Body ground Always 10 kΩ or higher
- Result:
Proceed to OK NG
OK
for LHD: Click herePower Source / Network>POWER DISTRIBUTION>MAIN BODY ECU(for LHD)>REMOVAL
for RHD: Click herePower Source / Network>POWER DISTRIBUTION>MAIN BODY ECU(for RHD)>REMOVAL
NG
Remove the back door lock assembly.
Inspect the back door lock assembly.
Click hereVehicle Interior>DOOR LOCK>BACK DOOR LOCK>INSPECTION
- Result:
Proceed to OK NG
OK
NG
Disconnect the 3E instrument panel junction block assembly connector.
Measure the resistance according to the value(s) in the table below.
- Standard Resistance:
Tester Connection Condition Specified Condition U12-1 (ACT+) - 3E-8 (TR+) Always Below 1 Ω U12-3 (D+) - 3E-33 (BCTY) U12-2 (ACT-) - Body ground U12-1 (ACT+) or 3E-8 (TR+) - Body ground Always 10 kΩ or higher U12-3 (D+) or 3E-33 (BCTY) - Body ground
- Result:
Proceed to OK NG
OK
NG
Remove the instrument panel junction block assembly.
for LHD: Click herePower Source / Network>POWER DISTRIBUTION>MAIN BODY ECU(for LHD)>REMOVAL
for RHD: Click herePower Source / Network>POWER DISTRIBUTION>MAIN BODY ECU(for RHD)>REMOVAL
Remove the main body ECU (multiplex network body ECU) from the instrument panel junction block assembly.
Measure the resistance according to the value(s) in the table below.
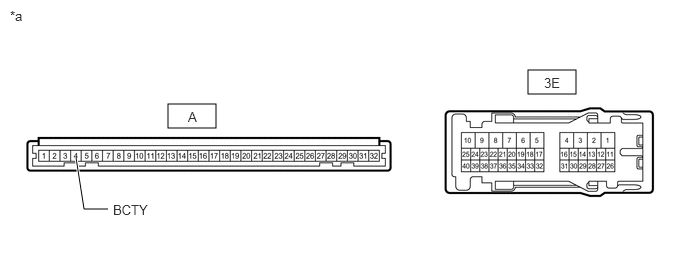
| *a | Component without harness connected
(Instrument Panel Junction Block Assembly) |
- | - |
- Standard Resistance:
Tester Connection Condition Specified Condition A-20 (BCTY) - 3E-33 Always Below 1 Ω
- Result:
Proceed to OK NG
OK
NG
for LHD: Click herePower Source / Network>POWER DISTRIBUTION>MAIN BODY ECU(for LHD)>REMOVAL
for RHD: Click herePower Source / Network>POWER DISTRIBUTION>MAIN BODY ECU(for RHD)>REMOVAL
Disconnect the instrument panel junction block assembly connector.
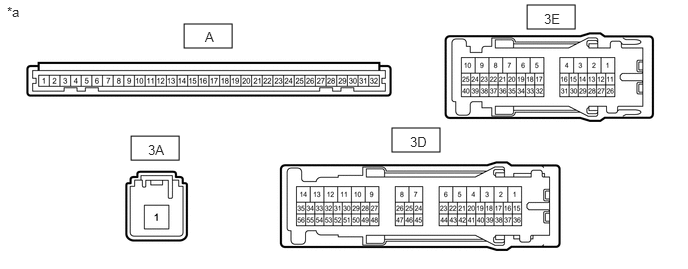
| *a | Front view of wire harness connector
(to Instrument Panel Junction Block Assembly) |
- | - |
Measure the resistance according to the value(s) in the table below.
- Standard Resistance:
Tester Connection Condition Specified Condition 3D-9 - 3E-8 Battery voltage applied to terminals 3A-1 and A-6 10 kΩ or higher 3D-9 - 3E-8 Battery voltage not applied to terminals 3A-1 and A-6 Below 1 Ω
Measure the voltage according to the value(s) in the table below.
- Standard Voltage:
Tester Connection Condition Specified Condition 3E-8 - Battery negative (-) terminal Battery voltage applied to terminals 4F-1 and A-6 11 to 14 V
- Result:
Proceed to OK NG
OK
for LHD: Click herePower Source / Network>POWER DISTRIBUTION>MAIN BODY ECU(for LHD)>REMOVAL
for RHD: Click herePower Source / Network>POWER DISTRIBUTION>MAIN BODY ECU(for RHD)>REMOVAL
NG
for LHD: Click herePower Source / Network>POWER DISTRIBUTION>MAIN BODY ECU(for LHD)>REMOVAL
for RHD: Click herePower Source / Network>POWER DISTRIBUTION>MAIN BODY ECU(for RHD)>REMOVAL