NAVIGATION / MULTI INFO DISPLAY NAVIGATION SYSTEM(for Radio and Display Type) B15C3 Speaker Output Short
DESCRIPTION
This DTC is stored when a malfunction occurs in the speakers.
| DTC No. | Detection Item | DTC Detection Condition | Trouble Area |
|---|---|---|---|
| B15C3 | Speaker Output Short | A short is detected in the speaker output circuit. | ·
Speakers ·
Harness or connector ·
Radio and display receiver assembly ·
Telematics transceiver* |
*: w/ Telematics Transceiver
WIRING DIAGRAM
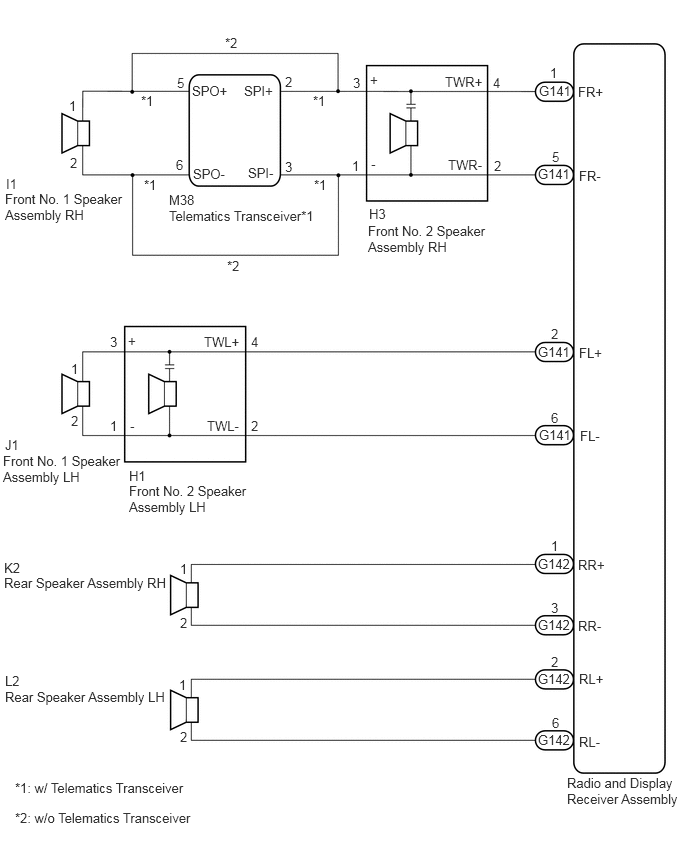
CAUTION / NOTICE / HINT
- NOTICE:
- ·
Check that the wire harness is properly installed and does not have any sharp bends, pinching or loose connections.
Click hereGeneral>INTRODUCTION>HOW TO TROUBLESHOOT ECU CONTROLLED SYSTEMS>HOW TO PROCEED WITH TROUBLESHOOTING
·When replacing telematics transceiver, perform the vehicle contract setting.
PROCEDURE
Clear the DTCs.
- Body Electrical > Navigation System > Clear DTCs
- 50002 212
Check for DTCs.
- Body Electrical > Navigation System > Trouble Codes
- 50001 212
- OK:
No DTCs are output.
- Result:
Proceed to OK NG
OK
Click hereGeneral>INTRODUCTION>HOW TO TROUBLESHOOT ECU CONTROLLED SYSTEMS>HOW TO PROCEED WITH TROUBLESHOOTING
NG
Check the vehicle condition.
- Result:
Result Proceed to w/ Telematics Transceiver A w/o Telematics Transceiver B
A
B
*1: for LH Side
*2: for RH Side
Disconnect the G141 and G142 radio and display receiver assembly connectors.
Disconnect the J1*1 and/or I1*2 front No. 1 speaker assembly connector.
Disconnect the H1*1 and/or H3*2 front No. 2 speaker assembly connector.
Disconnect the L2*1 and/or K2*2 rear speaker assembly connector.
Disconnect the M38 telematics transceiver connector.
Measure the resistance according to the value(s) in the table below.
- Standard Resistance:
for LH Side Tester Connection Condition Specified Condition G141-2 (FL+) - H1-4 (TWL+) Always Below 1 Ω G141-6 (FL-) - H1-2 (TWL-) Always Below 1 Ω H1-3 (+) - J1-1 Always Below 1 Ω H1-1 (-) - J1-2 Always Below 1 Ω G142-2 (RL+) - L2-1 Always Below 1 Ω G142-6 (RL-) - L2-2 Always Below 1 Ω G141-2 (FL+) - Body ground Always 10 kΩ or higher G141-6 (FL-) - Body ground Always 10 kΩ or higher G142-2 (RL+) - Body ground Always 10 kΩ or higher G142-6 (RL-) - Body ground Always 10 kΩ or higher H1-3 (+) - Body ground Always 10 kΩ or higher H1-1 (-) - Body ground Always 10 kΩ or higher
for RH Side Tester Connection Condition Specified Condition G141-1 (FR+) - H3-4 (TWR+) Always Below 1 Ω G141-5 (FR-) - H3-2 (TWR-) Always Below 1 Ω H3-3 (+) - M38-2 (SPI+) Always Below 1 Ω H3-1 (-) - M38-3 (SPI-) Always Below 1 Ω M38-5 (SPO+) - I1-1 Always Below 1 Ω M38-6 (SPO-) - I1-2 Always Below 1 Ω G142-1 (RR+) - K2-1 Always Below 1 Ω G142-3 (RR-) - K2-2 Always Below 1 Ω G141-1 (FR+) - Body ground Always 10 kΩ or higher G141-5 (FR-) - Body ground Always 10 kΩ or higher M38-5 (SPO+) - Body ground Always 10 kΩ or higher M38-6 (SPO-) - Body ground Always 10 kΩ or higher G142-1 (RR+) - Body ground Always 10 kΩ or higher G142-3 (RR-) - Body ground Always 10 kΩ or higher H3-3 (+) - Body ground Always 10 kΩ or higher H3-1 (-) - Body ground Always 10 kΩ or higher
- Result:
Proceed to OK NG
OK
NG
Remove the telematics transceiver.
Click hereAudio / Visual / Telematics>TELEMATICS>TELEMATICS TRANSCEIVER>REMOVAL
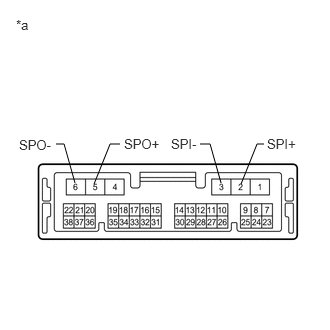
| *a | Component without harness connected
(Telematics Transceiver) |
Measure the resistance according to the value(s) in the table below.
- Standard Resistance:
Tester Connection Condition Specified Condition 2 (SPI+) - 5 (SPO+) Always Below 1 Ω 3 (SPI-) - 6 (SPO-) Always Below 1 Ω 2 (SPI+) - 3 (SPI-) Always 10 kΩ or higher 5 (SPO+) - 6 (SPO-) Always 10 kΩ or higher 2 (SPI+) or 5 (SPO+) - Body ground Always 10 kΩ or higher 3 (SPI-) or 6 (SPO-) - Body ground Always 10 kΩ or higher
- Result:
Proceed to OK NG
OK
NG
*1: for LH Side
*2: for RH Side
Disconnect the G141 and G142 radio and display receiver assembly connectors.
Disconnect the J1*1 and/or I1*2 front No. 1 speaker assembly connector.
Disconnect the H1*1 and/or H3*2 front No. 2 speaker assembly connector.
Disconnect the L2*1 and/or K2*2 rear speaker assembly connector.
Measure the resistance according to the value(s) in the table below.
- Standard Resistance:
for LH Side Tester Connection Condition Specified Condition G141-2 (FL+) - H1-4 (TWL+) Always Below 1 Ω G141-6 (FL-) - H1-2 (TWL-) Always Below 1 Ω H1-3 (+) - J1-1 Always Below 1 Ω H1-1 (-) - J1-2 Always Below 1 Ω G142-2 (RL+) - L2-1 Always Below 1 Ω G142-6 (RL-) - L2-2 Always Below 1 Ω G141-2 (FL+) - Body ground Always 10 kΩ or higher G141-6 (FL-) - Body ground Always 10 kΩ or higher G142-2 (RL+) - Body ground Always 10 kΩ or higher G142-6 (RL-) - Body ground Always 10 kΩ or higher H1-3 (+) - Body ground Always 10 kΩ or higher H1-1 (-) - Body ground Always 10 kΩ or higher
for RH Side Tester Connection Condition Specified Condition G141-1 (FR+) - H3-4 (TWR+) Always Below 1 Ω G141-5 (FR-) - H3-2 (TWR-) Always Below 1 Ω H3-3 (+) - I1-1 Always Below 1 Ω H3-1 (-) - I1-2 Always Below 1 Ω G142-1 (RR+) - K2-1 Always Below 1 Ω G142-3 (RR-) - K2-2 Always Below 1 Ω G141-1 (FR+) - Body ground Always 10 kΩ or higher G141-5 (FR-) - Body ground Always 10 kΩ or higher G142-1 (RR+) - Body ground Always 10 kΩ or higher G142-3 (RR-) - Body ground Always 10 kΩ or higher H3-3 (+) - Body ground Always 10 kΩ or higher H3-1 (-) - Body ground Always 10 kΩ or higher
- Result:
Proceed to OK NG
OK
NG
Remove the front No. 1 speaker assembly connector.
Click hereAudio / Visual / Telematics>AUDIO / VIDEO>FRONT DOOR SPEAKER>REMOVAL
Inspect the front No. 1 speaker assembly.
Click hereAudio / Visual / Telematics>AUDIO / VIDEO>FRONT DOOR SPEAKER>INSPECTION
- Result:
Proceed to OK NG
OK
NG
Replace the front No. 2 speaker assembly with a known good one.
Click hereAudio / Visual / Telematics>AUDIO / VIDEO>INSTRUMENT PANEL SPEAKER>REMOVAL
Clear the DTCs.
- Body Electrical > Navigation System > Clear DTCs
- 50002 212
Check for DTCs and check if the same DTCs is output.
- Body Electrical > Navigation System > Trouble Codes
- 50001 212
- NOTICE:
- ·
Connect all the connectors that were disconnected to the front No. 2 speaker assemblies.
·Perform the above inspection on both LH and RH sides.
- OK:
No DTCs are output.
- Result:
Proceed to OK NG
OK
NG
Remove the rear speaker assembly connector.
Click hereAudio / Visual / Telematics>AUDIO / VIDEO>REAR DOOR SPEAKER>REMOVAL
Inspect the rear speaker assembly.
Click hereAudio / Visual / Telematics>AUDIO / VIDEO>REAR DOOR SPEAKER>INSPECTION
- Result:
Proceed to OK NG
OK
NG