Home › Audio / Visual / Telematics › NAVIGATION / MULTI INFO DISPLAY › NAVIGATION SYSTEM › 2018.10–2019.09
RM3620E _56 Audio / Visual / Telematics _076048 NAVIGATION / MULTI INFO DISPLAY _0370120 NAVIGATION SYSTEM J

NAVIGATION / MULTI INFO DISPLAY  NAVIGATION SYSTEM  Microphone Circuit  


DESCRIPTION

·

The radio and display receiver assembly, telephone microphone assembly are connected to each other using the microphone connection detection signal lines.

·

Using this circuit, the DCM (telematics transceiver) sends power to telephone microphone assembly, and the telephone microphone assembly sends microphone signals to the radio and display receiver assembly and navigation ECU via the DCM (telematics transceiver).*

*: w/ Telematics Transceiver and for 6 Speakers


WIRING DIAGRAM
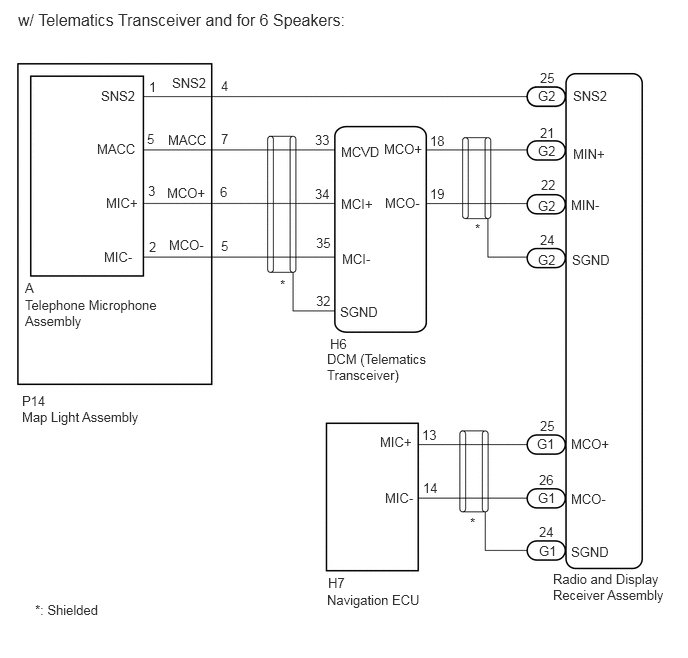
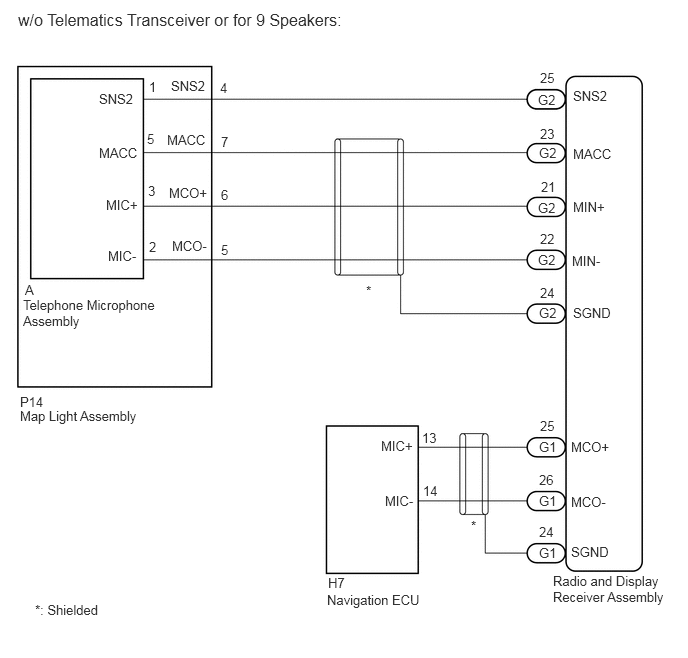
E402617E04
5.76,5.948 6.948,6.448 1.188,0.5 10 false Radio and Display Receiver Assembly 3.417,5.99 4.021,6.24 0.604,0.25 10 false H7 0.26,3.094 1.646,3.5 1.385,0.406 10 false Telephone Microphone Assembly 0.229,4.26 1.646,4.781 1.417,0.521 10 false Map Light Assembly 0.229,4.094 0.833,4.344 0.604,0.25 10 false P14 1.552,0.823 2.156,1.073 0.604,0.25 10 false 1 1.531,1.365 2.135,1.615 0.604,0.25 10 false 5 1.542,1.906 2.146,2.156 0.604,0.25 10 false 3 1.552,2.49 2.156,2.74 0.604,0.25 10 false 2 3.438,3.5 4.042,3.75 0.604,0.25 10 false H6 3.406,3.656 4.469,4.052 1.063,0.396 10 false DCM (Telematics Transceiver) 3.542,3.167 4.146,3.417 0.604,0.25 10 false SGND 3.552,2.042 4.156,2.292 0.604,0.25 10 false MCI+ 3.552,1.5 4.156,1.75 0.604,0.25 10 false MCVD 4,1.469 4.604,1.719 0.604,0.25 10 false MCO+ 5.969,1.521 6.573,1.771 0.604,0.25 10 false MIN+ 5.604,0.917 6.208,1.167 0.604,0.25 10 false G2 5.625,0.729 6.229,0.979 0.604,0.25 10 false 25 5.625,1.302 6.229,1.552 0.604,0.25 10 false 21 5.635,1.844 6.24,2.094 0.604,0.25 10 false 22 5.625,2.417 6.229,2.667 0.604,0.25 10 false 24 5.615,4.917 6.219,5.167 0.604,0.25 10 false 26 5.948,4.542 6.552,4.792 0.604,0.25 10 false MCO+ 5.969,0.917 6.573,1.167 0.604,0.25 10 false SNS2 1.75,1.375 2.354,1.625 0.604,0.25 10 false MACC 1.792,0.781 2.396,1.031 0.604,0.25 10 false SNS2 3.563,2.615 4.167,2.865 0.604,0.25 10 false MCI- 1.74,1.927 2.344,2.177 0.604,0.25 10 false MCO+ 1.76,2.469 2.365,2.719 0.604,0.25 10 false MCO- 5.958,2.625 6.563,2.875 0.604,0.25 10 false SGND 4.479,1.385 5.083,1.635 0.604,0.25 10 false 18 4.479,1.938 5.083,2.188 0.604,0.25 10 false 19 5.615,5.458 6.219,5.708 0.604,0.25 10 false 24 5.625,4.354 6.229,4.604 0.604,0.25 10 false 25 5.948,2.052 6.552,2.302 0.604,0.25 10 false MIN- 4.01,2.031 4.615,2.281 0.604,0.25 10 false MCO- 5.594,4.542 6.198,4.792 0.604,0.25 10 false G1 3.406,6.167 4.521,6.427 1.115,0.26 10 false Navigation ECU 5.948,5.115 6.552,5.365 0.604,0.25 10 false MCO- 5.948,5.667 6.552,5.917 0.604,0.25 10 false SGND 3.958,4.521 4.563,4.771 0.604,0.25 10 false MIC+ 4.01,5.104 4.615,5.354 0.604,0.25 10 false MIC- 3.292,3.052 3.896,3.302 0.604,0.25 10 false 32 3.292,2.448 3.896,2.698 0.604,0.25 10 false 35 3.281,1.938 3.885,2.188 0.604,0.25 10 false 34 3.281,1.375 3.885,1.625 0.604,0.25 10 false 33 4.396,4.448 5,4.698 0.604,0.25 10 false 13 4.406,5 5.01,5.25 0.604,0.25 10 false 14 0.365,6.271 1.458,6.531 1.094,0.26 10 false *: Shielded 2.917,2.885 3.208,3.125 0.292,0.24 10 false * 4.948,2.302 5.24,2.542 0.292,0.24 10 false * 4.896,5.365 5.188,5.604 0.292,0.24 10 false * 0.188,0.104 5.927,0.667 5.74,0.563 12 false w/ Telematics Transceiver and for 6 Speakers: 2.302,1.365 2.906,1.615 0.604,0.25 10 false 7 2.302,0.813 2.906,1.063 0.604,0.25 10 false 4 2.302,2.479 2.906,2.729 0.604,0.25 10 false 5 2.292,1.917 2.896,2.167 0.604,0.25 10 false 6 1.052,0.917 1.656,1.167 0.604,0.25 10 false SNS2 1.01,1.469 1.615,1.719 0.604,0.25 10 false MACC 1.104,2.031 1.708,2.281 0.604,0.25 10 false MIC+ 1.083,2.594 1.688,2.844 0.604,0.25 10 false MIC- 0.26,2.917 0.865,3.167 0.604,0.25 10 false A 5.604,1.49 6.208,1.74 0.604,0.25 10 false G2 5.604,2.063 6.208,2.313 0.604,0.25 10 false G2 5.604,2.625 6.208,2.875 0.604,0.25 10 false G2 5.604,5.104 6.208,5.354 0.604,0.25 10 false G1 5.615,5.656 6.219,5.906 0.604,0.25 10 false G1

E402618E06
5.76,5.969 6.948,6.469 1.188,0.5 10 false Radio and Display Receiver Assembly 3.417,5.99 4.021,6.24 0.604,0.25 10 false H7 0.24,3.094 1.625,3.5 1.385,0.406 10 false Telephone Microphone Assembly 0.208,4.25 1.625,4.771 1.417,0.521 10 false Map Light Assembly 0.208,4.104 0.813,4.354 0.604,0.25 10 false P14 1.552,0.823 2.156,1.073 0.604,0.25 10 false 1 1.531,1.365 2.135,1.615 0.604,0.25 10 false 5 1.542,1.906 2.146,2.156 0.604,0.25 10 false 3 1.552,2.49 2.156,2.74 0.604,0.25 10 false 2 5.969,2.073 6.573,2.323 0.604,0.25 10 false MIN+ 5.604,0.958 6.208,1.208 0.604,0.25 10 false G2 5.625,0.729 6.229,0.979 0.604,0.25 10 false 25 5.635,1.865 6.24,2.115 0.604,0.25 10 false 21 5.625,2.406 6.229,2.656 0.604,0.25 10 false 22 5.625,2.969 6.229,3.219 0.604,0.25 10 false 24 5.615,4.917 6.219,5.167 0.604,0.25 10 false 26 5.948,4.573 6.552,4.823 0.604,0.25 10 false MCO+ 5.969,0.917 6.573,1.167 0.604,0.25 10 false SNS2 1.74,1.375 2.344,1.625 0.604,0.25 10 false MACC 1.781,0.813 2.385,1.063 0.604,0.25 10 false SNS2 1.76,1.927 2.365,2.177 0.604,0.25 10 false MCO+ 1.792,2.479 2.396,2.729 0.604,0.25 10 false MCO- 5.969,3.177 6.573,3.427 0.604,0.25 10 false SGND 5.615,5.458 6.219,5.708 0.604,0.25 10 false 24 5.625,4.354 6.229,4.604 0.604,0.25 10 false 25 5.958,2.635 6.563,2.885 0.604,0.25 10 false MIN- 5.615,4.573 6.219,4.823 0.604,0.25 10 false G1 3.406,6.167 4.521,6.427 1.115,0.26 10 false Navigation ECU 5.948,5.146 6.552,5.396 0.604,0.25 10 false MCO- 5.948,5.667 6.552,5.917 0.604,0.25 10 false SGND 3.969,4.563 4.573,4.813 0.604,0.25 10 false MIC+ 4.01,5.135 4.615,5.385 0.604,0.25 10 false MIC- 4.396,4.479 5,4.729 0.604,0.25 10 false 13 4.406,5.031 5.01,5.281 0.604,0.25 10 false 14 0.365,6.271 1.458,6.531 1.094,0.26 10 false *: Shielded 3.813,2.948 4.104,3.188 0.292,0.24 10 false * 4.906,5.396 5.198,5.635 0.292,0.24 10 false * 0.188,0.104 6.958,0.74 6.771,0.635 12 false w/o Telematics Transceiver or for 9 Speakers: 5.969,1.521 6.573,1.771 0.604,0.25 10 false MACC 2.302,2.521 2.906,2.771 0.604,0.25 10 false 5 2.292,0.833 2.896,1.083 0.604,0.25 10 false 4 2.302,1.948 2.906,2.198 0.604,0.25 10 false 6 2.302,1.396 2.906,1.646 0.604,0.25 10 false 7 1.031,0.948 1.635,1.198 0.604,0.25 10 false SNS2 1.031,1.51 1.635,1.76 0.604,0.25 10 false MACC 1.104,2.052 1.708,2.302 0.604,0.25 10 false MIC+ 1.125,2.583 1.729,2.833 0.604,0.25 10 false MIC- 5.625,1.313 6.229,1.563 0.604,0.25 10 false 23 0.26,2.938 0.865,3.188 0.604,0.25 10 false A 5.615,1.51 6.219,1.76 0.604,0.25 10 false G2 5.604,2.083 6.208,2.333 0.604,0.25 10 false G2 5.604,2.625 6.208,2.875 0.604,0.25 10 false G2 5.615,3.177 6.219,3.427 0.604,0.25 10 false G2 5.615,5.135 6.219,5.385 0.604,0.25 10 false G1 5.615,5.677 6.219,5.927 0.604,0.25 10 false G1

CAUTION / NOTICE / HINT

NOTICE:
·

When replacing the radio and display receiver assembly, always replace it with a new one. If a radio and display receiver assembly which was installed to another vehicle is used, the following may occur:

-

A communication malfunction DTC may be stored.

-

The radio and display receiver assembly may not operate normally.


·

When replacing the DCM (telematics transceiver), make sure to replace it with a new one.


HINT:

Depending on the parts that are replaced during vehicle inspection or maintenance, performing initialization, registration or calibration may be needed. Refer to Precaution for Navigation System.

Click hereAudio / Visual / Telematics>NAVIGATION / MULTI INFO DISPLAY>NAVIGATION SYSTEM>PRECAUTION


PROCEDURE
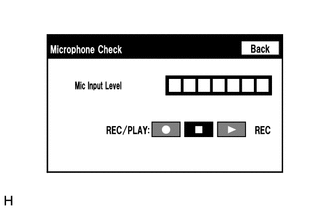
1.CHECK MICROPHONE AND VOICE RECOGNITION (INPUT TO NAVIGATION ECU)
a.
E268457

Enter the "Microphone Check" screen. Refer to Check Microphone (Input to navigation ECU) in Operation Check.

Click hereAudio / Visual / Telematics>NAVIGATION / MULTI INFO DISPLAY>NAVIGATION SYSTEM>OPERATION CHECK


b.

When voice is input into the microphone, check that the microphone input level meter changes according to the input voice.

OK:

Check result is normal.


Result:
Proceed to
OK
NG


OK

PROCEED TO NEXT SUSPECTED AREA SHOWN IN PROBLEM SYMPTOMS TABLE

NG

2.CHECK MICROPHONE AND VOICE RECOGNITION (INPUT TO RADIO AND DISPLAY RECEIVER ASSEMBLY)
a.
E268457

Enter the "Microphone Check" screen. Refer to Check Microphone (Input to radio and display receiver assembly) in Operation Check.

Click hereAudio / Visual / Telematics>NAVIGATION / MULTI INFO DISPLAY>NAVIGATION SYSTEM>OPERATION CHECK


b.

When voice is input into the microphone, check that the microphone input level meter changes according to the input voice.

OK:

Check result is normal.


Result:
Proceed to
OK
NG


OK

3.CHECK HARNESS AND CONNECTOR (RADIO AND DISPLAY RECEIVER ASSEMBLY - NAVIGATION ECU)

NG

5.CHECK MODEL
3.CHECK HARNESS AND CONNECTOR (RADIO AND DISPLAY RECEIVER ASSEMBLY - NAVIGATION ECU)
a.

Disconnect the G1 radio and display receiver assembly connector.


b.

Disconnect the H7 navigation ECU connector.


c.

Measure the resistance according to the value(s) in the table below.

Standard Resistance:
Tester Connection Condition Specified Condition
G1-25 (MCO+) - H7-13 (MIC+) Always Below 1 Ω
G1-26 (MCO-) - H7-14 (MIC-) Always Below 1 Ω
G1-25 (MCO+) or H7-13 (MIC+) - Body ground Always 10 kΩ or higher
G1-26 (MCO-) or H7-14 (MIC-) - Body ground Always 10 kΩ or higher
G1-24 (SGND) - Body ground Always 10 kΩ or higher


Result:
Proceed to
OK
NG


OK

4.CHECK RADIO AND DISPLAY RECEIVER ASSEMBLY (OUTPUT TO NAVIGATION ECU)

NG

REPAIR OR REPLACE HARNESS OR CONNECTOR

4.CHECK RADIO AND DISPLAY RECEIVER ASSEMBLY (OUTPUT TO NAVIGATION ECU)
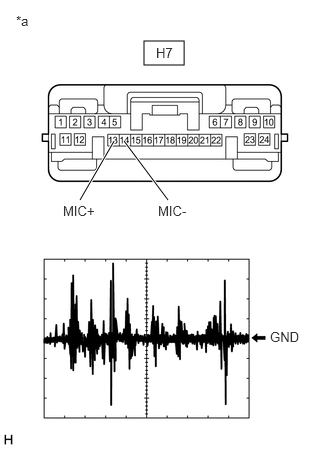
a.
E368005C24
1.5,0.427 1.917,0.677 0.417,0.25 1.75,2.083 1.292,1.469 true 0.833,2.083 1.188,1.469 true 2.813,3.427 3.208,3.656 0.396,0.229 10 false GND 0.656,2.115 1.052,2.344 0.396,0.229 10 false MIC+ 0.167,0.135 0.563,0.365 0.396,0.229 10 false *a 1.625,0.469 2.021,0.698 0.396,0.229 10 false H7 1.646,2.115 2.042,2.344 0.396,0.229 10 false MIC-
*a Front view of wire harness connector
(to Navigation ECU)


Check the output waveform.

i.

Disconnect the navigation ECU connector.


ii.

Turn the ignition switch to ACC.


iii.

Check the signal waveform according to the condition(s) in the table below.

Item Condition
Measurement terminal H7-13 (MIC+) - H7-14 (MIC-)
Tool setting 50 mV/DIV., 500 ms/DIV.
Vehicle condition
1.

Turn the ignition switch to ACC.

2.

Sound is input to the map light assembly when the user is closer than 125 mm from the map light assembly sound holes.


OK:

The waveform is similar to that shown in the illustration.


HINT:

The oscilloscope waveform shown in the illustration is an example for reference only.


Result:
Proceed to
OK
NG


OK

PROCEED TO NEXT SUSPECTED AREA SHOWN IN PROBLEM SYMPTOMS TABLE

NG

REPLACE RADIO AND DISPLAY RECEIVER ASSEMBLY

5.CHECK MODEL
a.

Choose the model to be inspected.

Result:
Result Proceed to
w/ Telematics Transceiver and for 6 Speakers A
w/o Telematics Transceiver or for 9 Speakers B


A

6.CHECK HARNESS AND CONNECTOR (RADIO AND DISPLAY RECEIVER ASSEMBLY - MAP LIGHT ASSEMBLY)

B

12.CHECK HARNESS AND CONNECTOR (RADIO AND DISPLAY RECEIVER ASSEMBLY - MAP LIGHT ASSEMBLY)
6.CHECK HARNESS AND CONNECTOR (RADIO AND DISPLAY RECEIVER ASSEMBLY - MAP LIGHT ASSEMBLY)
a.

Disconnect the G2 radio and display receiver assembly connector.


b.

Disconnect the P14 map light assembly connector.


c.

Measure the resistance according to the value(s) in the table below.

Standard Resistance:
Tester Connection Condition Specified Condition
G2-25 (SNS2) - P14-4 (SNS2) Always Below 1 Ω
G2-25 (SNS2) or P14-4 (SNS2) - Body ground Always 10 kΩ or higher


Result:
Proceed to
OK
NG


OK

7.CHECK HARNESS AND CONNECTOR (RADIO AND DISPLAY RECEIVER ASSEMBLY - DCM [TELEMATICS TRANSCEIVER])

NG

REPAIR OR REPLACE HARNESS OR CONNECTOR

7.CHECK HARNESS AND CONNECTOR (RADIO AND DISPLAY RECEIVER ASSEMBLY - DCM [TELEMATICS TRANSCEIVER])
a.

Disconnect the G2 radio and display receiver assembly connector.


b.

Disconnect the H6 DCM (telematics transceiver) connector.


c.

Measure the resistance according to the value(s) in the table below.

Standard Resistance:
Tester Connection Condition Specified Condition
G2-21 (MIN+) - H6-18 (MCO+) Always Below 1 Ω
G2-22 (MIN-) - H6-19 (MCO-) Always Below 1 Ω
G2-21 (MIN+) or H6-18 (MCO+) - Body ground Always 10 kΩ or higher
G2-22 (MIN-) or H6-19 (MCO-) - Body ground Always 10 kΩ or higher
G2-24 (SGND) - Body ground Always 10 kΩ or higher


Result:
Proceed to
OK
NG


OK

8.CHECK HARNESS AND CONNECTOR (DCM (TELEMATICS TRANSCEIVER) - MAP LIGHT ASSEMBLY)

NG

REPAIR OR REPLACE HARNESS OR CONNECTOR

8.CHECK HARNESS AND CONNECTOR (DCM (TELEMATICS TRANSCEIVER) - MAP LIGHT ASSEMBLY)
a.

Disconnect the H6 DCM (telematics transceiver) connector.


b.

Disconnect the P14 map light assembly connector.


c.

Measure the resistance according to the value(s) in the table below.

Standard Resistance:
Tester Connection Condition Specified Condition
H6-33 (MCVD) - P14-7 (MACC) Always Below 1 Ω
H6-34 (MCI+) - P14-6 (MCO+) Always Below 1 Ω
H6-35 (MCI-) - P14-5 (MCO-) Always Below 1 Ω
H6-33 (MCVD) or P14-7 (MACC) - Body ground Always 10 kΩ or higher
H6-34 (MCI+) or P14-6 (MCO+) - Body ground Always 10 kΩ or higher
H6-35 (MCI-) or P14-5 (MCO-) - Body ground Always 10 kΩ or higher
H6-32 (SGND) - Body ground Always 10 kΩ or higher


Result:
Proceed to
OK
NG


OK

9.CHECK DCM (TELEMATICS TRANSCEIVER)

NG

REPAIR OR REPLACE HARNESS OR CONNECTOR

9.CHECK DCM (TELEMATICS TRANSCEIVER)
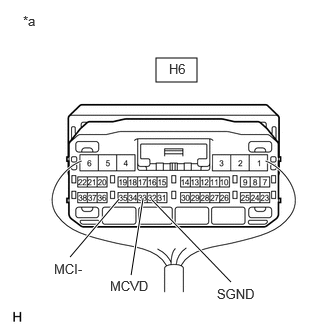
a.
E283057C56
1.625,0.604 2.052,0.854 0.427,0.25 0.729,2.677 1.24,2.073 true 1.365,2.865 1.49,2.063 true 2.406,2.938 1.583,2.083 true 0.24,0.135 0.552,0.292 0.313,0.156 10 false *a 0.563,2.719 0.958,2.875 0.396,0.156 10 false MCI- 1.146,2.896 1.646,3.073 0.5,0.177 10 false MCVD 2.26,2.979 2.76,3.156 0.5,0.177 10 false SGND 1.76,0.635 2.26,0.813 0.5,0.177 10 false H6
*a Component with harness connected
(DCM [Telematics Transceiver])


Remove the DCM (telematics transceiver) with the connector(s) still connected.

Click hereAudio / Visual / Telematics>TELEMATICS>TELEMATICS TRANSCEIVER>REMOVAL


b.

Measure the voltage according to the value(s) in the table below.

Standard Voltage:
Tester Connection Switch Condition Specified Condition
H6-33 (MCVD) - Body ground Ignition switch ACC 4 to 6 V


c.

Measure the resistance according to the value(s) in the table below.

Standard Resistance:
Tester Connection Condition Specified Condition
H6-35 (MCI-) - Body ground Always Below 1 Ω
H6-32 (SGND) - Body ground Always Below 1 Ω


Result:
Proceed to
OK
NG


OK

10.CHECK MAP LIGHT ASSEMBLY (OUTPUT TO DCM [TELEMATICS TRANSCEIVER])

NG

REPLACE DCM (TELEMATICS TRANSCEIVER)

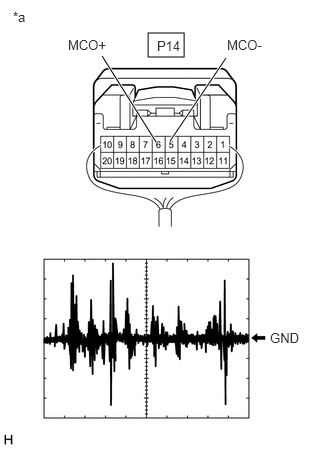
10.CHECK MAP LIGHT ASSEMBLY (OUTPUT TO DCM [TELEMATICS TRANSCEIVER])
a.
E369494C25
1.542,0.344 1.917,0.594 0.375,0.25 1.625,1.479 1.063,0.583 true 1.771,1.469 2.354,0.604 true 0.708,0.385 1.323,0.583 0.615,0.198 10 false MCO+ 2.365,0.385 2.979,0.583 0.615,0.198 10 false MCO- 1.635,0.396 2.25,0.594 0.615,0.198 10 false P14 2.813,3.438 3.427,3.635 0.615,0.198 10 false GND 0.135,0.094 0.75,0.292 0.615,0.198 10 false *a
*a Front view of wire harness connector
(to Map Light Assembly)


Check the output waveform.

i.

Remove the map light assembly with the connector(s) still connected.

Click hereVehicle Interior>LIGHTING (INT)>PERSONAL LIGHT>REMOVAL


ii.

Connect an oscilloscope to terminals 6 (MCO+) and 5 (MCO-) of the P14 map light assembly connector.


iii.

Turn the ignition switch to ACC.


b.

Connect an oscilloscope to terminals 6 (MCO+) and 5 (MCO-) of the P14 map light assembly connector.


c.

Check the signal waveform according to the condition(s) in the table below.

Item Condition
Measurement terminal P14-6 (MCO+) - P14-5 (MCO-)
Tool setting 50 mV/DIV., 500 ms/DIV.
Vehicle condition
1.

Turn the ignition switch to ACC.

2.

Sound is input to the map light assembly when the user is closer than 125 mm from the map light assembly sound holes.


OK:

The waveform is similar to that shown in the illustration.


HINT:

The oscilloscope waveform shown in the illustration is an example for reference only.


Result:
Proceed to
OK
NG


OK

11.CHECK DCM (TELEMATICS TRANSCEIVER) (OUTPUT TO RADIO AND DISPLAY RECEIVER ASSEMBLY)

NG

15.INSPECT MAP LIGHT ASSEMBLY
11.CHECK DCM (TELEMATICS TRANSCEIVER) (OUTPUT TO RADIO AND DISPLAY RECEIVER ASSEMBLY)
a.
E364296C41
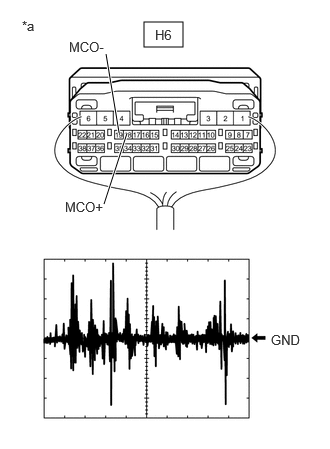
1.5,0.229 1.906,0.49 0.406,0.26 1.24,1.385 1.104,0.563 true 1.083,2.125 1.323,1.385 true 0.229,0.188 0.542,0.385 0.313,0.198 10 false *a 1.615,0.281 2.073,0.479 0.458,0.198 10 false H6 0.677,2.073 1.292,2.271 0.615,0.198 10 false MCO+ 0.719,0.406 1.333,0.604 0.615,0.198 10 false MCO- 2.823,3.458 3.24,3.656 0.417,0.198 10 false GND
*a Component with harness connected
DCM (Telematics Transceiver)


Check the output waveform.

i.

Remove the DCM (telematics transceiver) with the connector(s) still connected.

Click hereAudio / Visual / Telematics>TELEMATICS>TELEMATICS TRANSCEIVER>REMOVAL


ii.

Connect an oscilloscope to terminals 18 (MCO+) and 19 (MCO-) of the H6 DCM (telematics transceiver) connector.


iii.

Turn the ignition switch to ACC.


iv.

Check the signal waveform according to the condition(s) in the table below.

Item Condition
Measurement terminal H6-18 (MCO+) - H6-19 (MCO-)
Tool setting 50 mV/DIV., 500 ms/DIV.
Vehicle condition
1.

Turn the ignition switch to ACC.

2.

Sound is input to the map light assembly when the user is closer than 125 mm from the map light assembly sound holes.


OK:

The waveform is similar to that shown in the illustration.


HINT:

The oscilloscope waveform shown in the illustration is an example for reference only.


Result:
Proceed to
OK
NG


OK

REPLACE RADIO AND DISPLAY ASSEMBLY

NG

REPLACE DCM (TELEMATICS TRANSCEIVER)

12.CHECK HARNESS AND CONNECTOR (RADIO AND DISPLAY RECEIVER ASSEMBLY - MAP LIGHT ASSEMBLY)
a.

Disconnect the G2 radio and display receiver assembly connector.


b.

Disconnect the P14 map light assembly connector.


c.

Measure the resistance according to the value(s) in the table below.

Standard Resistance:
Tester Connection Condition Specified Condition
G2-25 (SNS2) - P14-4 (SNS2) Always Below 1 Ω
G2-23 (MACC) - P14-7 (MACC) Always Below 1 Ω
G2-21 (MIN+) - P14-6 (MCO+) Always Below 1 Ω
G2-22 (MIN-) - P14-5 (MCO-) Always Below 1 Ω
G2-25 (SNS2) or P14-4 (SNS2) - Body ground Always 10 kΩ or higher
G2-23 (MACC) or P14-7 (MACC) - Body ground Always 10 kΩ or higher
G2-21 (MIN+) or P14-6 (MCO+) - Body ground Always 10 kΩ or higher
G2-22 (MIN-) or P14-5 (MCO-) - Body ground Always 10 kΩ or higher
G2-24 (SGND) - Body ground Always 10 kΩ or higher


Result:
Proceed to
OK
NG


OK

13.CHECK RADIO AND DISPLAY RECEIVER ASSEMBLY

NG

REPAIR OR REPLACE HARNESS OR CONNECTOR

13.CHECK RADIO AND DISPLAY RECEIVER ASSEMBLY
a.
E360498C91
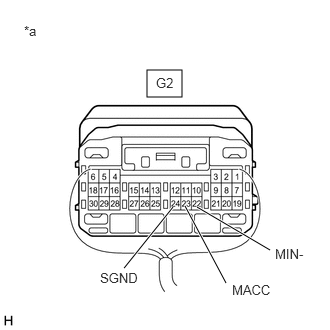
1.531,0.729 1.896,1.01 0.365,0.281 1.292,2.792 1.802,2.156 true 2.813,2.604 2.052,2.156 true 2.354,2.948 1.927,2.146 true 0.25,0.24 0.563,0.438 0.313,0.198 10 false *a 1.625,0.781 1.938,0.979 0.313,0.198 10 false G2 1.042,2.813 1.49,3.052 0.448,0.24 10 false SGND 2.865,2.563 3.24,2.771 0.375,0.208 10 false MIN- 2.417,2.938 2.865,3.177 0.448,0.24 10 false MACC
*a Component with harness connected
(Radio and Display Receiver Assembly)


Remove the radio and display receiver assembly with the connector(s) still connected.

Click hereAudio / Visual / Telematics>AUDIO / VIDEO>RADIO RECEIVER>REMOVAL


b.

Measure the voltage according to the value(s) in the table below.

Standard Voltage:
Tester Connection Switch Condition Specified Condition
G2-23 (MACC) - Body ground Ignition switch ACC 4 to 6 V


c.

Measure the resistance according to the value(s) in the table below.

Standard Resistance:
Tester Connection Condition Specified Condition
G2-24 (SGND) - Body ground Always Below 1 Ω
G2-22 (MIN-) - Body ground Always Below 1 Ω


Result:
Proceed to
OK
NG


OK

14.CHECK MAP LIGHT ASSEMBLY (OUTPUT TO RADIO AND DISPLAY RECEIVER)

NG

REPLACE RADIO AND DISPLAY RECEIVER ASSEMBLY

14.CHECK MAP LIGHT ASSEMBLY (OUTPUT TO RADIO AND DISPLAY RECEIVER)
a.
E369494C25
1.542,0.344 1.917,0.594 0.375,0.25 1.625,1.479 1.063,0.583 true 1.771,1.469 2.354,0.604 true 0.708,0.385 1.323,0.583 0.615,0.198 10 false MCO+ 2.365,0.385 2.979,0.583 0.615,0.198 10 false MCO- 1.635,0.396 2.25,0.594 0.615,0.198 10 false P14 2.813,3.438 3.427,3.635 0.615,0.198 10 false GND 0.135,0.094 0.75,0.292 0.615,0.198 10 false *a
*a Component with harness connected
(Map Light Assembly)


Check the output waveform.

i.

Remove the map light assembly with the connector(s) still connected.

Click hereVehicle Interior>LIGHTING (INT)>PERSONAL LIGHT>REMOVAL


ii.

Connect an oscilloscope to terminals 6 (MCO+) and 5 (MCO-) of the P14 map light assembly connector.


iii.

Turn the ignition switch to ACC.


iv.

Check the signal waveform according to the condition(s) in the table below.

Item Condition
Measurement terminal P14-6 (MCO+) - P14-5 (MCO-)
Tool setting 50 mV/DIV., 500 ms/DIV.
Vehicle condition
1.

Turn the ignition switch to ACC.

2.

Sound is input to the map light assembly when the user is closer than 125 mm from the map light assembly sound holes.


OK:

The waveform is similar to that shown in the illustration.


HINT:

The oscilloscope waveform shown in the illustration is an example for reference only.


Result:
Proceed to
OK
NG


OK

REPLACE RADIO AND DISPLAY ASSEMBLY

NG

15.INSPECT MAP LIGHT ASSEMBLY
a.
E369493C70
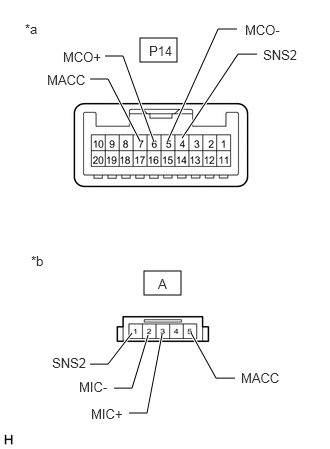
1.458,0.396 1.844,0.646 0.385,0.25 1.5,2.823 1.885,3.073 0.385,0.25 1.604,1.479 1.281,0.583 1.281,0.583 1.094,0.583 true 1.75,1.458 2.271,0.302 2.271,0.302 2.469,0.302 true 1.375,3.469 1.125,3.792 1.125,3.792 0.938,3.792 true 1.542,3.49 1.375,4.042 1.375,4.042 1.188,4.042 true 1.688,3.479 1.531,4.302 1.531,4.302 1.344,4.302 true 1.99,3.469 2.25,3.938 2.25,3.938 2.448,3.938 true 1.458,1.469 1.125,0.823 1.125,0.823 0.938,0.823 true 1.896,1.438 2.479,0.563 2.479,0.563 2.677,0.563 true 0.26,0.219 0.573,0.417 0.313,0.198 10 false *a 0.323,2.635 0.635,2.833 0.313,0.198 10 false *b 0.656,0.51 1.156,0.729 0.5,0.219 10 false MCO+ 2.552,0.229 3.031,0.438 0.479,0.208 10 false MCO- 1.552,0.448 2.031,0.656 0.479,0.208 10 false P14 1.646,2.875 2.125,3.083 0.479,0.208 10 false A 2.74,0.49 3.219,0.698 0.479,0.208 10 false SNS2 0.49,0.75 0.99,0.969 0.5,0.219 10 false MACC 0.542,3.698 1.021,3.906 0.479,0.208 10 false SNS2 2.51,3.854 3.01,4.073 0.5,0.219 10 false MACC 0.948,4.229 1.448,4.448 0.5,0.219 10 false MIC+ 0.823,3.948 1.323,4.167 0.5,0.219 10 false MIC-
*a Component without harness connected
(Map Light Assembly (Wire Harness Side))
*b Component without harness connected
(Map Light Assembly (Telephone Microphone Assembly Side))


Remove the map light assembly.

Click hereVehicle Interior>LIGHTING (INT)>PERSONAL LIGHT>REMOVAL


b.

Disconnect the telephone microphone assembly connector.


c.

Measure the resistance according to the value(s) in the table below.

Standard Resistance:
Tester Connection Condition Specified Condition
P14-4 (SNS2) - A-1 (SNS2) Always Below 1 Ω
P14-7 (MACC) - A-5 (MACC) Always Below 1 Ω
P14-6 (MCO+) - A-3 (MIC+) Always Below 1 Ω
P14-5 (MCO-) - A-2 (MIC-) Always Below 1 Ω
P14-4 (SNS2) - P14-5 (MCO-) Always 10 kΩ or higher
P14-4 (SNS2) - P14-6 (MCO+) Always 10 kΩ or higher
P14-4 (SNS2) - P14-7 (MACC) Always 10 kΩ or higher
P14-5 (MCO-) - P14-6 (MCO+) Always 10 kΩ or higher
P14-5 (MCO-) - P14-7 (MACC) Always 10 kΩ or higher
P14-6 (MCO+) - P14-7 (MACC) Always 10 kΩ or higher


Result:
Proceed to
OK
NG


OK

NG

REPLACE MAP LIGHT ASSEMBLY