STOP AND START STOP AND START SYSTEM(for M20A-FKS) Backup Boost Converter Circuit
DESCRIPTION
A backup boost converter is built into the engine stop and start ECU. The backup boost converter helps maintain the power source voltage when the engine is restarted by stop and start control.
This prevents various functions such as the audio and visual system from malfunctioning if the power source voltage drops due to the battery voltage dropping when the engine is restarted by stop and start control.
If any DTCs are output, troubleshoot the DTCs first.
- HINT:
-
A relay function and fuse function are provided in the backup boost converter.
-
If there is a malfunction in any of the electrical system circuits connected to the backup boost converter, the fuse and relay functions shut off the malfunctioning circuit to protect other circuits (remains shut off until next trip).
-
When the electrical system circuit is shut off, power to the circuit is cut off, causing any systems connected to the circuit to be disabled.
-
The fuse function is reset* when the ignition switch is turned off. If the malfunction still exists in the electrical system circuit that has been shut off by the relay function, it will be shut off again by the relay and fuse functions the next time the ignition switch is turned to ON.
-
*: A semiconductor fuse self resets according to electric signal.
- The backup boost converter supplies power to:·
Toyota safety sense
·Tire pressure warning system
·Vehicle stability control system
·Power steering system
·Audio and visual system
·Navigation system
·Panoramic view monitor system
·Blind spot monitor system
·Telematics system
·CAN communication system
·Meter / gauge system
·Air conditioning system
WIRING DIAGRAM
Refer to DTC P323A19.
Click hereEngine / Hybrid System>STOP AND START>STOP AND START SYSTEM(for M20A-FKS)>P323A19
CAUTION / NOTICE / HINT
- NOTICE:
- ·
Before replacing the engine stop and start ECU, read the number of starter operations and write it into a new engine stop and start ECU.
Click hereEngine / Hybrid System>STOP AND START>STOP AND START SYSTEM(for M20A-FKS)>REGISTRATION
·After replacing the engine stop and start ECU or air conditioning amplifier assembly, reset and perform learning of the air conditioning information in the engine stop and start ECU.
Click hereEngine / Hybrid System>STOP AND START>STOP AND START SYSTEM(for M20A-FKS)>REGISTRATION
·After replacing the engine stop and start ECU or airbag ECU assembly, clear and calibrate the deceleration sensor zero point in the engine stop and start ECU.
Click hereEngine / Hybrid System>STOP AND START>STOP AND START SYSTEM(for M20A-FKS)>REGISTRATION
·for Continuously variable transaxle:
Bleed the oil pump with motor assembly (continuously variable transaxle assembly) after removing and installing the continuously variable transaxle assembly or replacing the CVT fluid.
Click hereEngine / Hybrid System>STOP AND START>STOP AND START SYSTEM(for M20A-FKS)>REGISTRATION
·Inspect the fuses for circuits related to this system before performing the following procedure.
PROCEDURE
Determine the trouble area by referring to the table below.
| Effect on Vehicle | Trouble Area/Cause | Fail-safe | DTC Output | Stop and start cancel indicator | Symptom | Proceed to |
|---|---|---|---|---|---|---|
| When the engine is restarted by stop and start control:
The following symptoms may occur ·
Audio and visual system is reset ·
The combination meter assembly fades out ·
The steering wheel feels heavy when the engine is restarted* |
Backup boost converter internal malfunction
·
Internal power source malfunction ·
Internal power source overvoltage ·
CPU duty malfunction ·
Communication cycle error |
Stop and start control prohibited | P323A00
P323AA2 P323B29 P323B38 |
Blinks | Systems stop operating during engine restart as the backup boost converter output voltage cannot be boosted | A |
| Battery voltage drop | ||||||
| Systems on the converter output side do not operate
B41 terminal: Tire pressure warning system will not operate B42 terminal: Both of the following will not operate ·
Audio and visual system ·
Navigation system B43 terminal: Both of the following will not operate ·
Audio and visual system ·
Navigation system ·
Digital inner mirror ·
EC mirror IG41 terminal: All of the following will not operate ·
Toyota safety sense ·
Tire pressure warning system ·
Blind spot monitor system ·
CAN communication system ·
Navigation system ·
Air conditioning system |
Overcurrent applied to an output terminal (output terminal relay circuit is shutoff) | Stop and start control is prohibited
(Connected ECUs or sensors may detect power source malfunction DTCs) |
P323A19 | Blinks | Systems do not operate as power supply from the converter is cut off | A |
| Systems do not operate
(Due to converter input side malfunction) IG1 terminal: All of the following will not operate ·
Toyota safety sense ·
Tire pressure warning system ·
Vehicle stability control system ·
Power steering system ·
Blind spot monitor system ·
CAN communication system ·
Navigation system ·
Air conditioning system IG2 terminal: Both of the following will not operate ·
Meter / gauge system ·
Telematics system ACC terminal: All of the following will not operate ·
Audio and visual system ·
Navigation system ·
Telematics system |
Converter input circuit malfunction
·
Open or short to GND in IG1 circuit ·
Open or short to GND in IG2 circuit ·
Open or short to GND in ACC circuit |
Stop and start control prohibited | - | Does not blink (Blinks when communication error DTCs are stored) | Systems do not operate as power supply from the converter is cut off | B |
| Systems on the converter output side do not operate
(varies depending on the malfunctioning relay circuit the converter detected) AC41 terminal: Both of the following will not operate ·
Audio and visual system ·
Telematics system IG11 terminal: The power steering system will not operate IG12 terminal: The meter / gauge system will not operate IG31 terminal: Both of the following will not operate ·
Vehicle stability control system ·
Power steering system IG41 terminal: All of the following will not operate ·
Toyota safety sense ·
Tire pressure warning system ·
Blind spot monitor system ·
CAN communication system ·
Navigation system ·
Air conditioning system B41 terminal: Tire pressure warning system will not operate B42 terminal: Both of the following will not operate ·
Audio and visual system ·
Navigation system B43 terminal: Both of the following will not operate ·
Audio and visual system ·
Navigation system ·
Digital inner mirror ·
EC mirror |
Malfunction in circuits the converter supplies power to
(between the converter and ECUs or sensors) |
Related systems do not operate as the relay circuit in the converter is turned off | - | Does not blink (Blinks when communication error DTCs are stored) | Systems do not operate as power supply from the converter is cut off | B |
| All of the following systems do not operate
·
Toyota safety sense ·
Tire pressure warning system ·
Vehicle stability control system ·
Power steering system ·
Audio and visual system ·
Blind spot monitor system ·
CAN communication system ·
Meter / gauge system ·
Air conditioning system ·
Digital inner mirror ·
EC mirror |
·
Open in BBC fuse circuit ·
Short in converter circuit ·
Backup boost converter malfunction |
Stop and start control prohibited | P061519 | Does not blink (Due to disabled meter / gauge system) | All systems that the converter supplies power to do not operate (see circuit diagram) | A |
| P30DF62
P30EF4B P323A00 P323A16 P323AA2 P323B29 P323B38 |
||||||
| The audio does not operate
(until the ignition switch is turned off) |
Excessive audio volume
Data List item "State of BBC" displays "BBC Overcurrent" while the circuit is protected |
The relay circuit in the converter is turned off to cut off power supply to the audio and visual system (navigation system) (Returns to normal when the ignition switch is turned off) | - | Does not blink | If overcurrent is detected in the audio and visual system (navigation system), system operation is disabled while the ignition switch is ON
(Returns to normal when the ignition switch is turned off) |
C |
| The external backup boost converter (eco run vehicle converter assembly) output side system does not operate
·
Navigation system ·
Audio and visual system |
·
Open in BBC NO. 3 fuse circuit ·
Malfunction in circuits the converter supplies power to ·
External backup boost converter (eco run vehicle converter assembly) malfunction |
- | - | Does not blink | All systems that the converter supplies power to do not operate (see circuit diagram) | D |
·
The combination meter assembly cannot be turned off (short between IG12 and +B) ·
Communication error DTCs may be stored due to short between AC41 and +B
|
Converter circuit malfunction
·
Short between IG12 and +B ·
Short between AC41 and +B |
- | - | Does not blink | The converter cannot shut off the power source when the ignition switch is turned off | B |
·
Ignition switch cannot be turned off from ACC (short between ACC and +B) ·
Ignition switch cannot be turned off from IG (short between IG1 or IG2 and +B) |
Engine stop and start ECU power source circuit malfunction
·
Short between ACC and +B ·
Short between IG1 and +B ·
Short between IG2 and +B |
- | - | Does not blink | Ignition switch cannot be turned off | B |
*: A DTC may be stored in the power steering system
- Result:
Proceed to A B C D
A
B
C
D
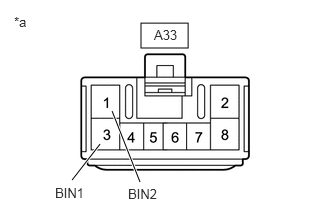
| *a | Front view of wire harness connector
(to Engine Stop and Start ECU) |
Disconnect the engine stop and start ECU connector.
Measure the voltage according to the value(s) in the table below.
- Standard Voltage:
Tester Connection Condition Specified Condition A33-1 (BIN2) - Body ground Always 9.5 to 14 V A33-3 (BIN1) - Body ground Always 9.5 to 14 V
- Result:
Proceed to OK NG
OK
NG
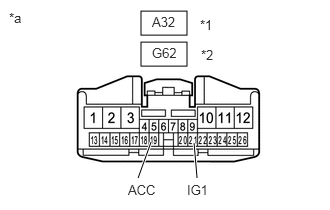
| *1 | for LHD |
| *2 | for RHD |
| *a | Front view of wire harness connector
(to Engine Stop and Start ECU) |
Disconnect the engine stop and start ECU connector.
Turn the ignition switch to ACC.
Measure the voltage according to the value(s) in the table below.
- Standard Voltage:
Tester Connection Condition Specified Condition A32*1-19 (ACC) - Body ground
G62*1-19 (ACC) - Body groundIgnition switch ACC 9.5 to 14 V
Turn the ignition switch to ON.
Measure the voltage according to the value(s) in the table below.
- Standard Voltage:
Tester Connection Condition Specified Condition A32*1-21 (IG1) - Body ground
G62*2-21 (IG1) - Body groundIgnition switch ON 9.5 to 14 V
Turn the ignition switch to off.
Measure the voltage according to the value(s) in the table below.
- Standard Voltage:
Tester Connection Condition Specified Condition A32*1-19 (ACC) - Body ground
G62*2-19 (ACC) - Body groundIgnition switch off 0 to 1 V A32*1-21 (IG1) - Body ground
G62*2-21 (IG1) - Body groundIgnition switch off 0 to 1 V
*1: for LHD
*2: for RHD
- Result:
Proceed to OK NG
OK
NG
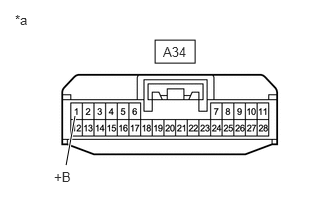
| *a | Front view of wire harness connector
(to Engine Stop and Start ECU) |
Disconnect the engine stop and start ECU connector.
Turn the ignition switch to ON.
Measure the voltage according to the value(s) in the table below.
- Standard Voltage:
Tester Connection Condition Specified Condition A34-1 (+B) - Body ground Ignition switch ON 9.5 to 14 V
Turn the ignition switch to off.
Measure the voltage according to the value(s) in the table below.
- Standard Voltage:
Tester Connection Condition Specified Condition A34-1 (+B) - Body ground Ignition switch off 0 to 1 V
- Result:
Proceed to OK NG
OK
NG
Disconnect the connector from the corresponding system ECU/sensor.
Measure the resistance according to the value(s) in the table below.
- Standard Resistance:
Power Steering ECU (Rack and Pinion Power Steering Gear Assembly) Tester Connection Condition Specified Condition A32*1-6 (IG11) - C54-4 (IG)
G62*2-6 (IG11) - C54-4 (IG)Always Below 1 Ω A32*1-6 (IG11) or C54-4 (IG) - Body ground and other terminals
G62*2-6 (IG11) or C54-4 (IG) - Body ground and other terminalsAlways 10 kΩ or higher
Combination Meter Assembly Tester Connection Condition Specified Condition A32*1-10 (IG12) - G18-38 (IG+)
G62*2-10 (IG12) - G18-38 (IG+)Always Below 1 Ω A32*1-10 (IG12) or G18-38 (IG+) - Body ground and other terminals
G62*2-10 (IG12) or G18-38 (IG+) - Body ground and other terminalsAlways 10 kΩ or higher
Telematics Transceiver Assembly Tester Connection Condition Specified Condition A32*1-26 (IG13) - H6-7 (IG2)
G62*2-26 (IG13) - H6-7 (IG2)Always Below 1 Ω A32*1-16 (B12) - H6-1 (+B)
G62*2-16 (B12) - H6-1 (+B)Always Below 1 Ω A32*1-24 (AC41) - H6-8 (ACC)
G62*2-24 (AC41) - H6-8 (ACC)Always Below 1 Ω A32*1-26 (IG13) or H6-7 (IG2) - Body ground and other terminals
G62*2-26 (IG13) or H6-7 (IG2) - Body ground and other terminalsAlways 10 kΩ or higher A32*1-16 (B12) or H6-1 (+B) - Body ground and other terminals
G62*2-16 (B12) or H6-1 (+B) - Body ground and other terminalsAlways 10 kΩ or higher A32*1-24 (AC41) or H6-8 (ACC) - Body ground and other terminals
G62*2-24 (AC41) or H6-8 (ACC) - Body ground and other terminalsAlways 10 kΩ or higher
Radio and Display Receiver Assembly (w/ Display Audio System) Tester Connection Condition Specified Condition A32*1-12 (B42) - G3-4 (+B1)
G62*2-12 (B42) - G3-4 (+B1)Always Below 1 Ω A32*1-24 (AC41) - G3-15 (ACC1)
G62*2-24 (AC41) - G3-15 (ACC1)Always Below 1 Ω A32*1-12 (B42) or G3-4 (+B1) - Body ground and other terminals
G62*2-12 (B42) or G3-4 (+B1) - Body ground and other terminalsAlways 10 kΩ or higher A32*1-24 (AC41) or G3-15 (ACC1) - Body ground and other terminals
G62*2-24 (AC41) or G3-15 (ACC1) - Body ground and other terminalsAlways 10 kΩ or higher
Radio Receiver Assembly (w/o Display Audio System) Tester Connection Condition Specified Condition A32*1-12 (B42) - G66-4 (+B1)
G62*2-12 (B42) - G66-4 (+B1)Always Below 1 Ω A32*1-12 (B42) or G66-4 (+B1) - Body ground and other terminals
G62*2-12 (B42) or G66-4 (+B1) - Body ground and other terminalsAlways 10 kΩ or higher
Electrical Key and Tire Pressure Monitoring System Receiver Assembly (w/ Tire Pressure Warning System) Tester Connection Condition Specified Condition A32*1-2 (B41) - M8-7 (+B)
G62*2-2 (B41) - M8-7 (+B)Always Below 1 Ω A32*1-3 (IG41) - M8-1 (IG)
G62*2-3 (IG41) - M8-1 (IG)Always Below 1 Ω A32*1-2 (B41) or M8-7 (+B) - Body ground and other terminals
G62*2-2 (B41) or M8-7 (+B) - Body ground and other terminalsAlways 10 kΩ or higher A32*1-3 (IG41) or M8-1 (IG) - Body ground and other terminals
G62*2-3 (IG41) or M8-1 (IG) - Body ground and other terminalsAlways 10 kΩ or higher
Central Gateway ECU (Network Gateway ECU) Tester Connection Condition Specified Condition A32*1-3 (IG41) - G72-11 (IG1)
G62*2-3 (IG41) - G72-11 (IG1)Always Below 1 Ω A32*1-3 (IG41) or G72-11 (IG1) - Body ground and other terminals
G62*2-3 (IG41) or G72-11 (IG1) - Body ground and other terminalsAlways 10 kΩ or higher
Clearance Warning ECU Assembly Tester Connection Condition Specified Condition A32*1-3 (IG41) - H4-1 (IG)
G62*2-3 (IG41) - H4-1 (IG)Always Below 1 Ω A32*1-3 (IG41) or H4-1 (IG) - Body ground and other terminals
G62*2-3 (IG4) or H4-1 (IG) - Body ground and other terminalsAlways 10 kΩ or higher
Forward Recognition Camera (w/ Toyota Safety Sense) Tester Connection Condition Specified Condition A32*1-3 (IG41) - P8-7 (IGB)
G62*2-3 (IG41) - P8-7 (IGB)Always Below 1 Ω A32*1-3 (IG41) or P8-7 (IGB) - Body ground and other terminals
G62*2-3 (IG41) or P8-7 (IGB) - Body ground and other terminalsAlways 10 kΩ or higher
Millimeter Wave Radar Sensor Assembly (w/ Toyota Safety Sense) Tester Connection Condition Specified Condition A32*1-3 (IG41) - B9-8 (IGB)
G62*2-3 (IG41) - B9-8 (IGB)Always Below 1 Ω A32*1-3 (IG41) or B9-8 (IGB) - Body ground and other terminals
G62*2-3 (IG41) or B9-8 (IGB) - Body ground and other terminalsAlways 10 kΩ or higher
Blind Spot Monitor Sensor LH Tester Connection Condition Specified Condition A32*1-3 (IG41) - Q1-5 (BLB)
G62*2-3 (IG41) - Q1-5 (BLB)Always Below 1 Ω A32*1-3 (IG41) or Q1-5 (BLB) - Body ground and other terminals
G62*2-3 (IG41) or Q1-5 (BLB) - Body ground and other terminalsAlways 10 kΩ or higher
Blind Spot Monitor Sensor RH Tester Connection Condition Specified Condition A32*1-3 (IG41) - Q13-5 (BRB)
G62*2-3 (IG41) - Q13-5 (BRB)Always Below 1 Ω A32*1-3 (IG41) or Q13-5 (BRB) - Body ground and other terminals
G62*2-3 (IG41) or Q13-5 (BRB) - Body ground and other terminalsAlways 10 kΩ or higher
Air Conditioning Control Assembly Tester Connection Condition Specified Condition A32*1-3 (IG41) - G24-9 (IG+)
G62*2-3 (IG41) - G24-9 (IG+)Always Below 1 Ω A32*1-25 (IL41) - G24-8 (ILL+)
G62*2-25 (IL41) - G24-8 (ILL+)Always Below 1 Ω A32*1-3 (IG41) or G24-9 (IG+) - Body ground and other terminals
G62*2-3 (IG41) or G24-9 (IG+) - Body ground and other terminalsAlways 10 kΩ or higher A32*1-25 (IL41) or G24-8 (ILL+) - Body ground and other terminals
G62*2-25 (IL41) or G24-8 (ILL+) - Body ground and other terminalsAlways 10 kΩ or higher
Inner Rear View Mirror Assembly (w/ EC Mirror) Tester Connection Condition Specified Condition A32*1-3 (IG41) - P2-4 (IG)*3
G62*2-3 (IG41) - P2-4 (IG)*3Always Below 1 Ω A32*1-3 (IG41) - P3-1 (IG)*4
G62*2-3 (IG41) - P3-1 (IG)*4Always Below 1 Ω A32*1-3 (IG41) or P2-4 (IG)*3 - Body ground and other terminals
G62*2-3 (IG41) or P2-4 (IG)*3 - Body ground and other terminalsAlways 10 kΩ or higher A32*1-3 (IG41) or P3-1 (IG)*4 - Body ground and other terminals
G62*2-3 (IG41) or P3-1 (IG)*4 - Body ground and other terminalsAlways 10 kΩ or higher
Instrument Panel Junction Block Assembly (Main Body ECU (Multiplex Network Body ECU)) (for Manual transaxle) Tester Connection Condition Specified Condition A32*1-3 (IG41) - 4A-15
G62*2-3 (IG41) - 4A-15Always Below 1 Ω A32*1-3 (IG41) or 4A-15 - Body ground and other terminals
G62*2-3 (IG41) or 4A-15 - Body ground and other terminalsAlways 10 kΩ or higher
Inner Rear View Mirror Assembly (w/ Digital Inner Mirror) Tester Connection Condition Specified Condition A32*1-11 (B43) - P1-6 (+B)
G62*2-11 (B43) - P1-6 (+B)Always Below 1 Ω A32*1-11 (B43) or P1-6 (+B) - Body ground and other terminals
G62*2-11 (B43) or P1-6 (+B) - Body ground and other terminalsAlways 10 kΩ or higher
Navigation ECU Tester Connection Condition Specified Condition A32*1-11 (B43) - H7-10 (+B)
G62*2-11 (B43) - H7-10 (+B)Always Below 1 Ω A32*1-11 (B43) or H7-10 (+B) - Body ground and other terminals
G62*2-11 (B43) or H7-10 (+B) - Body ground and other terminalsAlways 10 kΩ or higher
Skid Control ECU (Brake Actuator Assembly) Tester Connection Condition Specified Condition A32*1-1 (IG31) - A39-36 (IG1)
G62*2-1 (IG31) - A39-36 (IG1)Always Below 1 Ω A32*1-1 (IG31) or A39-36 (IG1) - Body ground and other terminals
G62*2-1 (IG31) or A39-36 (IG1) - Body ground and other terminalsAlways 10 kΩ or higher
Steering Sensor Tester Connection Condition Specified Condition A32*1-1 (IG31) - G68-9 (IG1)
G62*2-1 (IG31) - G68-9 (IG1)Always Below 1 Ω A32*1-1 (IG31) or G68-9 (IG1) - Body ground and other terminals
G62*2-1 (IG31) or G68-9 (IG1) - Body ground and other terminalsAlways 10 kΩ or higher
*1: for LHD
*2: for RHD
*3: w/ Forward Recognition Camera
*4: w/o Forward Recognition Camera
- Result:
Proceed to OK NG
OK
NG
Disconnect the connector from the corresponding system ECU/sensor.
Measure the voltage according to the value(s) in the table below.
- HINT:
-
Measure the voltage at the corresponding terminals.
- Standard Voltage:
Tester Connection Condition Specified Condition H6-1 (+B) - Body ground Always 10.5 to 16 V G3-4 (+B1) - Body ground*1 Always 10.5 to 16 V G66-4 (+B1) - Body ground*2 Always 10.5 to 16 V M8-7 (+B) - Body ground*3 Always 10.5 to 16 V P1-6 (+B) - Body ground*4 Always 10.5 to 16 V H7-10 (+B) - Body ground Always 10.5 to 16 V
*1: w/ Display Audio System
*2: w/o Display Audio System
*3: w/ Tire Pressure Warning System
*4: w/ Digital Inner Mirror
Turn the ignition switch to ACC.
Measure the voltage according to the value(s) in the table below.
- HINT:
-
Measure the voltage at the corresponding terminals.
- Standard Voltage:
Tester Connection Condition Specified Condition H6-8 (ACC) - Body ground Ignition switch ACC 10.5 to 16 V G3-15 (ACC1) - Body ground* Ignition switch ACC 10.5 to 16 V
*: w/ Display Audio System
Turn the ignition switch to ON.
Measure the voltage according to the value(s) in the table below.
- HINT:
-
Measure the voltage at the corresponding terminals.
- Standard Voltage:
Tester Connection Condition Specified Condition C54-4 (IG) - Body ground Ignition switch ON 10.5 to 16 V G18-38 (IG+) - Body ground Ignition switch ON 10.5 to 16 V H6-7 (IG2) - Body ground Ignition switch ON 10.5 to 16 V G72-11 (IG1) - Body ground Ignition switch ON 10.5 to 16 V H4-1 (IG) - Body ground Ignition switch ON 10.5 to 16 V P8-7 (IGB) - Body ground Ignition switch ON 10.5 to 16 V B9-8 (IGB) - Body ground*1 Ignition switch ON 10.5 to 16 V Q1-5 (BLB) - Body ground Ignition switch ON 10.5 to 16 V Q13-5 (BRB) - Body ground Ignition switch ON 10.5 to 16 V G24-9 (IG+) - Body ground Ignition switch ON 10.5 to 16 V M8-1 (IG) - Body ground Ignition switch ON 10.5 to 16 V P2-4 (IG) - Body ground*2 Ignition switch ON 10.5 to 16 V P3-1 (IG) - Body ground*3 Ignition switch ON 10.5 to 16 V 4A-15 - Body ground*4 Ignition switch ON 10.5 to 16 V A39-36 (IG1) - Body ground Ignition switch ON 10.5 to 16 V G68-9 (IG1) - Body ground Ignition switch ON 10.5 to 16 V
*1: for LHD
*2: w/ Forward Recognition Camera
*3: w/o Forward Recognition Camera
*4: for Manual transaxle
Turn the headlight dimmer switch (light control switch) to the tail or head position.
Measure the voltage according to the value(s) in the table below.
- HINT:
-
Measure the voltage at the corresponding terminals.
- Standard Voltage:
Tester Connection Condition Specified Condition G24-8 (ILL+) - Body ground Headlight dimmer switch (light control switch) in tail or head position 10.5 to 16 V
- Result:
Proceed to OK NG
OK
NG
Turn the ignition switch off and wait for 1 minute.
Turn the ignition switch to ON.
Lower the audio volume.
Check if the audio and visual system operates normally.
- OK:
Audio and visual system operates normally.
- Result:
Proceed to OK NG
OK
NG
Disconnect the engine stop and start ECU connector.
Disconnect the radio and display receiver assembly connector. (w/ Display Audio System)
Disconnect the radio receiver assembly connector. (w/o Display Audio System)
Measure the resistance according to the value(s) in the table below.
- Standard Resistance:
Tester Connection Condition Specified Condition A32*1-12 (B42) or G3-4 (+B1)*3 - Body ground
G62*2-12 (B42) or G3-4 (+B1)*3 - Body groundAlways 10 kΩ or higher A32*1-12 (B42) or G66-4 (+B1)*4 - Body ground
G62*2-12 (B42) or G66-4 (+B1)*4 - Body groundAlways 10 kΩ or higher
*1: for LHD
*2: for RHD
*3: w/ Display Audio System
*4: w/o Display Audio System
- Result:
Result Proceed to OK (w/ Display Audio System) A OK (w/o Display Audio System) B NG C
A
B
C
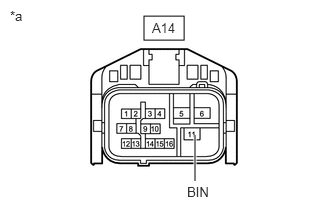
| *a | Front view of wire harness connector
(to External Backup Boost Converter (Eco Run Vehicle Converter Assembly)) |
Disconnect the external backup boost converter (eco run vehicle converter assembly) connector.
Measure the voltage according to the value(s) in the table below.
- Standard Voltage:
Tester Connection Condition Specified Condition A14-11 (BIN) - Body ground Always 9.5 to 14 V
- Result:
Proceed to OK NG
OK
NG
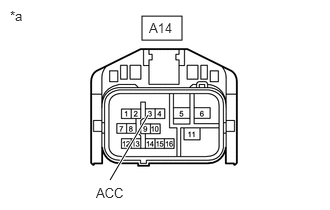
| *a | Front view of wire harness connector
(to External Backup Boost Converter (Eco Run Vehicle Converter Assembly)) |
Disconnect the external backup boost converter (eco run vehicle converter assembly) connector.
Turn the ignition switch to ACC
Measure the voltage according to the value(s) in the table below.
- Standard Voltage:
Tester Connection Condition Specified Condition A14-3 (ACC) - Body ground Ignition switch ACC 9.5 to 14 V
Turn the ignition switch off.
Measure the voltage according to the value(s) in the table below.
- Standard Voltage:
Tester Connection Condition Specified Condition A14-3 (ACC) - Body ground Ignition switch off 0 to 1 V
- Result:
Proceed to OK NG
OK
NG
Disconnect the eco run vehicle converter assembly (external backup boost converter) connector.
Measure the resistance according to the value(s) in the table below.
- Standard Resistance:
Tester Connection Condition Specified Condition A14-6 (GND) - Body ground Always Below 1 Ω
- Result:
Proceed to OK NG
OK
NG
Disconnect the external backup boost converter (eco run vehicle converter assembly) connector.
Disconnect the stereo component amplifier assembly connectors.
Measure the resistance according to the value(s) in the table below.
- Standard Resistance:
Tester Connection Condition Specified Condition A14-5 (BO1) - M2-1 (+B) Always Below 1 Ω A14-5 (BO1) - M2-16 (+B2) Always Below 1 Ω A14-12 (ACO) - M3-12 (ACC) Always Below 1 Ω A14-5 (BO1), M2-1 (+B) or M2-16 (+B2) - Body ground and other terminals Always 10 kΩ or higher A14-12 (ACO) or M3-12 (ACC) - Body ground and other terminals Always 10 kΩ or higher
- Result:
Proceed to OK NG
OK
NG
Disconnect the stereo component amplifier assembly connectors.
Measure the voltage according to the value(s) in the table below.
- Standard Voltage:
Tester Connection Condition Specified Condition M2-1 (+B) - Body ground Always 10.5 to 16 V M2-16 (+B2) - Body ground Always 10.5 to 16 V
Turn the ignition switch to ACC.
Measure the voltage according to the value(s) in the table below.
- Standard Voltage:
Tester Connection Condition Specified Condition M3-12 (ACC) - Body ground Ignition switch ACC 10.5 to 16 V
- Result:
Proceed to OK NG
OK
for Navigation system: Click hereAudio / Visual / Telematics>NAVIGATION / MULTI INFO DISPLAY>NAVIGATION SYSTEM>HOW TO PROCEED WITH TROUBLESHOOTING
for Audio and Visual System (for Radio and Display): Click hereAudio / Visual / Telematics>AUDIO / VIDEO>AUDIO AND VISUAL SYSTEM (for Radio and Display Type)>HOW TO PROCEED WITH TROUBLESHOOTING
NG
Click hereEngine / Hybrid System>STOP AND START>STOP AND START SYSTEM CANCEL SWITCH ASSEMBLY>REMOVAL
Disconnect the external backup boost converter (eco run vehicle converter assembly) connector.
Disconnect the instrument panel junction block assembly connector.
Measure the resistance according to the value(s) in the table below.
- Standard Resistance:
Tester Connection Condition Specified Condition A14-3 (ACC) - 4A-40 Always Below 1 Ω A14-3 (ACC) or 4A-40 - Body ground and other terminals Always 10 kΩ or higher
- Result:
Proceed to OK NG
OK
NG