STOP AND START STOP AND START SYSTEM(for M20A-FKS) Neutral Position Switch Circuit
DESCRIPTION
for Continuously variable transaxle:
The engine stop and start ECU uses the park/neutral position switch assembly installed to the automatic transaxle assembly to detect when the shift lever is in P or N.
for Manual transaxle:
The neutral position switch detects whether the shift lever is in neutral. When the shift lever in any position other than neutral, stop and start control is prohibited.
WIRING DIAGRAM
Refer to DTC P085012.
Click hereEngine / Hybrid System>STOP AND START>STOP AND START SYSTEM(for M20A-FKS)>P085012
Refer to DTC P085011.
Click hereEngine / Hybrid System>STOP AND START>STOP AND START SYSTEM(for M20A-FKS)>P085011
CAUTION / NOTICE / HINT
- NOTICE:
- ·
Before replacing the engine stop and start ECU, read the number of starter operations and write it into a new engine stop and start ECU.
Click hereEngine / Hybrid System>STOP AND START>STOP AND START SYSTEM(for M20A-FKS)>REGISTRATION
·After replacing the engine stop and start ECU or air conditioning amplifier assembly, reset and perform learning of the air conditioning information in the engine stop and start ECU.
Click hereEngine / Hybrid System>STOP AND START>STOP AND START SYSTEM(for M20A-FKS)>REGISTRATION
·After replacing the engine stop and start ECU or airbag ECU assembly, clear and calibrate the deceleration sensor zero point in the engine stop and start ECU.
Click hereEngine / Hybrid System>STOP AND START>STOP AND START SYSTEM(for M20A-FKS)>REGISTRATION
·for Continuously variable transaxle:
Bleed the oil pump with motor assembly (continuously variable transaxle assembly) after removing and installing the continuously variable transaxle assembly or replacing the CVT fluid.
Click hereEngine / Hybrid System>STOP AND START>STOP AND START SYSTEM(for M20A-FKS)>REGISTRATION
PROCEDURE
Connect the GTS to the DLC3.
Turn the ignition switch to ON.
Turn the GTS on.
Enter the following menus: Powertrain / Stop and Start / Data List / Neutral Switch.
- Powertrain > Stop and Start > Data List
-
Tester Display Neutral Switch - 50003 392 202
In accordance with the display on the GTS, read the Data List.
- OK:
GTS Display Condition Normal Condition Neutral Switch Shift lever in P or N ON Shift lever not in P or N OFF
- Result:
Result Proceed to OK A NG (for Continuously variable transaxle) B NG (for Manual transaxle) C
A
Click hereEngine / Hybrid System>STOP AND START>STOP AND START SYSTEM(for M20A-FKS)>PROBLEM SYMPTOMS TABLE
B
C
Inspect the park/neutral position switch assembly.
for 2WD:
Click hereDrivetrain>K120 (MULTIDRIVE / CVT)>PARK / NEUTRAL POSITION SWITCH>INSPECTION
for 4WD/AWD:
Click hereDrivetrain>K120F (MULTIDRIVE / CVT)>PARK / NEUTRAL POSITION SWITCH>INSPECTION
- Result:
Proceed to OK NG
OK
NG
for 2WD:
Click hereDrivetrain>K120 (MULTIDRIVE / CVT)>PARK / NEUTRAL POSITION SWITCH>REMOVAL
for 4WD/AWD:
Click hereDrivetrain>K120F (MULTIDRIVE / CVT)>PARK / NEUTRAL POSITION SWITCH>REMOVAL
Disconnect the engine stop and start ECU connector.
Disconnect the park/neutral position switch assembly connector.
Disconnect the ECM connector.
Disconnect the certification ECU (smart key ECU Assembly) connector. (w/ Entry and Start System)
Disconnect the ignition or starter switch assembly connector. (w/o Entry and Start System)
Remove the ST NO. 1 relay from the No. 1 engine room relay block and No. 1 junction block assembly.
Measure the resistance according to the value(s) in the table below.
- Standard Resistance:
Tester Connection Condition Specified Condition A34-21 (STA) - C31-5 (L) Always Below 1 Ω A34-17 (CLL) - C31-4 (B) Always Below 1 Ω A34-21 (STA) or C31-5 (L) - Body ground and other terminals Always 10 kΩ or higher A34-17 (CLL) or C31-4 (B) - Body ground and other terminals Always 10 kΩ or higher
- Result:
Proceed to OK NG
OK
NG
Disconnect the engine stop and start ECU connector.
Disconnect the neutral position switch connector.
Measure the resistance according to the value(s) in the table below.
- Standard Resistance:
Tester Connection Condition Specified Condition A34-26 (TMVC) - C55-1 (W1) Always Below 1 Ω A34-25 (TME2) - C55-3 (F+) Always Below 1 Ω A34-8 (TMN) - C55-2 (TMN) Always Below 1 Ω A34-26 (TMVC) or C55-1 (W1) - Body ground Always 10 kΩ or higher A34-25 (TME2) or C55-3 (F+) - Body ground Always 10 kΩ or higher A34-8 (TMN) or C55-2 (TMN) - Body ground Always 10 kΩ or higher
- Result:
Proceed to OK NG
OK
NG
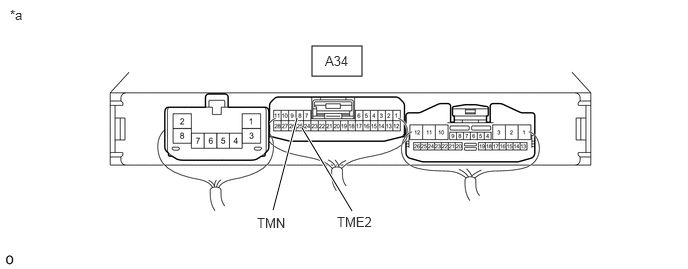
| *a | Component with harness connected
(Engine Stop and Start ECU) |
- | - |
Measure the voltage according to the value(s) in the table below.
- Standard Voltage:
Tester Connection Condition Specified Condition A34-8 (TMN) - A34-25 (TME2) Ignition switch ON, shift lever in neutral 2.7 to 4.3 V Ignition switch ON, shift lever in any position other than neutral 0.7 to 1.9 V
- Result:
Proceed to OK NG
OK
NG
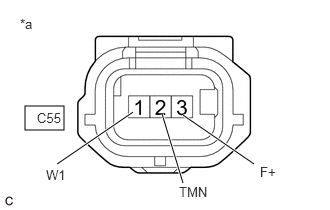
| *a | Front view of wire harness connector
(to Neutral Position Switch) |
- HINT:
-
Make sure that the connector is properly connected. If it is not, securely connect it and check for DTCs again.
Disconnect the neutral position switch connector.
Turn the ignition switch to ON.
Measure the voltage according to the value(s) in the table below.
- Standard Voltage:
Tester Connection Condition Specified Condition C55-1 (W1) - Body ground Ignition switch ON 4.5 to 5.5 V C55-2 (TMN) - Body ground Ignition switch ON 3.0 to 5.0 V
Turn the ignition switch off and wait for at least 30 seconds.
Measure the resistance according to the value(s) in the table below.
- Standard Resistance:
Tester Connection Condition Specified Condition C55-1 (W1) - C55-2 (TMN) Ignition switch off 0.95 to 1.05 kΩ C55-3 (F+) - Body ground Always Below 1 Ω
- Result:
Proceed to OK NG
OK
for 4WD/AWD:
Click hereDrivetrain>EG62F (MANUAL TRANSMISSION / TRANSAXLE)>NEUTRAL POSITION SWITCH>REMOVAL
NG