MIRROR (EXT) OUTER REAR VIEW MIRROR INSPECTION
PROCEDURE

 87940
1.INSPECT OUTER REAR VIEW MIRROR ASSEMBLY LH (w/o Foot light)
Check the operation of the mirror surface.
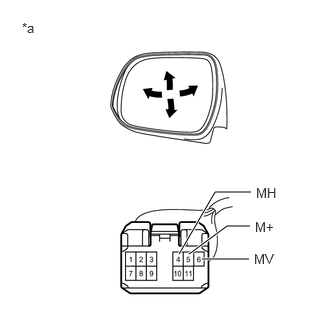
| *a | Component without harness connected
(Outer Rear View Mirror Assembly LH) |
Disconnect the outer rear view mirror assembly LH connector.
Apply auxiliary battery voltage and check the operation of the mirror.
- OK:
Auxiliary Battery Connection Specified Condition Auxiliary battery positive (+) → 6 (MV)
Auxiliary battery negative (-) → 5 (M+)Turns upward Auxiliary battery positive (+) → 5 (M+)
Auxiliary battery negative (-) → 6 (MV)Turns downward Auxiliary battery positive (+) → 5 (M+)
Auxiliary battery negative (-) → 4 (MH)Turns right Auxiliary battery positive (+) → 4 (MH)
Auxiliary battery negative (-) → 5 (M+)Turns left
If the result is not as specified, replace the outer rear view mirror assembly LH.
Check the side turn signal light assembly LH.
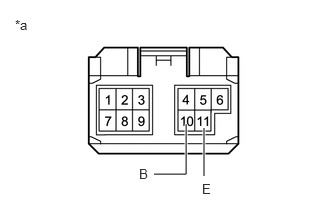
| *a | Component without harness connected
(Outer Rear View Mirror Assembly LH) |
Disconnect the outer rear view mirror assembly LH connector.
Apply auxiliary battery voltage to the terminals of the connector, and check the illumination condition.
- OK:
Auxiliary Battery Connection Specified Condition Auxiliary battery positive (+) → 10 (B)
Auxiliary battery negative (-) → 11 (E)Side turn light illuminates
If the result is not as specified, inspect the side turn signal light assembly LH or replace the outer rear view mirror assembly LH.
Click hereVehicle Exterior>LIGHTING (EXT)>SIDE TURN SIGNAL LIGHT ASSEMBLY>INSPECTION
w/ Mirror Heater, w/o Blind Spot Monitor System:
Check the operation of the mirror heater.
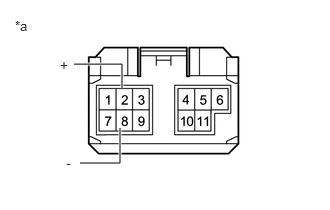
| *a | Component without harness connected
(Outer Rear View Mirror Assembly LH) |
Disconnect the outer rear view mirror assembly LH connector.
Measure the resistance according to the value(s) in the table below.
- Standard Resistance:
Tester Connection Condition Specified Condition 2 (+) - 8 (-) 25 °C (77 °F) 7.0 to 9.5 Ω
If the result is not as specified, replace the outer rear view mirror assembly LH.
Connect the cable from the positive (+) auxiliary battery terminal to terminal 2 (+) and the negative (-) auxiliary battery terminal to terminal 8 (-), and then check that the mirror becomes warm.
- HINT:
-
It takes a short time for the mirror to become warm.
- OK:
Mirror becomes warm.
If the result is not as specified, inspect the outer mirror LH or replace the outer rear view mirror assembly LH.
Click hereVehicle Exterior>MIRROR (EXT)>OUTER REAR VIEW MIRROR GLASS>INSPECTION
w/ Blind Spot Monitor System:
Check the operation of the mirror heater.
| *a | Component without harness connected
(Outer Rear View Mirror Assembly LH) |
Disconnect the outer rear view mirror assembly LH connector.
Measure the resistance according to the value(s) in the table below.
- Standard Resistance:
Tester Connection Condition Specified Condition 2 (+) - 8 (-) 25 °C (77 °F) 6.5 to 9.0 Ω
If the result is not as specified, replace the outer rear view mirror assembly LH.
Connect the cable from the positive (+) auxiliary battery terminal to terminal 2 (+) and the negative (-) auxiliary battery terminal to terminal 8 (-), and then check that the mirror becomes warm.
- HINT:
-
It takes a short time for the mirror to become warm.
- OK:
Mirror becomes warm.
If the result is not as specified, inspect the outer mirror LH or replace the outer rear view mirror assembly LH.
Click hereVehicle Exterior>MIRROR (EXT)>OUTER REAR VIEW MIRROR GLASS>INSPECTION
w/ Blind Spot Monitor System:
Check the operation of the blind spot monitor indicator.
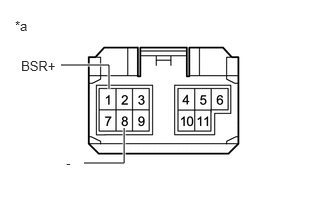
| *a | Component without harness connected
(Outer Rear View Mirror Assembly LH) |
Connect 4 new 1.5 V dry-cell batteries in series.
Apply 6 V dry-cell batteries to the terminals of the connector, and check the blind spot monitor indicator condition.
- OK:
Battery Connection Specified Condition Positive (+) end of the 6 V dry-cell battery → 1 (BSL+)
Negative (-) end of the 6 V dry-cell battery → 8 (-)Blind spot monitor indicator comes on
- NOTICE:
-
Do not apply a voltage of 6 V or higher.
If the result is not as specified, inspect the outer mirror LH or replace the outer rear view mirror assembly LH.
Click hereVehicle Exterior>MIRROR (EXT)>OUTER REAR VIEW MIRROR GLASS>INSPECTION
87966
2.INSPECT OUTER MIRROR RETRACTOR LH (w/o Foot light)
Check the operation of the retractable mirror.
- NOTICE:
- ·
Disconnect and reconnect the auxiliary battery between each mirror position check.
·The mirror position cannot be changed manually when the auxiliary battery is connected. To change the mirror position manually, the auxiliary battery must be disconnected first.
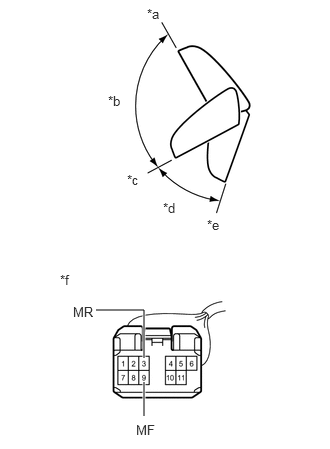
| *a | (A) Forward position |
| *b | (B) |
| *c | (C) Driving position |
| *d | (D) |
| *e | (E) Retracted position |
| *f | Component without harness connected
(Outer Rear View Mirror Assembly LH) |
Disconnect the outer rear view mirror assembly LH connector.
For each position: Disconnect the auxiliary battery, set the mirror position by hand, connect the auxiliary battery, and check the retractable mirror movement.
- OK:
Auxiliary Battery Connection Condition Specified Condition Auxiliary battery positive (+) → 3 (MR)
Auxiliary battery negative (-) → 9 (MF)Forward position (A) Moves from (A) to (E) Auxiliary battery positive (+) → 9 (MF)
Auxiliary battery negative (-) → 3 (MR)Forward position (A) Does not move Auxiliary battery positive (+) → 3 (MR)
Auxiliary battery negative (-) → 9 (MF)Position between forward position (A) and driving position (C) Moves from (B) to (E) Auxiliary battery positive (+) → 9 (MF)
Auxiliary battery negative (-) → 3 (MR)Position between forward position (A) and driving position (C) Moves from (B) to (A) Auxiliary battery positive (+) → 3 (MR)
Auxiliary battery negative (-) → 9 (MF)Driving position (C) Moves from (C) to (E) Auxiliary battery positive (+) → 9 (MF)
Auxiliary battery negative (-) → 3 (MR)Driving position (C) Does not move Auxiliary battery positive (+) → 3 (MR)
Auxiliary battery negative (-) → 9 (MF)Position between driving position (C) and retracted position (E) Moves from (D) to (E) Auxiliary battery positive (+) → 9 (MF)
Auxiliary battery negative (-) → 3 (MR)Position between driving position (C) and retracted position (E) Moves from (D) to (C) Auxiliary battery positive (+) → 3 (MR)
Auxiliary battery negative (-) → 9 (MF)Retracted position (E) Does not move Auxiliary battery positive (+) → 9 (MF)
Auxiliary battery negative (-) → 3 (MR)Retracted position (E) Moves from (E) to (C)
If the result is not as specified, replace the outer mirror retractor LH.
87910
3.INSPECT OUTER REAR VIEW MIRROR ASSEMBLY RH (w/o Foot light)
Check the operation of the mirror surface.
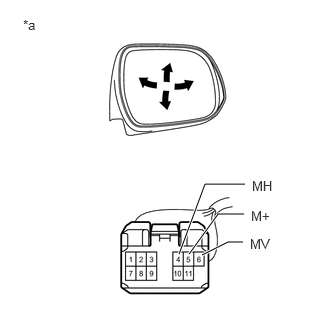
| *a | Component without harness connected
(Outer Rear View Mirror Assembly RH) |
Disconnect the outer rear view mirror assembly RH connector.
Apply auxiliary battery voltage and check the operation of the mirror.
- OK:
Auxiliary Battery Connection Specified Condition Auxiliary battery positive (+) → 6 (MV)
Auxiliary battery negative (-) → 5 (M+)Turns upward Auxiliary battery positive (+) → 5 (M+)
Auxiliary battery negative (-) → 6 (MV)Turns downward Auxiliary battery positive (+) → 4 (MH)
Auxiliary battery negative (-) → 5 (M+)Turns left Auxiliary battery positive (+) → 5 (M+)
Auxiliary battery negative (-) → 4 (MH)Turns right
If the result is not as specified, replace the outer rear view mirror assembly RH.
Check the side turn signal light assembly RH.
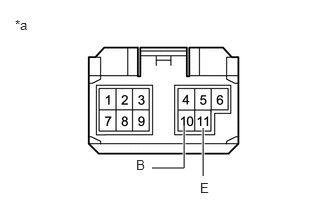
| *a | Component without harness connected
(Outer Rear View Mirror Assembly RH) |
Disconnect the outer rear view mirror assembly RH connector.
Apply auxiliary battery voltage to the terminals of the connector, and check the illumination condition.
- OK:
Auxiliary Battery Connection Specified Condition Auxiliary battery positive (+) → 10 (B)
Auxiliary battery negative (-) → 11 (E)Side turn light illuminates
If the result is not as specified, inspect the side turn signal light assembly RH or replace the outer rear view mirror assembly RH.
Click hereVehicle Exterior>LIGHTING (EXT)>SIDE TURN SIGNAL LIGHT ASSEMBLY>INSPECTION
w/ Mirror Heater, w/o Blind Spot Monitor System:
Check the operation of the mirror heater.
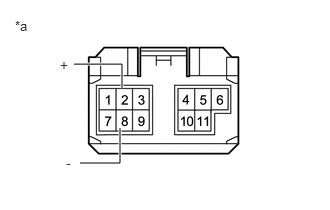
| *a | Component without harness connected
(Outer Rear View Mirror Assembly RH) |
Disconnect the outer rear view mirror assembly RH connector.
Measure the resistance according to the value(s) in the table below.
- Standard Resistance:
Tester Connection Condition Specified Condition 2 (+) - 8 (-) 25 °C (77 °F) 7.0 to 9.5 Ω
If the result is not as specified, replace the outer rear view mirror assembly RH.
Connect the cable from the positive (+) auxiliary battery terminal to terminal 2 (+) and the negative (-) auxiliary battery terminal to terminal 8 (-), and then check that the mirror becomes warm.
- HINT:
-
It takes a short time for the mirror to become warm.
- OK:
Mirror becomes warm.
If the result is not as specified, inspect the outer mirror RH or replace the outer rear view mirror assembly RH.
Click hereVehicle Exterior>MIRROR (EXT)>OUTER REAR VIEW MIRROR GLASS>INSPECTION
w/ Blind Spot Monitor System:
Check the operation of the mirror heater.
| *a | Component without harness connected
(Outer Rear View Mirror Assembly RH) |
Disconnect the outer rear view mirror assembly RH connector.
Measure the resistance according to the value(s) in the table below.
- Standard Resistance:
Tester Connection Condition Specified Condition 2 (+) - 8 (-) 25 °C (77 °F) 6.5 to 9.0 Ω
If the result is not as specified, replace the outer rear view mirror assembly RH.
Connect the cable from the positive (+) auxiliary battery terminal to terminal 2 (+) and the negative (-) auxiliary battery terminal to terminal 8 (-), and then check that the mirror becomes warm.
- HINT:
-
It takes a short time for the mirror to become warm.
- OK:
Mirror becomes warm.
If the result is not as specified, inspect the outer mirror RH or replace the outer rear view mirror assembly RH.
Click hereVehicle Exterior>MIRROR (EXT)>OUTER REAR VIEW MIRROR GLASS>INSPECTION
w/ Blind Spot Monitor System:
Check the operation of the blind spot monitor indicator.
| *a | Component without harness connected
(Outer Rear View Mirror Assembly RH) |
Connect 4 new 1.5 V dry-cell batteries in series.
Apply 6 V dry-cell batteries to the terminals of the connector, and check the blind spot monitor indicator condition.
- OK:
Battery Connection Specified Condition Positive (+) end of the 6 V dry-cell battery → 1 (BSR+)
Negative (-) end of the 6 V dry-cell battery → 8 (-)Blind spot monitor indicator comes on
- NOTICE:
-
Do not apply a voltage of 6 V or higher.
If the result is not as specified, inspect the outer mirror RH or replace the outer rear view mirror assembly RH.
Click hereVehicle Exterior>MIRROR (EXT)>OUTER REAR VIEW MIRROR GLASS>INSPECTION
87946
4.INSPECT OUTER MIRROR RETRACTOR RH (w/o Foot light)
Check the operation of the retractable mirror.
- NOTICE:
- ·
Disconnect and reconnect the auxiliary battery between each mirror position check.
·The mirror position cannot be changed manually when the auxiliary battery is connected. To change the mirror position manually, the auxiliary battery must be disconnected first.
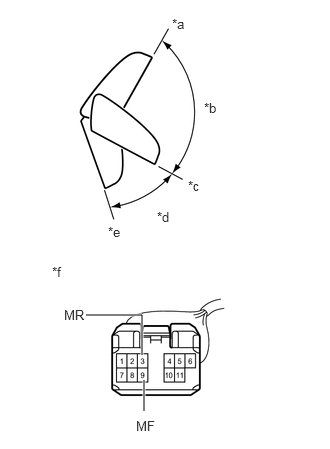
| *a | (A) Forward position |
| *b | (B) |
| *c | (C) Driving position |
| *d | (D) |
| *e | (E) Retracted position |
| *f | Component without harness connected
(Outer Rear View Mirror Assembly RH) |
Disconnect the outer rear view mirror assembly RH connector.
For each position: Disconnect the battery, set the mirror position by hand, connect the battery, and check the retractable mirror movement.
- OK:
Auxiliary Battery Connection Condition Specified Condition Auxiliary battery positive (+) → 3 (MR)
Auxiliary battery negative (-) → 9 (MF)Forward position (A) Moves from (A) to (E) Auxiliary battery positive (+) → 9 (MF)
Auxiliary battery negative (-) → 3 (MR)Forward position (A) Does not move Auxiliary battery positive (+) → 3 (MR)
Auxiliary battery negative (-) → 9 (MF)Position between forward position (A) and driving position (C) Moves from (B) to (E) Auxiliary battery positive (+) → 9 (MF)
Auxiliary battery negative (-) → 3 (MR)Position between forward position (A) and driving position (C) Moves from (B) to (A) Auxiliary battery positive (+) → 3 (MR)
Auxiliary battery negative (-) → 9 (MF)Driving position (C) Moves from (C) to (E) Auxiliary battery positive (+) → 9 (MF)
Auxiliary battery negative (-) → 3 (MR)Driving position (C) Does not move Auxiliary battery positive (+) → 3 (MR)
Auxiliary battery negative (-) → 9 (MF)Position between driving position (C) and retracted position (E) Moves from (D) to (E) Auxiliary battery positive (+) → 9 (MF)
Auxiliary battery negative (-) → 3 (MR)Position between driving position (C) and retracted position (E) Moves from (D) to (C) Auxiliary battery positive (+) → 3 (MR)
Auxiliary battery negative (-) → 9 (MF)Retracted position (E) Does not move Auxiliary battery positive (+) → 9 (MF)
Auxiliary battery negative (-) → 3 (MR)Retracted position (E) Moves from (E) to (C)
If the result is not as specified, replace the outer mirror retractor RH.
87940
5.INSPECT OUTER REAR VIEW MIRROR ASSEMBLY LH (w/ Foot light)
Check the operation of the retractable mirror.
- NOTICE:
- ·
Disconnect and reconnect the auxiliary battery between each mirror position check.
·The mirror position cannot be changed manually when the auxiliary battery is connected. To change the mirror position manually, the auxiliary battery must be disconnected first.
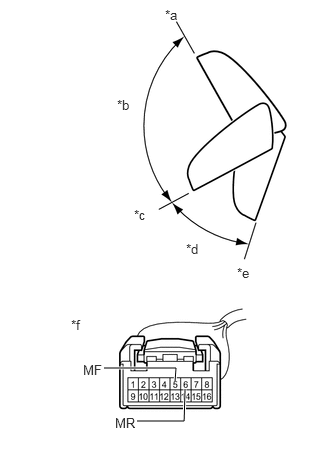
| *a | (A) Forward position |
| *b | (B) |
| *c | (C) Driving position |
| *d | (D) |
| *e | (E) Retracted position |
| *f | Component without harness connected
(Outer Rear View Mirror Assembly LH) |
Disconnect the outer rear view mirror assembly LH connector.
For each position: Disconnect the battery, set the mirror position by hand, connect the battery, and check the retractable mirror movement.
- OK:
Auxiliary Battery Connection Condition Specified Condition Auxiliary battery positive (+) → 6 (MR)
Auxiliary battery negative (-) → 5 (MF)Forward position (A) Moves from (A) to (E) Auxiliary battery positive (+) → 5 (MF)
Auxiliary battery negative (-) → 6 (MR)Forward position (A) Does not move Auxiliary battery positive (+) → 6 (MR)
Auxiliary battery negative (-) → 5 (MF)Position between forward position (A) and driving position (C) Moves from (B) to (E) Auxiliary battery positive (+) → 5 (MF)
Auxiliary battery negative (-) → 6 (MR)Position between forward position (A) and driving position (C) Moves from (B) to (A) Auxiliary battery positive (+) → 6 (MR)
Auxiliary battery negative (-) → 5 (MF)Driving position (C) Moves from (C) to (E) Auxiliary battery positive (+) → 5 (MF)
Auxiliary battery negative (-) → 6 (MR)Driving position (C) Does not move Auxiliary battery positive (+) → 6 (MR)
Auxiliary battery negative (-) → 5 (MF)Position between driving position (C) and retracted position (E) Moves from (D) to (E) Auxiliary battery positive (+) → 5 (MF)
Auxiliary battery negative (-) → 6 (MR)Position between driving position (C) and retracted position (E) Moves from (D) to (C) Auxiliary battery positive (+) → 6 (MR)
Auxiliary battery negative (-) → 5 (MF)Retracted position (E) Does not move Auxiliary battery positive (+) → 5 (MF)
Auxiliary battery negative (-) → 6 (MR)Retracted position (E) Moves from (E) to (C)
If the result is not as specified, replace the outer rear view mirror assembly LH.
Check the operation of the mirror surface.
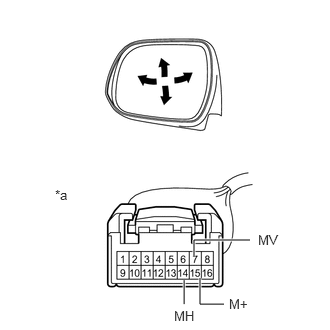
| *a | Component without harness connected
(Outer Rear View Mirror Assembly LH) |
Disconnect the outer rear view mirror assembly LH connector.
Apply auxiliary battery voltage and check the operation of the mirror.
- OK:
Auxiliary Battery Connection Specified Condition Auxiliary battery positive (+) → 7 (MV)
Auxiliary battery negative (-) → 15 (M+)Turns upward Auxiliary battery positive (+) → 15 (M+)
Auxiliary battery negative (-) → 7 (MV)Turns downward Auxiliary battery positive (+) → 15 (M+)
Auxiliary battery negative (-) → 14 (MH)Turns right Auxiliary battery positive (+) → 14 (MH)
Auxiliary battery negative (-) → 15 (M+)Turns left
If the result is not as specified, replace the outer rear view mirror assembly LH.
Check the side turn signal light assembly LH.
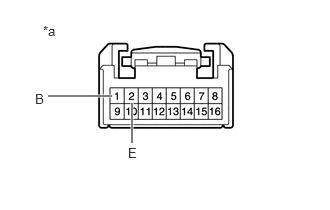
| *a | Component without harness connected
(Outer Rear View Mirror Assembly LH) |
Disconnect the outer rear view mirror assembly LH connector.
Apply auxiliary battery voltage to the terminals of the connector, and check the illumination condition.
- OK:
Auxiliary Battery Connection Specified Condition Auxiliary battery positive (+) → 1 (B)
Auxiliary battery negative (-) → 2 (E)Side turn light illuminates
If the result is not as specified, inspect the side turn signal light assembly LH or replace the outer rear view mirror assembly LH.
Click hereVehicle Exterior>LIGHTING (EXT)>SIDE TURN SIGNAL LIGHT ASSEMBLY>INSPECTION
Check the operation of the mirror heater.
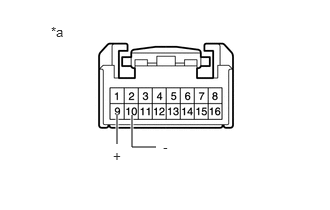
| *a | Component without harness connected
(Outer Rear View Mirror Assembly LH) |
Disconnect the outer rear view mirror assembly LH connector.
Measure the resistance according to the value(s) in the table below.
- Standard Resistance:
Tester Connection Condition Specified Condition 9 (+) - 10 (-) 25 °C (77 °F) 6.5 to 9.0 Ω
If the result is not as specified, replace the outer rear view mirror assembly LH.
Connect the cable from the positive (+) auxiliary battery terminal to terminal 9 (+) and the negative (-) auxiliary battery terminal to terminal 10 (-), and then check that the mirror becomes warm.
- HINT:
-
It takes a short time for the mirror to become warm.
- OK:
Mirror becomes warm.
If the result is not as specified, inspect the outer mirror LH or replace the outer mirror actuator assembly LH.
Click hereVehicle Exterior>MIRROR (EXT)>OUTER REAR VIEW MIRROR GLASS>INSPECTION
Check the mirror light illumination.
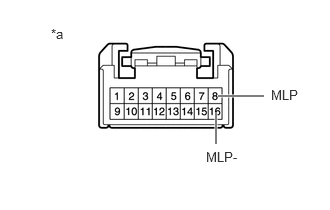
| *a | Component without harness connected
(Outer Rear View Mirror Assembly LH) |
Disconnect the outer rear view mirror assembly LH connector.
Apply auxiliary battery voltage to the terminals of the connector, and check the illumination condition.
- OK:
Auxiliary Battery Connection Specified Condition Auxiliary battery positive (+) → 8 (MLP)
Auxiliary battery negative (-) → 16 (MLP-)Mirror light illuminates
If the result is not as specified, replace the outer rear view mirror assembly LH.
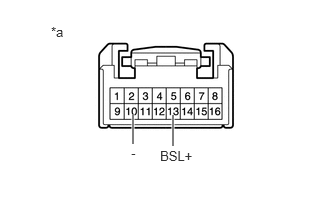
| *a | Component without harness connected
(Outer Rear View Mirror Assembly LH) |
Check the operation of the blind spot monitor indicator.
Connect 4 new 1.5 V dry-cell batteries in series.
Apply 6 V dry-cell batteries to the terminals of the connector, and check the blind spot monitor indicator condition.
- OK:
Battery Connection Specified Condition Positive (+) end of the 6 V dry-cell battery → 13 (BSL+)
Negative (-) end of the 6 V dry-cell battery → 10 (-)Blind spot monitor indicator comes on
- NOTICE:
-
Do not apply a voltage of 6 V or higher.
If the result is not as specified, inspect the outer mirror LH or replace the outer rear view mirror assembly LH.
Click hereVehicle Exterior>MIRROR (EXT)>OUTER REAR VIEW MIRROR GLASS>INSPECTION
87910
6.INSPECT OUTER REAR VIEW MIRROR ASSEMBLY RH (w/ Foot light)
Check the operation of the retractable mirror.
- NOTICE:
- ·
Disconnect and reconnect the auxiliary battery between each mirror position check.
·The mirror position cannot be changed manually when the auxiliary battery is connected. To change the mirror position manually, the auxiliary battery must be disconnected first.
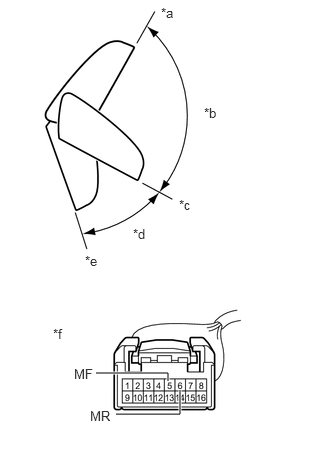
| *a | (A) Forward position |
| *b | (B) |
| *c | (C) Driving position |
| *d | (D) |
| *e | (E) Retracted position |
| *f | Component without harness connected
(Outer Rear View Mirror Assembly RH) |
Disconnect the outer rear view mirror assembly RH connector.
For each position: Disconnect the battery, set the mirror position by hand, connect the battery, and check the retractable mirror movement.
- OK:
Auxiliary Battery Connection Condition Specified Condition Auxiliary battery positive (+) → 6 (MR)
Auxiliary battery negative (-) → 5 (MF)Forward position (A) Moves from (A) to (E) Auxiliary battery positive (+) → 5 (MF)
Auxiliary battery negative (-) → 6 (MR)Forward position (A) Does not move Auxiliary battery positive (+) → 6 (MR)
Auxiliary battery negative (-) → 5 (MF)Position between forward position (A) and driving position (C) Moves from (B) to (E) Auxiliary battery positive (+) → 5 (MF)
Auxiliary battery negative (-) → 6 (MR)Position between forward position (A) and driving position (C) Moves from (B) to (A) Auxiliary battery positive (+) → 6 (MR)
Auxiliary battery negative (-) → 5 (MF)Driving position (C) Moves from (C) to (E) Auxiliary battery positive (+) → 5 (MF)
Auxiliary battery negative (-) → 6 (MR)Driving position (C) Does not move Auxiliary battery positive (+) → 6 (MR)
Auxiliary battery negative (-) → 5 (MF)Position between driving position (C) and retracted position (E) Moves from (D) to (E) Auxiliary battery positive (+) → 5 (MF)
Auxiliary battery negative (-) → 6 (MR)Position between driving position (C) and retracted position (E) Moves from (D) to (C) Auxiliary battery positive (+) → 6 (MR)
Auxiliary battery negative (-) → 5 (MF)Retracted position (E) Does not move Auxiliary battery positive (+) → 5 (MF)
Auxiliary battery negative (-) → 6 (MR)Retracted position (E) Moves from (E) to (C)
If the result is not as specified, replace the outer rear view mirror assembly RH.
Check the operation of the mirror surface.
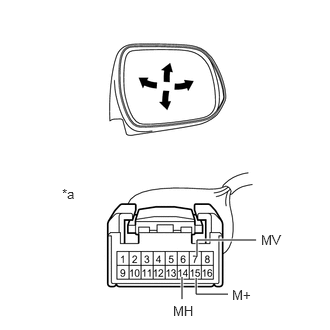
| *a | Component without harness connected
(Outer Rear View Mirror Assembly RH) |
Disconnect the outer rear view mirror assembly RH connector.
Apply auxiliary battery voltage and check the operation of the mirror.
- OK:
Auxiliary Battery Connection Specified Condition Auxiliary battery positive (+) → 7 (MV)
Auxiliary battery negative (-) → 15 (M+)Turns upward Auxiliary battery positive (+) → 15 (M+)
Auxiliary battery negative (-) → 7 (MV)Turns downward Auxiliary battery positive (+) → 14 (MH)
Auxiliary battery negative (-) → 15 (M+)Turns left Auxiliary battery positive (+) → 15 (M+)
Auxiliary battery negative (-) → 14 (MH)Turns right
If the result is not as specified, replace the outer rear view mirror assembly RH.
Check the side turn signal light assembly RH.
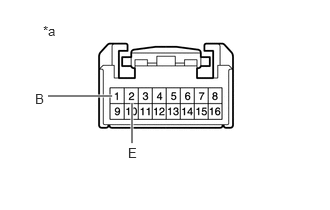
| *a | Component without harness connected
(Outer Rear View Mirror Assembly RH) |
Disconnect the outer rear view mirror assembly RH connector.
Apply auxiliary battery voltage to the terminals of the connector, and check the illumination condition.
- OK:
Auxiliary Battery Connection Specified Condition Auxiliary battery positive (+) → 1 (B)
Auxiliary battery negative (-) → 2 (E)Side turn light illuminates
If the result is not as specified, inspect the side turn signal light assembly RH or replace the outer rear view mirror assembly RH.
Click hereVehicle Exterior>LIGHTING (EXT)>SIDE TURN SIGNAL LIGHT ASSEMBLY>INSPECTION
Check the operation of the mirror heater.
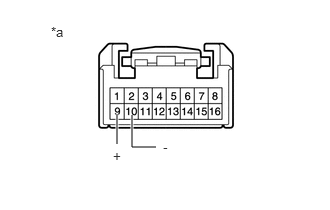
| *a | Component without harness connected
(Outer Rear View Mirror Assembly RH) |
Disconnect the outer rear view mirror assembly RH connector.
Measure the resistance according to the value(s) in the table below.
- Standard Resistance:
Tester Connection Condition Specified Condition 9 (+) - 10 (-) 25 °C (77 °F) 6.5 to 9.0 Ω
If the result is not as specified, replace the outer rear view mirror assembly RH.
Connect the cable from the positive (+) auxiliary battery terminal to terminal 9 (+) and the negative (-) auxiliary battery terminal to terminal 10 (-), and then check that the mirror becomes warm.
- HINT:
-
It takes a short time for the mirror to become warm.
- OK:
Mirror becomes warm.
If the result is not as specified, inspect the outer mirror RH or replace the outer mirror actuator assembly RH.
Click hereVehicle Exterior>MIRROR (EXT)>OUTER REAR VIEW MIRROR GLASS>INSPECTION
Check the mirror light illumination.
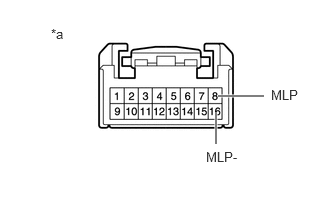
| *a | Component without harness connected
(Outer Rear View Mirror Assembly RH) |
Disconnect the outer rear view mirror assembly RH connector.
Apply auxiliary battery voltage to the terminals of the connector, and check the illumination condition.
- OK:
Auxiliary Battery Connection Specified Condition Auxiliary battery positive (+) → 8 (MLP)
Auxiliary battery negative (-) → 16 (MLP-)Mirror light illuminates
If the result is not as specified, replace the outer rear view mirror assembly RH.
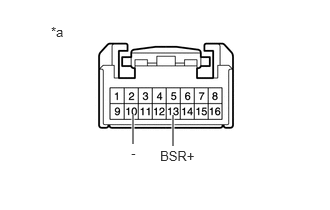
| *a | Component without harness connected
(Outer Rear View Mirror Assembly RH) |
Check the operation of the blind spot monitor indicator.
Connect 4 new 1.5 V dry-cell batteries in series.
Apply 6 V dry-cell batteries to the terminals of the connector, and check the blind spot monitor indicator condition.
- OK:
Battery Connection Specified Condition Positive (+) end of the 6 V dry-cell battery → 13 (BSR+)
Negative (-) end of the 6 V dry-cell battery → 10 (-)Blind spot monitor indicator comes on
- NOTICE:
-
Do not apply a voltage of 6 V or higher.
If the result is not as specified, inspect the outer mirror RH or replace the outer rear view mirror assembly RH.
Click hereVehicle Exterior>MIRROR (EXT)>OUTER REAR VIEW MIRROR GLASS>INSPECTION