A25A-FXS LUBRICATION OIL PUMP REMOVAL
CAUTION / NOTICE / HINT
The necessary procedures (adjustment, calibration, initialization, or registration) that must be performed after parts are removed and installed, or replaced during oil pump removal/installation are shown below.
| Replaced Part or Performed Procedure | Necessary Procedure | Effect/Inoperative Function when Necessary Procedure not Performed | Link |
|---|---|---|---|
|
*: When performing learning using the GTS. Click here( |
|||
| Auxiliary battery terminal is disconnected/reconnected | Perform steering sensor zero point calibration | Lane control system | ( ) |
| Parking support brake system (for HV model)* | |||
| Pre-collision system | |||
| Memorize steering angle neutral point | Parking assist monitor system | ()
|
|
| Panoramic view monitor system (for HV model) | ()
|
||
| Reset back door close position | Power back door system (for HV model) | ()
|
|
| Power back door initialization | Power door lock control system | ()
|
|
| Replacement of ECM | w/ Canister Pump Module:
Perform Vehicle Identification Number (VIN) registration |
DTC P063051 is output | ()
|
w/o Canister Pump Module:
Perform Vehicle Identification Number (VIN) or frame number registration |
()
|
||
·
Replacement of engine assembly ·
Gas leak from exhaust system is repaired ·
Replacement of throttle body with motor assembly ·
Replacement of cam timing control motor with EDU assembly ·
Removal and installation of a cam timing control motor with EDU assembly ·
Replacement of camshaft timing gear assembly ·
Removal and installation of a camshaft timing gear assembly ·
Replacement of cylinder head sub-assembly ·
Replacement of camshaft (for intake or exhaust camshaft) ·
Replacement of camshaft timing exhaust gear assembly ·
Replacement of port fuel injector assembly ·
Replacement of direct fuel injector assembly ·
Replacement of fuel pump assembly (for high pressure side) ·
Replacement of engine coolant temperature sensor ·
Replacement of spark plug ·
Replacement of ignition coil assembly ·
Replacement of EGR valve assembly ·
Replacement of knock control sensor ·
Replacement of air fuel ratio sensor (sensor 2) |
Inspection after repair | ·
Poor idle, etc. ·
Engine start function, etc. |
()(w/ Canister Pump Module)
( )(w/o Canister Pump Module)
|
| Replacement of inverter with converter assembly | Resolver learning | ·
DTCs are stored ·
Slight vibration at a vehicle speed of 5 km/h (3 mph) or less ·
Shock or vibration during acceleration |
()
|
| Replacement of hybrid vehicle transaxle assembly | ·
Resolver learning ·
Initialize resolver |
||
| Suspension, tires, etc.
(The vehicle height changes because of suspension or tire replacement) |
Rear television camera assembly optical axis (Back camera position setting) | Parking assist monitor system | ()for Initialization
( )for Calibration
|
| Replacement of headlight ECU sub-assembly LH | ·
Synchronize the vehicle information ·
Perform headlight ECU sub-assembly LH initialization |
Lighting system (EXT) | ()
|
| Suspension, tires, etc.
(The vehicle height changes because of suspension or tire replacement) |
Perform headlight ECU sub-assembly LH initialization | ||
| Front wheel alignment adjustment | 1.
Clear the zero point calibration data and stored linear solenoid valve calibration data. 2.
Perform initialization and calibration of the linear solenoid valve. 3.
Perform yaw rate and acceleration sensor zero point calibration. |
·
DTCs are stored ·
ABS warning light illuminates ·
Brake warning light / yellow (minor malfunction) illuminates ·
Slip indicator light illuminates ·
VSC disabled or malfunctions |
()
|
| Front bumper assembly (Including removal and installation) | ·
Ultrasonic sensor detection angle ·
Ultrasonic sensor detection angle registration |
Parking support brake system (for HV model) | ()
|
| Front television camera view adjustment | Panoramic view monitor system (for HV model) | ()
|
|
- NOTICE:
- ·
After the power switch is turned off, the navigation system requires approximately a minute to record various types of memory and settings. As a result, after turning the power switch off, wait a minute or more before disconnecting the cable from the negative (-) auxiliary battery terminal.
·This procedure includes the removal of small-head bolts. Refer to Small-Head Bolts of Basic Repair Hint to identify the small-head bolts.
Click hereGeneral>INTRODUCTION>REPAIR INSTRUCTION>PRECAUTION
PROCEDURE

 11310
1.REMOVE TIMING CHAIN COVER ASSEMBLY
12102A
2.REMOVE NO. 2 OIL PAN SUB-ASSEMBLY
15104
3.REMOVE OIL STRAINER SUB-ASSEMBLY
89491
4.REMOVE ENGINE OIL LEVEL SENSOR
15167
5.REMOVE OIL PUMP BRACKET
13620B
6.REMOVE ENGINE BALANCER ASSEMBLY
15100
7.REMOVE OIL PUMP ASSEMBLY
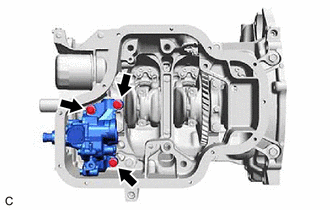
Remove the 3 bolts and oil pump assembly from the stiffening crankcase assembly.
11420
8.REMOVE STIFFENING CRANKCASE ASSEMBLY