MAINTENANCE REAR BRAKE FLEXIBLE HOSE REMOVAL
CAUTION / NOTICE / HINT
The necessary procedures (adjustment, calibration, initialization, or registration) that must be performed after parts are removed and installed, or replaced during rear flexible hose removal/installation are shown below.
| Replaced Part or Performed Procedure | Necessary Procedure | Effect/Inoperative Function when Necessary Procedure not Performed | Link |
|---|---|---|---|
|
*1: When performing learning using the GTS. Click here( |
|||
| Auxiliary battery terminal is disconnected/reconnected | Perform steering sensor zero point calibration | Lane control system | ( ) |
| Parking support brake system (for HV model)* | |||
| Pre-collision system | |||
| Memorize steering angle neutral point | Parking assist monitor system | ()
|
|
| Panoramic view monitor system (for HV model) | ()
|
||
| Reset back door close position | Power back door system (for HV model) | ()
|
|
| Power back door initialization | Power door lock control system | ()
|
|
- NOTICE:
- ·
If both left and right rear flexible hoses are disconnected at the same time, be sure to place an identification mark on each hose to indicate its installation position.
·After the ignition switch is turned off, the navigation system requires approximately a minute to record various types of memory and settings. As a result, after turning the power switch off, wait a minute or more before disconnecting the cable from the negative (-) auxiliary battery terminal. (w/o vacuum brake booster)
- HINT:
- ·
Use the same procedure for the RH side and LH side.
·The following procedure is for the LH side.
PROCEDURE

 1. PRECAUTION (w/o Vacuum Brake Booster)
- NOTICE:
-
After turning the ignition switch off, waiting time may be required before disconnecting the cable from the negative (-) auxiliary battery terminal. Therefore, make sure to read the disconnecting the cable from the negative (-) auxiliary battery terminal notices before proceeding with work.
2.REMOVE REAR WHEEL
3.DISABLE BRAKE CONTROL (w/o Vacuum Brake Booster)
4.DRAIN BRAKE FLUID
- NOTICE:
-
If brake fluid leaks onto any painted surface, immediately wash it off.
47319F
5.REMOVE REAR FLEXIBLE HOSE LH
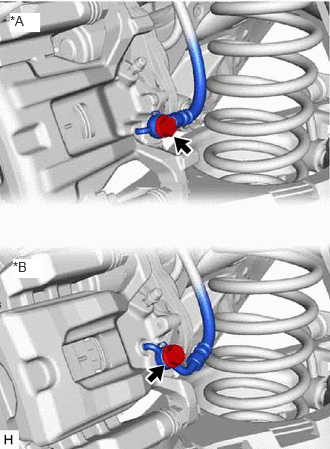
| *A | for Type A |
| *B | for Type B |
Remove the union bolt and gasket, and disconnect the rear flexible hose LH from the rear disc brake cylinder assembly.
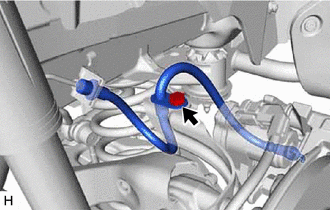
Remove the bolt and separate the rear flexible hose LH from the rear flexible hose bracket.
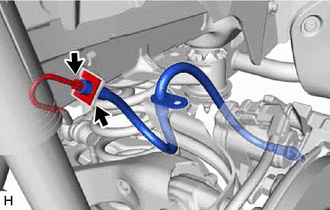
Using a union nut wrench, disconnect the brake line while holding the rear flexible hose LH with a wrench.
- NOTICE:
- ·
Do not kink or damage the brake line.
·Do not allow any foreign matter such as dirt or dust to enter the brake line from the connecting parts.
Remove the clip and rear flexible hose LH from the vehicle body.