EXTERIOR PANELS / TRIM GRILLE SHUTTER REASSEMBLY
PROCEDURE

 53158E
1.INSTALL NO. 4 RADIATOR GRILLE SEAL (for RH Side)
- HINT:
-
When installing a new No. 4 radiator grille seal, heat the radiator shutter sub-assembly using a heat light.
- Standard:
Item Temperature Radiator Shutter Sub-assembly 20 to 30°C (68 to 86°F)
- CAUTION:
-
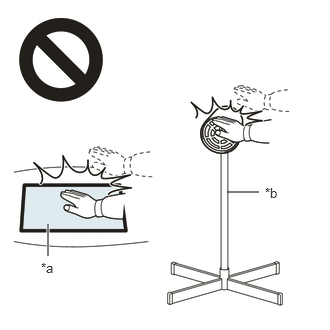 2.365,2 2.698,2 false 0.5,2.333 0.5,2.667 true 0.427,2.708 0.74,2.865 0.313,0.156 10 false *a 2.76,1.927 3.073,2.083 0.313,0.156 10 false *b
*a Heated Part *b Heat Light
- ·
Do not touch the heat light and heated parts.
·Touching the heat light may result in burns.
·Touching heated parts for a long time may result in burns.
- NOTICE:
-
Do not heat the radiator shutter sub-assembly excessively.
When reusing the radiator shutter sub-assembly:
Using a heat light, heat the radiator shutter sub-assembly surface.
Remove any remaining double-sided tape from the radiator shutter sub-assembly.
Wipe off any tape adhesive residue with cleaner.
- NOTICE:
- ·
Installing the radiator shutter sub-assembly with some double-sided tape remaining may cause poor adhesion. Perform this procedure until the tape is sufficiently removed.
·Make sure to use a cloth when removing. Using a screwdriver, etc., may cause damage and poor adhesion.
·Also, clean a new radiator shutter sub-assembly surface.
Remove the release paper of a new No. 4 radiator grille seal trying not to touch the adhesional surface.
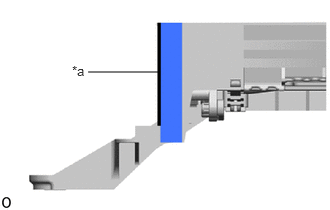
| *a | Rib |
Install the No. 4 radiator grille seal as shown in the illustration.
53156G
2.INSTALL NO. 2 RADIATOR GRILLE SEAL
- HINT:
-
When installing a new No. 2 radiator grille seal, heat the radiator shutter sub-assembly using a heat light.
- Standard:
Item Temperature Radiator Shutter Sub-assembly 20 to 30°C (68 to 86°F)
- CAUTION:
-
2.365,2 2.698,2 false 0.5,2.333 0.5,2.667 true 0.427,2.708 0.74,2.865 0.313,0.156 10 false *a 2.76,1.927 3.073,2.083 0.313,0.156 10 false *b
*a Heated Part *b Heat Light
- ·
Do not touch the heat light and heated parts.
·Touching the heat light may result in burns.
·Touching heated parts for a long time may result in burns.
- NOTICE:
-
Do not heat the radiator shutter sub-assembly excessively.
When reusing the radiator shutter sub-assembly:
Using a heat light, heat the radiator shutter sub-assembly surface.
Remove any remaining double-sided tape from the radiator shutter sub-assembly.
Wipe off any tape adhesive residue with cleaner.
- NOTICE:
- ·
Installing the radiator shutter sub-assembly with some double-sided tape remaining may cause poor adhesion. Perform this procedure until the tape is sufficiently removed.
·Make sure to use a cloth when removing. Using a screwdriver, etc., may cause damage and poor adhesion.
·Also, clean a new radiator shutter sub-assembly surface.
Remove the release paper of a new No. 2 radiator grille seal trying not to touch the adhesional surface.
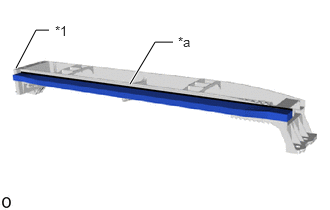
| *1 | No. 4 Radiator Grille Seal (RH Side) |
| *a | Rib |
Install the No. 2 radiator grille seal as shown in the illustration.
53158E
3.INSTALL NO. 4 RADIATOR GRILLE SEAL (for LH Side)
- HINT:
-
When installing the No. 4 radiator grille seal, heat the radiator shutter sub-assembly using a heat light.
- Standard:
Item Temperature Radiator Shutter Sub-assembly 20 to 30°C (68 to 86°F)
- CAUTION:
-
2.365,2 2.698,2 false 0.5,2.333 0.5,2.667 true 0.427,2.708 0.74,2.865 0.313,0.156 10 false *a 2.76,1.927 3.073,2.083 0.313,0.156 10 false *b
*a Heated Part *b Heat Light
- ·
Do not touch the heat light and heated parts.
·Touching the heat light may result in burns.
·Touching heated parts for a long time may result in burns.
- NOTICE:
-
Do not heat the radiator shutter sub-assembly excessively.
When reusing the radiator shutter sub-assembly:
Using a heat light, heat the radiator shutter sub-assembly surface.
Remove any remaining double-sided tape from the radiator shutter sub-assembly.
Wipe off any tape adhesive residue with cleaner.
- NOTICE:
- ·
Installing the radiator shutter sub-assembly with some double-sided tape remaining may cause poor adhesion. Perform this procedure until the tape is sufficiently removed.
·Make sure to use a cloth when removing. Using a screwdriver, etc., may cause damage and poor adhesion.
·Also, clean a new radiator shutter sub-assembly surface.
Remove the release paper of a new No. 4 radiator grille seal trying not to touch the adhesional surface.
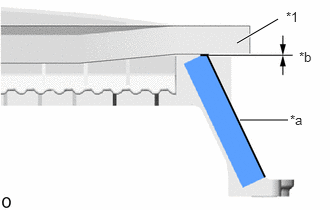
| *1 | No. 2 Radiator Grille Seal |
| *a | Line |
| *b | 0 to 3 mm (0 to 0.118 in.) |
Install the No. 4 radiator grille seal as shown in the illustration.
53155J
4.INSTALL NO. 1 RADIATOR GRILLE SEAL
- HINT:
-
When installing a new No. 1 radiator grille seal, heat the radiator shutter sub-assembly using a heat light.
- Standard:
Item Temperature Radiator Shutter Sub-assembly 20 to 30°C (68 to 86°F)
- CAUTION:
-
2.365,2 2.698,2 false 0.5,2.333 0.5,2.667 true 0.427,2.708 0.74,2.865 0.313,0.156 10 false *a 2.76,1.927 3.073,2.083 0.313,0.156 10 false *b
*a Heated Part *b Heat Light
- ·
Do not touch the heat light and heated parts.
·Touching the heat light may result in burns.
·Touching heated parts for a long time may result in burns.
- NOTICE:
-
Do not heat the radiator shutter sub-assembly excessively.
When reusing the radiator shutter sub-assembly:
Using a heat light, heat the radiator shutter sub-assembly surface.
Remove any remaining double-sided tape from the radiator shutter sub-assembly.
Wipe off any tape adhesive residue with cleaner.
- NOTICE:
- ·
Installing the radiator shutter sub-assembly with some double-sided tape remaining may cause poor adhesion. Perform this procedure until the tape is sufficiently removed.
·Make sure to use a cloth when removing. Using a screwdriver, etc., may cause damage and poor adhesion.
·Also, clean a new radiator shutter sub-assembly surface.
Remove the release paper of a new No. 1 radiator grille seal trying not to touch the adhesional surface.
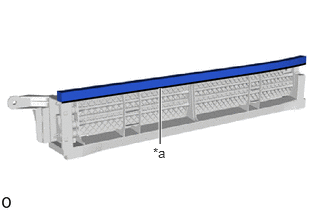
| *a | Rib |
Install the No. 1 radiator grille seal as shown in the illustration.
53157C
5.INSTALL NO. 3 RADIATOR GRILLE SEAL (for LH Side)
- HINT:
-
When installing a new No. 3 radiator grille seal, heat the radiator shutter sub-assembly using a heat light.
- Standard:
Item Temperature Radiator Shutter Sub-assembly 20 to 30°C (68 to 86°F)
- CAUTION:
-
2.365,2 2.698,2 false 0.5,2.333 0.5,2.667 true 0.427,2.708 0.74,2.865 0.313,0.156 10 false *a 2.76,1.927 3.073,2.083 0.313,0.156 10 false *b
*a Heated Part *b Heat Light
- ·
Do not touch the heat light and heated parts.
·Touching the heat light may result in burns.
·Touching heated parts for a long time may result in burns.
- NOTICE:
-
Do not heat the radiator shutter sub-assembly excessively.
When reusing the radiator shutter sub-assembly:
Using a heat light, heat the radiator shutter sub-assembly surface.
Remove any remaining double-sided tape from the radiator shutter sub-assembly.
Wipe off any tape adhesive residue with cleaner.
- NOTICE:
- ·
Installing the radiator shutter sub-assembly with some double-sided tape remaining may cause poor adhesion. Perform this procedure until the tape is sufficiently removed.
·Make sure to use a cloth when removing. Using a screwdriver, etc., may cause damage and poor adhesion.
·Also, clean a new radiator shutter sub-assembly surface.
Remove the release paper of a new No. 3 radiator grille seal trying not to touch the adhesional surface.
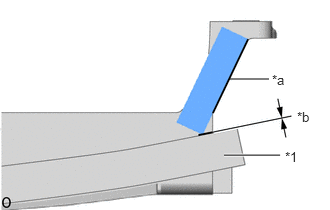
| *1 | No. 1 Radiator Grille Seal |
| *a | Frame Terminal Part |
| *b | 0 to 3 mm (0 to 0.118 in.) |
Install the No. 3 radiator grille seal as shown in the illustration.
53157C
6.INSTALL NO. 3 RADIATOR GRILLE SEAL (for RH Side)
- HINT:
-
When installing a new No. 3 radiator grille seal, heat the radiator shutter sub-assembly using a heat light.
- Standard:
Item Temperature Radiator Shutter Sub-assembly 20 to 30°C (68 to 86°F)
- CAUTION:
-
2.365,2 2.698,2 false 0.5,2.333 0.5,2.667 true 0.427,2.708 0.74,2.865 0.313,0.156 10 false *a 2.76,1.927 3.073,2.083 0.313,0.156 10 false *b
*a Heated Part *b Heat Light
- ·
Do not touch the heat light and heated parts.
·Touching the heat light may result in burns.
·Touching heated parts for a long time may result in burns.
- NOTICE:
-
Do not heat the radiator shutter sub-assembly excessively.
When reusing the radiator shutter sub-assembly:
Using a heat light, heat the radiator shutter sub-assembly surface.
Remove any remaining double-sided tape from the radiator shutter sub-assembly.
Wipe off any tape adhesive residue with cleaner.
- NOTICE:
- ·
Installing the radiator shutter sub-assembly with some double-sided tape remaining may cause poor adhesion. Perform this procedure until the tape is sufficiently removed.
·Make sure to use a cloth when removing. Using a screwdriver, etc., may cause damage and poor adhesion.
·Also, clean a new radiator shutter sub-assembly surface.
Remove the release paper of a new No. 3 radiator grille seal trying not to touch the adhesional surface.
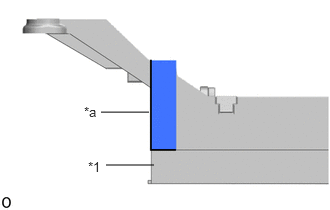
| *1 | No. 1 Radiator Grille Seal |
| *a | Frame Terminal Part |
Install the No. 3 radiator grille seal as shown in the illustration.
88940D
7.INSTALL SWING GRILLE ACTUATOR ASSEMBLY
When installing a new swing grille actuator assembly:
Open the grille shutter fin as shown in the illustration.
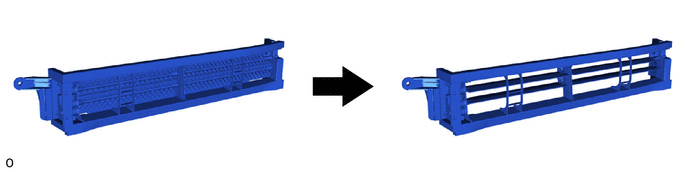
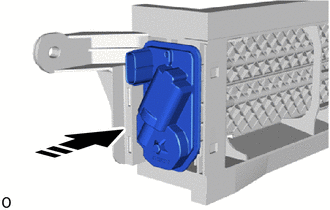

|
Install in this Direction |
Install the swing grille actuator assembly as shown in the illustration.
85667F
8.INSTALL MOTOR COVER
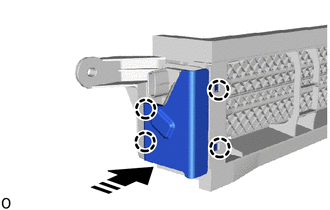
|
|
Install in this Direction |
Attach the claw to install the motor cover as shown in the illustration.
88790B
9.INSTALL THERMISTOR ASSEMBLY