EXTERIOR PANELS / TRIM ROOF RACK REMOVAL
CAUTION / NOTICE / HINT
- HINT:
- ·
Use the same procedure for the RH and LH sides.
·The procedure listed below is for the LH side.
·If leaving the roof rack leg on the vehicle side, perform procedures 1 through 4 and procedures 9 through 11.
·If removing together with the roof rack leg, perform procedures 5 through 11.
PROCEDURE

 75632A
1.REMOVE NO. 1 ROOF SIDE GARNISH LID LH
- HINT:
-
Perform this procedure only if leaving the roof rack leg on the vehicle side.

|
Remove in this Direction |

|
Protective Tape |
w/o Roof Carrier:
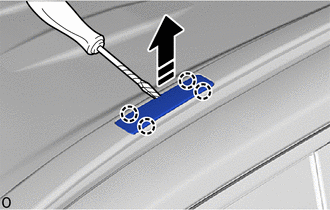
Using needle-nose pliers with its tip wrapped with protective tape, detach the claw to remove the No. 1 roof side garnish lid LH as shown in the illustration.
75634
2.REMOVE NO. 2 ROOF SIDE GARNISH LID LH
- HINT:
-
Perform this procedure only if leaving the roof rack leg on the vehicle side.
|
|
Remove in this Direction |
|
|
Protective Tape |
w/o Roof Carrier:
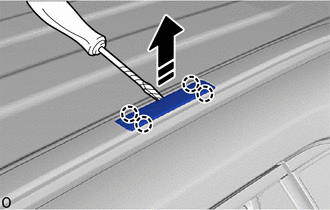
Using needle-nose pliers with its tip wrapped with protective tape, detach the claw to remove the No. 2 roof side garnish lid LH as shown in the illustration.
74610U
3.REMOVE ASSIST GRIP ASSEMBLY
- HINT:
-
Perform this procedure only if leaving the roof rack leg on the vehicle side.
-
Click hereVehicle Interior>INTERIOR PANELS / TRIM>ROOF HEADLINING>REMOVAL
75506B
4.REMOVE FRONT ROOF SIDE GARNISH SUB-ASSEMBLY LH
- HINT:
-
Perform this procedure only if leaving the roof rack leg on the vehicle side.
|
|
Protective Tape |
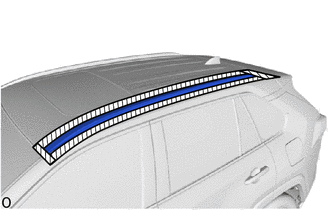
Put protective tape around the front roof side garnish sub-assembly LH.
Remove the 2 bolts.
except Panoramic Moon Roof:
Detach the guide and clip in the order shown in the illustration.
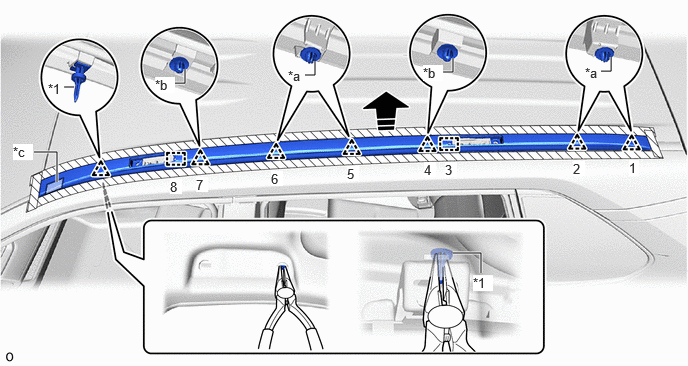
| *1 | Front Roof Rack Retainer LH | - | - |
| *a | Clip<A> | *b | Clip<B> |
| *c | Double-sided Tape | - | - |
|
|
Remove in this Direction | - | - |
- NOTICE:
-
If the front roof side garnish sub-assembly LH has been removed, replace the clip<A> with a new one.
- HINT:
-
Remove directly upward without twisting left/right.
Insert needle-nose pliers No. 2 from the hole on the front side of the assist grip installation area and detach the front roof rack retainer LH.
Detach the double-sided tape and remove the front roof side garnish sub-assembly LH.
for Panoramic Moon Roof:
Detach the guide and clip and rear roof rack retainer LH in the order shown in the illustration.
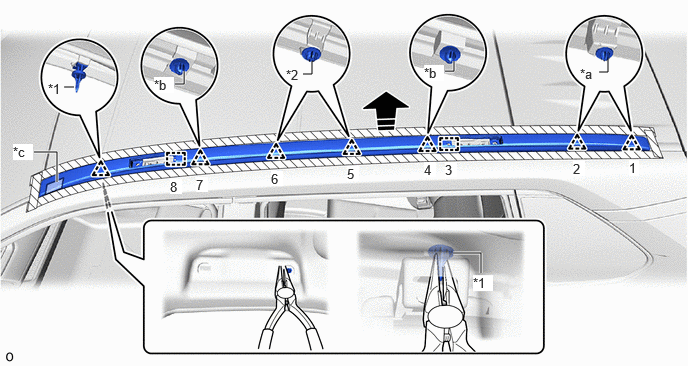
| *1 | Front Roof Rack Retainer LH | *2 | Rear Roof Rack Retainer LH |
| *a | Clip<A> | *b | Clip<B> |
| *c | Double-sided Tape | - | - |
|
|
Remove in this Direction | - | - |
- NOTICE:
-
If the front roof side garnish sub-assembly LH has been removed, replace the clip<A> with a new one.
- HINT:
-
Remove directly upward without twisting left/right.
Insert needle-nose pliers No. 2 from the hole on the front side of the assist grip installation area and detach the front roof rack retainer LH.
Detach the double-sided tape and remove the front roof side garnish sub-assembly LH.
5.REMOVE ROOF HEADLINING ASSEMBLY
- HINT:
-
Perform this procedure only if removing together with the roof rack leg.
-
Click hereVehicle Interior>INTERIOR PANELS / TRIM>ROOF HEADLINING>REMOVAL
62404
6.REMOVE ROOF SIDE RAIL GARNISH SUB-ASSEMBLY LH
- HINT:
-
Perform this procedure only if removing together with the roof rack leg.
|
|
Protective Tape |
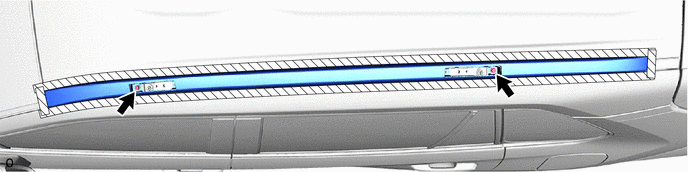
Put protective tape around the roof side rail garnish sub-assembly LH.
except Panoramic Moon Roof:
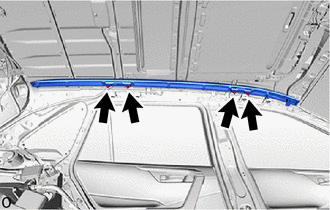
Remove the 4 nuts.
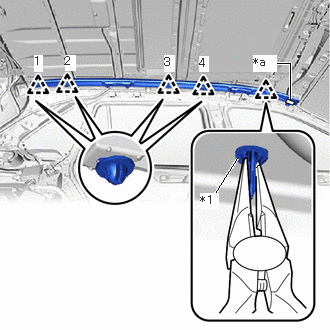
| *1 | Front Roof Rack Retainer LH |
| *a | Double-sided Tape |
Detach the clip in the order shown in the illustration.
- NOTICE:
-
If the roof side rail garnish sub-assembly LH has been removed, replace the clip with a new one.
Using a needle-nose pliers, detach the front roof rack retainer LH.
Detach the double-sided tape and remove the roof side rail garnish sub-assembly LH.
for Panoramic Moon Roof:
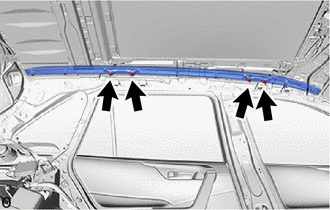
Remove the 4 nuts.
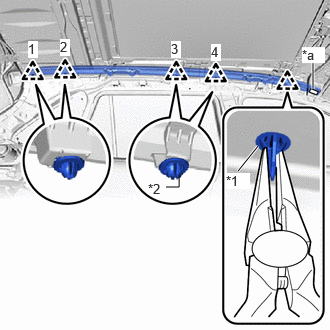
| *1 | Front Roof Rack Retainer LH |
| *2 | Rear Roof Rack Retainer LH |
| *a | Double-sided Tape |
Detach the clip and rear roof rack retainer LH in the order shown in the illustration.
- NOTICE:
-
If the roof side rail garnish sub-assembly LH has been removed, replace the clip with a new one.
Using a needle-nose pliers, detach the front roof rack retainer LH.
Detach the double-sided tape and remove the roof side rail garnish sub-assembly LH.
63436B
7.REMOVE NO. 1 ROOF CARRIER SEAL LH
- HINT:
- ·
Perform this procedure only if removing together with the roof rack leg.
·When removing the No. 1 roof carrier seal LH, if the double-sided tape is difficult to remove, heat the adhesive of the No. 1 roof carrier seal LH using a heat light.
- Standard:
Item Temperature No. 1 Roof Carrier Seal LH 20 to 30°C (68 to 86°F)
- CAUTION:
-
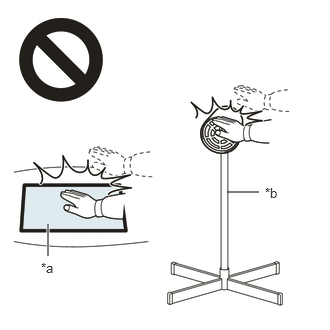 2.365,2 2.698,2 false 0.5,2.333 0.5,2.667 true 0.427,2.708 0.74,2.865 0.313,0.156 10 false *a 2.76,1.927 3.073,2.083 0.313,0.156 10 false *b
*a Heated Part *b Heat Light
- ·
Do not touch the heat light and heated parts.
·Touching the heat light may result in burns.
·Touching heated parts for a long time may result in burns.
- NOTICE:
-
Do not heat the No. 1 roof carrier seal LH excessively.
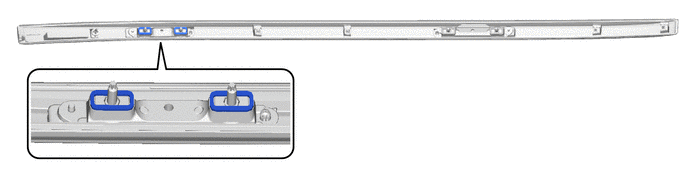
Remove the 2 No. 1 roof carrier seals LH.
63437D
8.REMOVE NO. 2 ROOF CARRIER SEAL LH
- HINT:
- ·
Perform this procedure only if removing together with the roof rack leg.
·When removing the No. 2 roof carrier seal LH, if the double-sided tape is difficult to remove, heat the adhesive of the No. 2 roof carrier seal LH using a heat light.
- Standard:
Item Temperature No. 2 Roof Carrier Seal LH 20 to 30°C (68 to 86°F)
- CAUTION:
-
2.365,2 2.698,2 false 0.5,2.333 0.5,2.667 true 0.427,2.708 0.74,2.865 0.313,0.156 10 false *a 2.76,1.927 3.073,2.083 0.313,0.156 10 false *b
*a Heated Part *b Heat Light
- ·
Do not touch the heat light and heated parts.
·Touching the heat light may result in burns.
·Touching heated parts for a long time may result in burns.
- NOTICE:
-
Do not heat the No. 2 roof carrier seal LH excessively.
Remove the 2 No. 2 roof carrier seals LH.
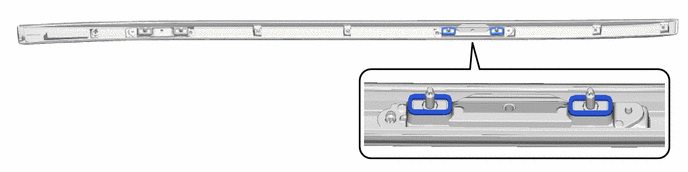
62436A
9.REMOVE FRONT ROOF SIDE RAIL PAD LH
- HINT:
-
When removing the front roof side rail pad LH, if the double-sided tape is difficult to remove, heat the adhesive of the front roof side rail pad LH using a heat light.
- Standard:
Item Temperature Front Roof Side Rail Pad LH 20 to 30°C (68 to 86°F)
- CAUTION:
-
2.365,2 2.698,2 false 0.5,2.333 0.5,2.667 true 0.427,2.708 0.74,2.865 0.313,0.156 10 false *a 2.76,1.927 3.073,2.083 0.313,0.156 10 false *b
*a Heated Part *b Heat Light
- ·
Do not touch the heat light and heated parts.
·Touching the heat light may result in burns.
·Touching heated parts for a long time may result in burns.
- NOTICE:
-
Do not heat the front roof side rail pad LH excessively.
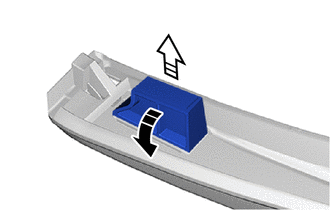
|
|
Remove in this Direction (1) |

|
Remove in this Direction (2) |
Remove the front roof side rail pad LH as shown in the illustration.
63453F
10.REMOVE FRONT ROOF RACK RETAINER LH
except Panoramic Moon Roof:
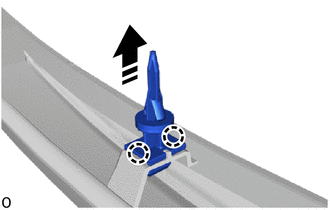
|
|
Remove in this Direction |
|
|
Protective Tape |
Using a screwdriver, detach the claw and remove the front roof rack retainer LH.
- HINT:
-
Tape the screwdriver tip before use.
for Panoramic Moon Roof:
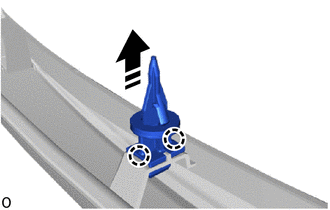
|
|
Remove in this Direction |
|
|
Protective Tape |
Using a screwdriver, detach the claw and remove the front roof rack retainer LH.
- HINT:
-
Tape the screwdriver tip before use.
63454F
11.REMOVE REAR ROOF RACK RETAINER LH
for Panoramic Moon Roof:
Detach the guide and remove the 2 rear roof rack retainers LH.
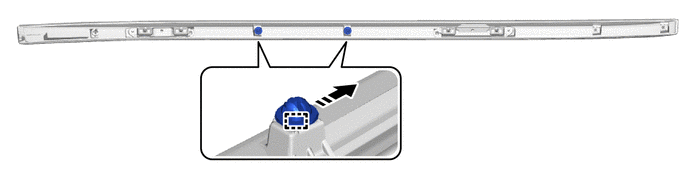
|
|
Remove in this Direction | - | - |