UB80F AUTOMATIC TRANSMISSION / TRANSAXLE AUTOMATIC TRANSAXLE SYSTEM P070312 Brake Switch "B" Circuit Short to Battery
DESCRIPTION
The purpose of the stop light switch signal circuit is to prevent the engine from stalling when the brakes are suddenly applied while driving in the lock-up condition.
When the brake pedal is depressed, the stop light switch assembly sends a signal to the ECM. The ECM then cancels the operation of the lock-up clutch while braking is in progress.
| DTC No. | Detection Item | DTC Detection Condition | Trouble Area | MIL | Memory | Note |
|---|---|---|---|---|---|---|
| P070312 | Brake Switch "B" Circuit Short to Battery | All of the following conditions are met (2-trip detection logic):
·
The ignition switch is ON. ·
The battery voltage is 8 V or higher. ·
The stop light switch remains ON while the vehicle is driven in a GO (30 km/h (18.65 mph) or more) and STOP (less than 3 km/h (1.86 mph)) pattern 5 times. |
·
Stop light switch assembly ·
Short in stop light switch signal circuit ·
ECM |
Comes on | DTC stored | SAE Code:
P0724 |
MONITOR DESCRIPTION
This DTC indicates that the stop light switch is remaining on. When the stop light switch remains on during GO and STOP driving, the ECM interprets this as a malfunction of the stop light switch assembly, illuminates the MIL and stores this DTC. The vehicle must GO (30 km/h (19 mph) or more) and STOP (less than 3 km/h (2 mph)) 5 times for 2 consecutive driving cycles in order for this DTC to be stored.
CONFIRMATION DRIVING PATTERN
- CAUTION:
-
When performing the confirmation driving pattern, obey all speed limits and traffic laws.
- HINT:
-
After repairs have been completed, clear the DTCs and then check that the vehicle has returned to normal by performing the following All Readiness check procedure.
Connect the GTS to the DLC3.
Turn the ignition switch to ON and turn the GTS on.
Clear the DTCs (even if no DTCs are stored, perform the clear DTC procedure).
Turn the ignition switch off and wait for 30 seconds or more.
Turn the ignition switch to ON and turn the GTS on.
Start the engine.
Repeat the following procedure 5 times:
Accelerate the vehicle to 30 km/h (18.65 mph) or more, depress the brake pedal and decelerate the vehicle to less than 3 km/h (1.86 mph).
Stop the vehicle.
Enter the following menus: Powertrain / Transmission / Utility / All Readiness.
Input the DTC: P070312.
Check the DTC judgment result.
| GTS Display | Description |
|---|---|
| NORMAL | ·
DTC judgment completed ·
System normal |
| ABNORMAL | ·
DTC judgment completed ·
System abnormal |
| INCOMPLETE | ·
DTC judgment not completed ·
Perform driving pattern after confirming DTC enabling conditions |
| N/A | ·
Unable to perform DTC judgment ·
Number of DTCs which do not fulfill DTC preconditions has reached ECU memory limit |
- HINT:
- ·
If the judgment result shows NORMAL, the system is normal.
·If the judgment result shows ABNORMAL, the system has a malfunction.
·If the judgment result shows INCOMPLETE or N/A, perform the Confirmation Driving Pattern and check the DTC judgment result again.
WIRING DIAGRAM
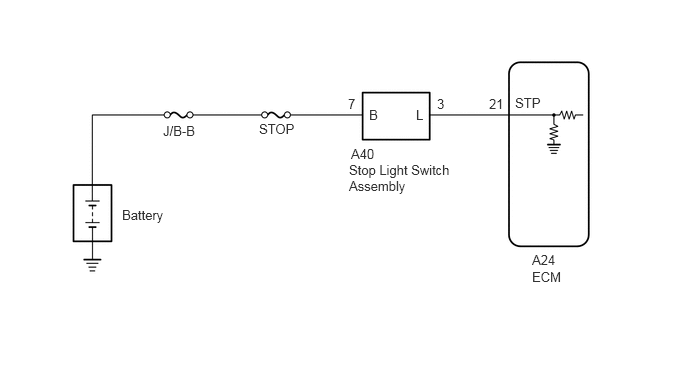
CAUTION / NOTICE / HINT
- NOTICE:
- ·
Inspect the fuses for circuits related to this system before performing the following procedure.
·Perform registration and/or initialization when parts related to the automatic transaxle are replaced.
Click hereDrivetrain>UB80F (AUTOMATIC TRANSMISSION / TRANSAXLE)>AUTOMATIC TRANSAXLE SYSTEM>PRECAUTION
DATA LIST
- NOTICE:
-
In the table below, the values listed under "Normal Condition" are reference values. Do not depend solely on these reference values when deciding whether a part is faulty or not.
- HINT:
-
Using the GTS to read the Data List allows the values or states of switches, sensors, actuators and other items to be read without removing any parts. This non-intrusive inspection can be very useful because intermittent conditions or signals may be discovered before parts or wiring is disturbed. Reading the Data List information early in troubleshooting is one way to save diagnostic time.
Warm up the engine.
Turn the ignition switch off.
Connect the GTS to the DLC3.
Turn the ignition switch to ON.
Turn the GTS on.
Enter the following menus: Powertrain / Transmission / Data List / Stop Light SW.
Read the Data List according to the display on the GTS.
- Powertrain > Transmission > Data List
-
Tester Display Measurement Item Range Normal Condition Diagnostic Note Stop Light SW Stop light switch status ON or OFF ·ON: Brake pedal depressed
·OFF: Brake pedal released
-
- Powertrain > Transmission > Data List
-
Tester Display Stop Light SW - 50003 373 12
PROCEDURE
Connect the GTS to the DLC3.
Turn the ignition switch to ON.
Turn the GTS on.
Enter the following menus: Powertrain / Transmission / Data List / Stop Light SW.
Read the Data List according to the display on the GTS.
- Powertrain > Transmission > Data List
-
Tester Display Measurement Item Range Normal Condition Diagnostic Note Stop Light SW Stop light switch status ON or OFF ·ON: Brake pedal depressed
·OFF: Brake pedal released
-
- Powertrain > Transmission > Data List
-
Tester Display Stop Light SW - 50003 373 12
- Result:
Result Proceed to Data List value is normal A Data List value is not normal B
A
Click hereGeneral>INTRODUCTION>HOW TO TROUBLESHOOT ECU CONTROLLED SYSTEMS>HOW TO PROCEED WITH TROUBLESHOOTING
B
Check the stop light switch assembly installation condition.
Click hereVehicle Exterior>LIGHTING (EXT)>STOP LIGHT SWITCH>INSTALLATION
- OK:
Stop light switch assembly is installed correctly.
- Result:
Proceed to OK NG
OK
NG
Inspect the stop light switch assembly.
Click hereVehicle Exterior>LIGHTING (EXT)>STOP LIGHT SWITCH>ON-VEHICLE INSPECTION
- Result:
Proceed to OK NG
OK
NG
Disconnect the ECM connector.
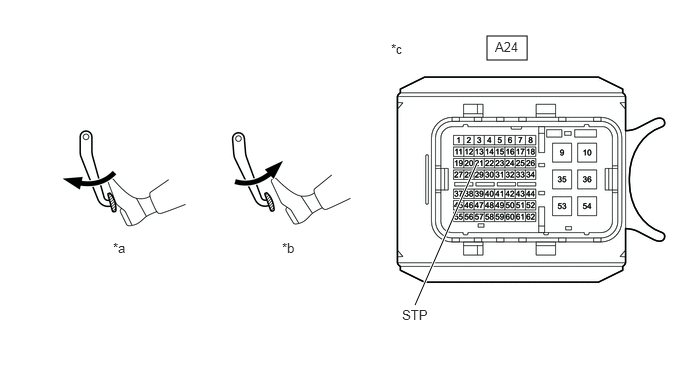
| *a | Brake pedal depressed | *b | Brake pedal released |
| *c | Front view of wire harness connector
(to ECM) |
- | - |
Measure the voltage according to the value(s) in the table below.
- Standard Voltage:
Tester Connection Condition Specified Condition A24-21 (STP) - Body ground Brake pedal released Below 1.5 V Brake pedal depressed 7.5 to 14 V
- HINT:
-
If there is a short in the STP terminal circuit, there may be a malfunction in the circuit of a connected ECU.
- Result:
Proceed to OK NG
OK
NG
Replace the ECM.
Click hereEngine / Hybrid System>A25A-FKS (ENGINE CONTROL)>ECM>REMOVAL
- Result:
Proceed to NEXT
NEXT
Click hereDrivetrain>UB80F (AUTOMATIC TRANSMISSION / TRANSAXLE)>AUTOMATIC TRANSAXLE SYSTEM>REGISTRATION