SUPPLEMENTAL RESTRAINT SYSTEMS OCCUPANT CLASSIFICATION SYSTEM(for HV Model) B1780 Front Occupant Classification Sensor LH Circuit Malfunction
DESCRIPTION
The front occupant classification sensor LH circuit consists of the occupant detection ECU and front occupant classification sensor LH.
DTC B1780 is stored when a malfunction is detected in the front occupant classification sensor LH circuit.
| DTC No. | Detection Item | DTC Detection Condition | Trouble Area |
|---|---|---|---|
| B1780 | Front Occupant Classification Sensor LH Circuit Malfunction | ·
The occupant detection ECU detects a line short, short to ground or B+, or an open in the front occupant classification sensor LH circuit. ·
Front occupant classification sensor LH malfunction ·
Occupant detection ECU malfunction |
·
Front seat wire RH ·
Front seat adjuster assembly RH (Front occupant classification sensor LH)* ·
Occupant detection ECU |
*: The front occupant classification sensor LH is built into the front seat adjuster assembly RH.
WIRING DIAGRAM
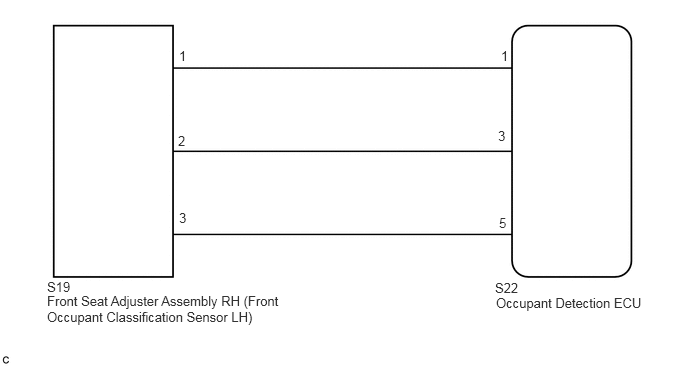
CAUTION / NOTICE / HINT
- NOTICE:
-
When disconnecting the cable from the negative (-) auxiliary battery terminal while performing repairs, some systems need to be initialized after the cable is reconnected.
-
Click hereGeneral>INTRODUCTION>REPAIR INSTRUCTION>INITIALIZATION
- HINT:
- ·
When DTC B1650 is stored as a result of troubleshooting for the airbag system, check the DTCs stored in the occupant detection ECU. When DTC B1780 is output, perform troubleshooting for this DTC first.
·If it is difficult to perform troubleshooting (wire harness inspection), remove the front passenger seat installation bolts to see under the seat cushion.
·In the above case, lift and hold the seat so that it does not fall down. Hold the seat only as necessary because holding the seat for a long period of time may cause seat rail deformation.
PROCEDURE
Turn the power switch off.
Disconnect the cable from the negative (-) auxiliary battery terminal, and wait for at least 90 seconds.
Check that the connectors are properly connected to the occupant detection ECU and front occupant classification sensor LH.
- Result:
Proceed to Connectors are properly connected Connectors are not properly connected
Connectors are properly connected
Connectors are not properly connected
Disconnect the connectors from the occupant detection ECU and front occupant classification sensor LH.
Check that the connectors (on the occupant detection ECU side and front occupant classification sensor LH side) are not damaged.
- Result:
Proceed to Connectors are not deformed or damaged Connectors are deformed or damaged
Connectors are not deformed or damaged
Connectors are deformed or damaged
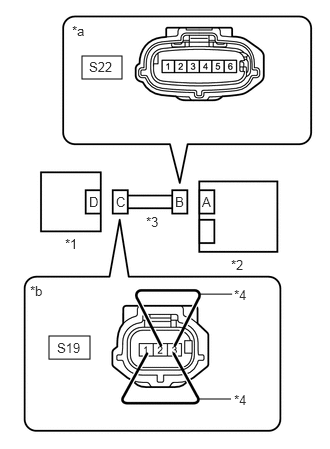
| *1 | Front Occupant Classification Sensor LH |
| *2 | Occupant Detection ECU |
| *3 | Front Seat Wire RH |
| *4 | Service Wire |
| *a | Front view of wire harness connector
(to Occupant Detection ECU) |
| *b | Front view of wire harness connector
(to Front Occupant Classification Sensor LH) |
Connect the cable to the negative (-) auxiliary battery terminal, and wait for at least 2 seconds.
Turn the power switch on (IG).
Measure the voltage according to the value(s) in the table below.
- Standard Voltage:
Tester Connection Switch Condition Specified Condition S22-1 - Body ground Power switch on (IG) Below 1 V S22-3 - Body ground S22-5 - Body ground
Turn the power switch off.
Disconnect the cable from the negative (-) auxiliary battery terminal, and wait for at least 90 seconds.
Using service wires, connect terminals 1 and 3 , and terminals 2 and 3 of connector C.
- NOTICE:
-
Do not forcibly insert the service wire into the terminals of the connector when connecting a service wire.
Measure the resistance according to the value(s) in the table below.
- Standard Resistance:
Tester Connection Condition Specified Condition S22-1 - S22-5 Always Below 1 Ω S22-3 - S22-5
Disconnect the service wire from connector C.
Measure the resistance according to the value(s) in the table below.
- Standard Resistance:
Tester Connection Condition Specified Condition S22-1 - S22-5 Always 1 MΩ or higher S22-3 - S22-5 S22-1 - S22-3 S22-1 - Body ground S22-3 - Body ground S22-5 - Body ground
- Result:
Proceed to OK NG
OK
NG
Connect the connectors to the occupant detection ECU and front occupant classification sensor LH.
Connect the cable to the negative (-) auxiliary battery terminal, and wait for at least 2 seconds.
Turn the power switch on (IG), and wait for at least 60 seconds.
Clear the DTCs stored in the occupant detection ECU.
- Body Electrical > Occupant Detection > Clear DTCs
- 50002 394
Clear the DTCs stored in the airbag sensor assembly.
- Body Electrical > SRS Airbag > Clear DTCs
- 50002 188
Turn the power switch off.
Turn the power switch on (IG), and wait for at least 60 seconds.
Check the DTCs stored in the occupant detection ECU.
- Body Electrical > Occupant Detection > Trouble Codes
- 50001 394
- Result:
Proceed to DTC B1780 is output DTC B1780 is not output
- HINT:
-
Codes other than DTC B1780 may be output at this time, but they are not related to this check.
DTC B1780 is output
DTC B1780 is not output
Click hereGeneral>INTRODUCTION>HOW TO TROUBLESHOOT ECU CONTROLLED SYSTEMS>HOW TO PROCEED WITH TROUBLESHOOTING
Turn the power switch off.
Disconnect the cable from the negative (-) auxiliary battery terminal, and wait for at least 90 seconds.
Replace the occupant detection ECU with a new one.
Click hereVehicle Interior>SEAT>FRONT SEAT ASSEMBLY (for Manual Seat)>DISASSEMBLY
- HINT:
-
Perform the inspection using parts from a normal vehicle if possible.
- Result:
Proceed to NEXT
NEXT
Connect the cable to the negative (-) auxiliary battery terminal, and wait for at least 2 seconds.
Turn the power switch on (IG), and wait for at least 60 seconds.
Clear the DTCs stored in the occupant detection ECU.
- Body Electrical > Occupant Detection > Clear DTCs
- 50002 394
Clear the DTCs stored in the airbag sensor assembly.
- Body Electrical > SRS Airbag > Clear DTCs
- 50002 188
Turn the power switch off.
Turn the power switch on (IG), and wait for at least 60 seconds.
Check the DTCs stored in the occupant detection ECU.
- Body Electrical > Occupant Detection > Trouble Codes
- 50001 394
- Result:
Proceed to DTC B1780 is output DTC B1780 is not output
- HINT:
-
Codes other than DTC B1780 may be output at this time, but they are not related to this check.
Turn the power switch off.
Disconnect the cable from the negative (-) auxiliary battery terminal, and wait for at least 90 seconds.
DTC B1780 is output
DTC B1780 is not output
Replace the front seat adjuster assembly RH with a new one.
Click hereVehicle Interior>SEAT>FRONT SEAT ASSEMBLY (for Manual Seat)>DISASSEMBLY
Connect the cable to the negative (-) auxiliary battery terminal, and wait for at least 2 seconds.
- Result:
Proceed to NEXT
NEXT
Using the GTS, perform "Zero Point Calibration".
- Body Electrical > Occupant Detection > Utility
-
Tester Display Zero Point Calibration - 50005 394 4435
- Result:
Proceed to NEXT
NEXT
Using the GTS, perform "Zero Point Calibration".
- Body Electrical > Occupant Detection > Utility
-
Tester Display Zero Point Calibration - 50005 394 4435
- Result:
Proceed to NEXT
NEXT