A25B-FXS ENGINE MECHANICAL CAMSHAFT INSTALLATION
CAUTION / NOTICE / HINT
- NOTICE:
-
This procedure includes the installation of small-head bolts. Refer to Small-Head Bolts of Basic Repair Hint to identify the small-head bolts.
-
Click hereGeneral>INTRODUCTION>REPAIR INSTRUCTION>PRECAUTION
PROCEDURE

 1.INSTALL CAMSHAFT
- HINT:
-
Perform inspection after repair after replacing the camshaft.
-
Click hereEngine / Hybrid System>A25B-FXS (ENGINE CONTROL)>SFI SYSTEM>INITIALIZATION
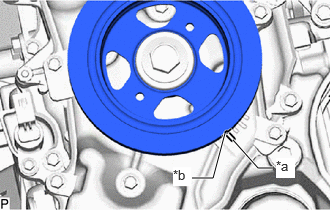
| *a | "0" Timing Mar |
| *b | Timing Mark |
Turn the crankshaft clockwise to align the timing mark (cutout) on the crankshaft pulley with the "0" timing mark on the No. 2 timing chain cover assembly.
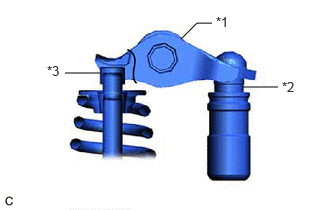
| *1 | No. 1 Valve Rocker Arm Sub-assembly |
| *2 | Valve Lash Adjuster Assembly |
| *3 | Valve Stem Cap |
Check that the No. 1 valve rocker arm sub-assembly is correctly installed as shown in the illustration.
Clean the camshaft housing sub-assembly and the cams and journals of the camshaft and No. 2 camshaft, and then apply engine oil to them.
Apply a light coat of engine oil to the journals of the camshaft and install the camshaft to the camshaft housing sub-assembly.
Apply a light coat of engine oil to the journals of the No. 2 camshaft and install the No. 2 camshaft to the camshaft housing sub-assembly.
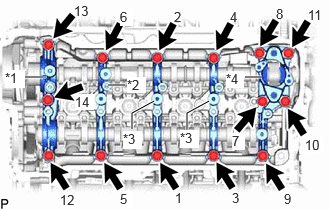
| *1 | No. 1 Camshaft Bearing Cap |
| *2 | No. 2 Camshaft Bearing Cap |
| *3 | No. 3 Camshaft Bearing Cap |
| *4 | No. 4 Camshaft Bearing Cap |
Set the No. 1 camshaft bearing cap, No. 2 camshaft bearing cap, 2 No. 3 camshaft bearing caps and No. 4 camshaft bearing cap as shown in the illustration.
Uniformly tighten the 14 camshaft bearing cap bolts in the order shown in the illustration.
- Torque:
- 28.5 N*m (291 kgf*cm, 21 ft.*lbf)
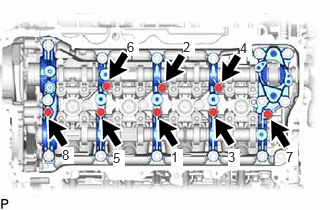
Uniformly tighten the 8 camshaft bearing cap bolts in the order shown in the illustration.
- Torque:
- 16 N*m (163 kgf*cm, 12 ft.*lbf)
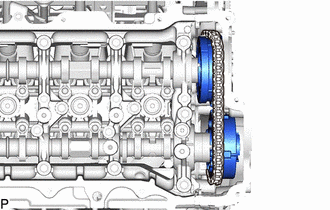
Set the camshaft timing gear assembly and camshaft timing exhaust gear assembly to the timing chain sub-assembly in order as shown in the illustration.
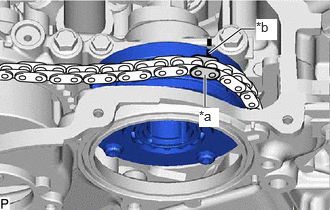
| *a | Paint Mark |
| *b | Timing Mark |
Align the timing mark on the camshaft timing gear assembly with the paint mark on the timing chain sub-assembly.
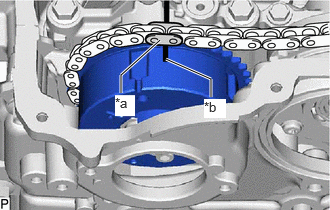
| *a | Paint Mark |
| *b | Timing Mark |
Align the timing mark on the camshaft timing exhaust gear assembly with the paint mark on the timing chain sub-assembly.
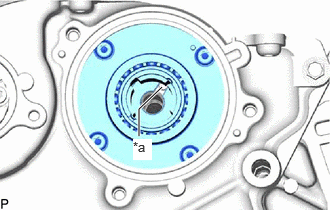
| *a | Knock Pin |
Using the hexagonal portion of the camshaft, install the camshaft timing gear assembly to the camshaft.
Check that the knock pin matches the pin hole from the No. 2 timing chain cover sub-assembly side.
Using a bi-hexagon socket wrench (10 mm), temporarily install the camshaft timing gear assembly with the bolt.
- HINT:
-
Temporarily install the bolt enough that the camshaft timing gear assembly does not detach from the knock pin of the camshaft.
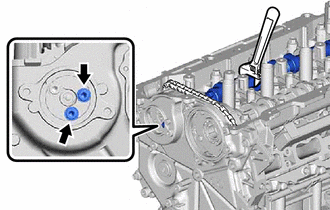
Using the hexagonal portion of the No. 2 camshaft, install the camshaft timing exhaust gear assembly to the No. 2 camshaft.
Temporarily install with the 2 bolts.
- HINT:
-
The 2 bolts can only be installed as shown in the illustration if the knock pin on the No. 2 camshaft and the pin hole on the camshaft timing exhaust gear assembly match. If the 2 bolts cannot be installed, the knock pin and pin hole do not match.
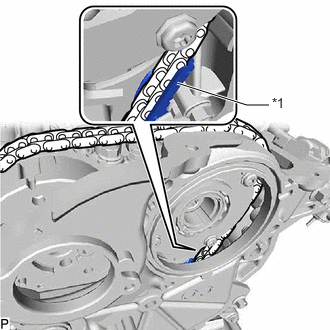
| *1 | No. 1 Chain Vibration Damper |
Check the status of the camshaft timing gear assembly and camshaft timing exhaust gear assembly temporarily installed to each camshaft.
Camshaft timing gear assembly side:
Check that the timing chain sub-assembly does not overlap the No. 1 chain vibration damper as shown in the illustration.
- NOTICE:
-
If the timing chain sub-assembly overlaps the No. 1 chain vibration damper, install it again.
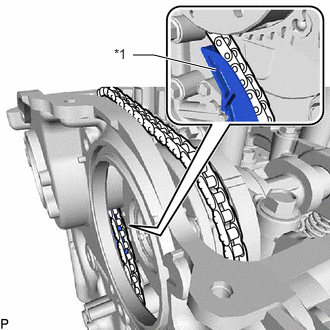
| *1 | Chain Tensioner Slipper |
Camshaft timing exhaust gear assembly side:
Check that the timing chain sub-assembly does not overlap the chain tensioner slipper as shown in the illustration.
- NOTICE:
-
If the timing chain sub-assembly overlaps the chain vibration slipper, install it again.
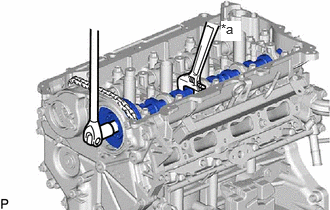
| *a | Hold |
Using the hexagonal portion of the camshaft, hold the camshaft.
- NOTICE:
- ·
Do not damage the camshaft housing sub-assembly, cylinder head sub-assembly and spark plug tube.
·Do not disassemble the camshaft timing gear assembly.
Using a bi-hexagon socket wrench (10 mm), tighten the bolt on the camshaft timing gear assembly.
- Torque:
- 86 N*m (877 kgf*cm, 63 ft.*lbf)
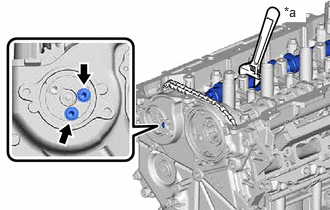
| *a | Hold |
Using the hexagonal portion of the No. 2 camshaft, hold the No. 2 camshaft.
- NOTICE:
- ·
Do not damage the camshaft housing sub-assembly, cylinder head sub-assembly and spark plug tube.
·Do not disassemble the camshaft timing gear assembly.
Using a hexagon wrench (5 mm), tighten the 2 bolts.
- Torque:
- 19 N*m (194 kgf*cm, 14 ft.*lbf)
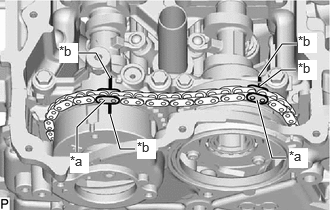
| *a | Paint Mark |
| *b | Timing Mark |
Check that the paint marks and timing marks are positioned as shown in the illustration.
Using the hexagonal portion of the camshaft, check that the timing chain sub-assembly slackens when the camshaft is moved in the direction shown in the illustration.
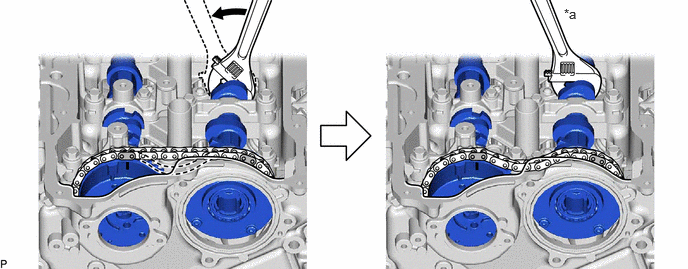
| *a | Hold | - | - |

|
Turn | - | - |
- NOTICE:
-
If the timing chain sub-assembly remains tight and does not slacken, the chain tensioner slipper and No. 1 chain vibration damper may overlap the timing chain sub -assembly, so install them again.
Remove the pin from the No. 1 chain tensioner assembly.
2.INSTALL STRAIGHT SCREW PLUG
3.SET NO. 1 CYLINDER TO TDC (COMPRESSION)
23477
4.INSTALL FUEL PUMP LIFTER GUIDE
11193
5.INSTALL SPARK PLUG TUBE GASKET
11201
6.INSTALL CYLINDER HEAD COVER SUB-ASSEMBLY
13090D
7.INSTALL CAM TIMING CONTROL MOTOR WITH EDU ASSEMBLY
135A0A
8.INSTALL CAMSHAFT TIMING OIL CONTROL VALVE ASSEMBLY (EXHAUST CAMSHAFT TIMING GEAR BOLT ASSEMBLY)
15370
9.INSTALL CAM TIMING OIL CONTROL SOLENOID ASSEMBLY
19500
10.INSTALL IGNITION COIL ASSEMBLY
82121
11.CONNECT ENGINE WIRE
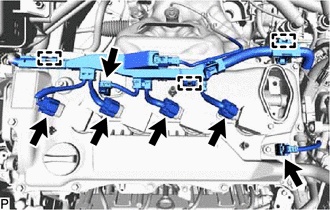
Attach the 3 clamps and connect the engine wire.
Connect the 6 connectors.
23100X
12.INSTALL FUEL PUMP ASSEMBLY (for High Pressure)